Friday, January 30, 2015

How to Stream FLV/F4V Videos to Google Chromecast

Have you ever tried to play movies on Google Chromecast? It will be so cool that allows you to stream some video formats on your High Definition Television (HDTV), such like the AVI, FLV, WebM, VOB, etc. However, you must meet some issues when importing FLV and F4V files, right? So what did that happen? 


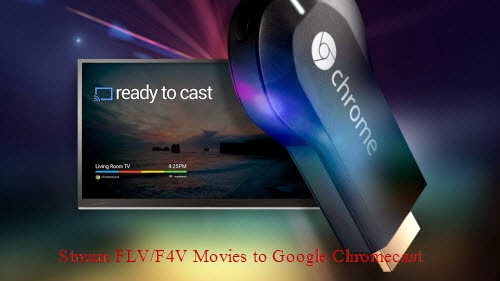
It requires a wireless connection using the Internet or a network connected computer, tablet, or smart phone. You can play various multimedia content, but only Google Cast supported formats can be streamed directly. According to this way, in order to smoothly watch HD movies on HD TV via Google Chromecast, we should know more details on Chromecast Supported and Unsupported Video Formats below.

Part 1.Introduction of Chromecast Supported and Unsupported Video Formats:

A: Standard supported Chromecast video formats include:
MP4- MPEG 4 or MP4 video files uses the standard .mp4 extension. It is most commonly used to store video and audio files.
WebM – An open video format for the web that allows everyone to stream video and audio codecs.
B: Some unsupported video formats include:
AVI – AVI (Audio Video Interleave), the most common format for audio/video data on the PC, is a multimedia container format with video and audio.
MKV – The Matroska Multimedia Container holds video, audio, picture, or subtitle tracks in one file.
FLV – Flash video formats are video files that are streamed over the Internet using the Adobe Flash Player.
MOV – MOV is a multimedia file format that contains one and more tracks of data, such as audio, video or text.
VOB – VOB (Video object) files are DVD-Video file formats that contain digital video audio, audio, and subtitles relevant to DVDs.
3G2 – This is video container file for audio, video, and text that is an extension of MP4.

Part 2.How to stream your supported video formats to Google Chromecast?

Method 1.Connect with your Mobile device
To stream videos using your mobile device, you will need to download and open the Chromecast app on your Android or iOS smartphone or tablet using Google Play or the App store. The Chromecast app is available for Android tablets and smartphones through Google Play and for iPhones and iPads in the App store.
Note: You should ensure that your mobile device is connected to your Wi-Fi and not your mobile network. Also, you must have the latest app installed and be on the same network as your Chromecast digital media player.

Method 2.Connect with your computer
Chromecast allows you to stream videos on your TV using your Mac or PC running the Chrome browser. This is the only browser that Chromecast is compatible with. Follow the instructions below to connect with your computer.
Step 1. Open the Chrome browser on your computer and then navigate to this page to see how to setup Chromecast.
Step 2. Dwnload the Chromecast app to your computer.
Step 3. Select the instruction below that is applicable to your computer.
i. On your Windows computer, Save the file, Run the Chromecast app and follow the prompts to complete setting up Chromecast. 
ii. On your Mac OS X computer, drag and drop the Chromecast app into your Applications folder. You will need to open the folder, run the application, and then select the Chromecast device. Follow the instructions to complete the setup process.

Method 3. Connect with YouTube:
Step 1. Connect your Chromecast device to an available HDMI slot on your HDTV. 
Step 2. When your Chromecast digital media player is securely connected to your TV you will see the Chromecast Home screen with your Wi-Fi name at the bottom of the screen. 
Step 3. Now, download the YouTube app on your Android or Apple tablet or smartphone. 
Step 4. Connect your Android or Apple device to the same Wi-Fi network as your Chromecast device.
Step 5. Open the YouTube app on your Android or Apple device and click the Cast button  to start streaming videos/

Part 3. How to stream those unsupported video formats to Google Chromecast?
Since we know the MP4 and WebM can be the two best ones for watching on Google Chromecast, what we need here is a professional FLV/F4V to MP4 Converter for us to smoothly work the original FLV files with Google Chromecast. Fortunately, Pavtube Video Converter for Windows/Mac is such a good choice for us to enjoy movies on Google Chromecast well.

Any more details to learn the conversion of FLV/F4V and MP4 for watching on Google Chromecast”

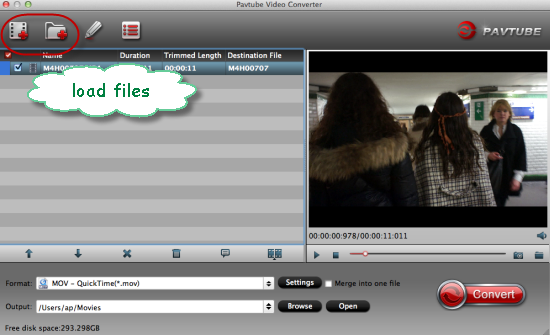
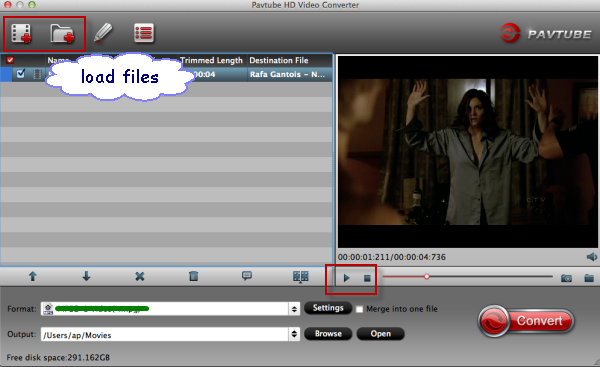
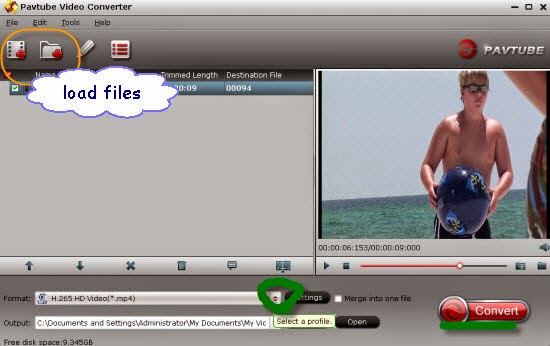
Step 1. Add your FLV/F4V files
Launch the program and open the main interface, we’d better to click the ‘Add video’ or ‘Add from folder’ to let our original files in.


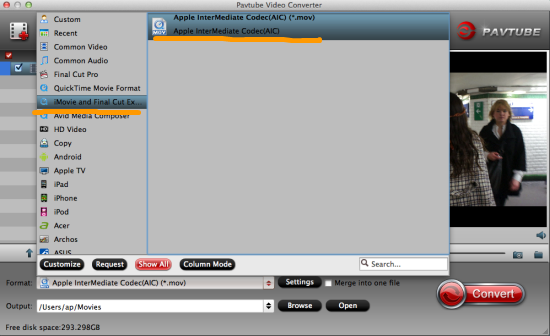
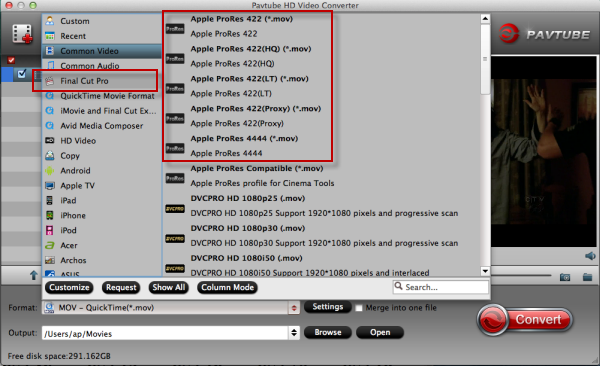
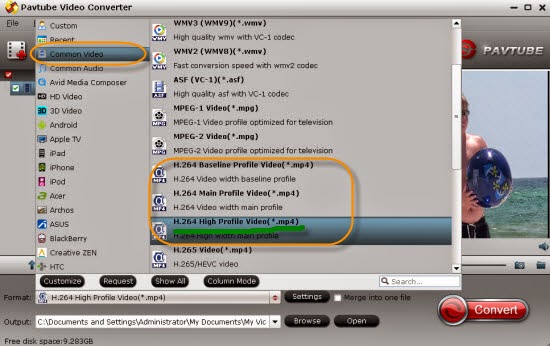
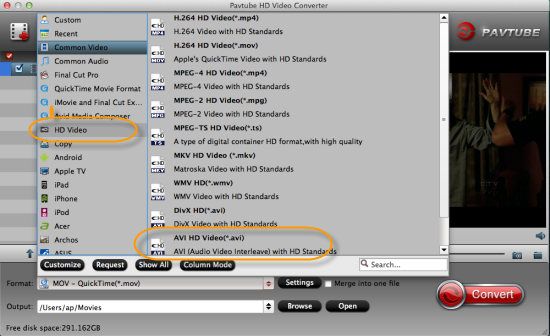
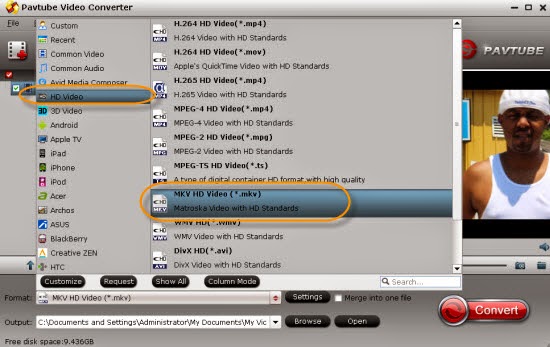
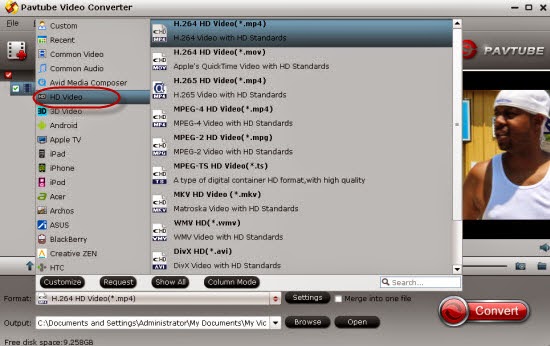
Step 2. Choose suitable one for Google Chromecast
Come to the output list by hitting the ‘Format’ bar on the left of the preview window, here we suggest you to select the ‘HD Video’>>’H.264 HD Video (*.mp4)’ as the best output one.


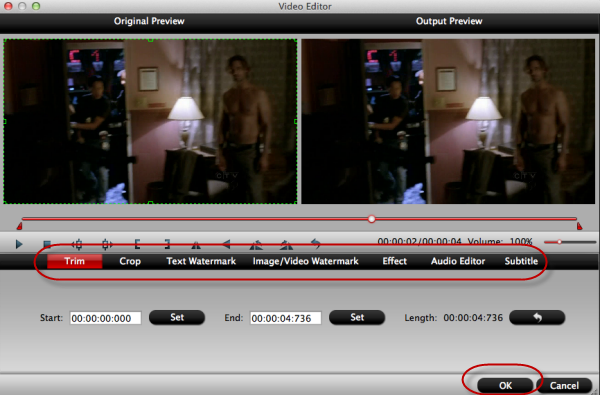
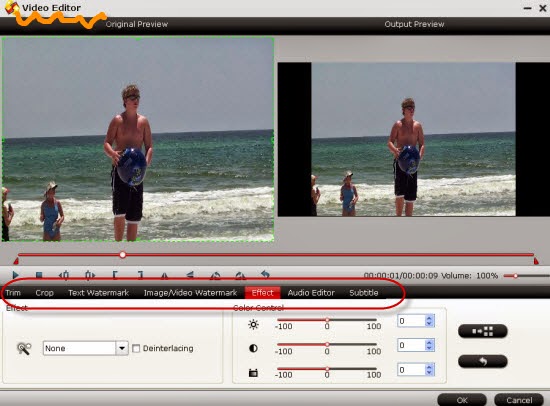
Step 3. As the additional functional button, on the main interface we can get into the ‘Edit’ button to adjust our output videos such like the video length with ‘Trim’, get rid of the edges with ‘Crop’, or even add some subtitles with ‘Subtitle’, etc. Just be a good editor here.


Notes: More talking on this professional Windows Video Converter, we have to tell you with the latest upgrade version, it can support the H.265/HEVC videos encode and decode, with the higher quality and smaller size, do you wanna a try?

For a final step, click the ‘Convert’ button we can easily get our work start. Next, we can take the part 2 as the reference to stream out compatible output movies to Google Chromecast for nice enjoyment. Now, do you still find it is hard for us to watch FLV/F4V movies on HD TV via Google Chromecast?

More:

Wednesday, January 28, 2015

Stream Any Videos and Audios to Roku for Nice Watching?

Part 1.Introduction of Roku and what can Roku bring to us?
As a widely-accepted media player, Roku can help us stream videos directly on your TV with lots of channel choices. But do you know that it can also be used as a streamer to cast your local video files on mobile to HDTV that you have at home? However, as the most media players, like VLCQuickTime, etc. For next step, we should know better about the Roku supported video and audio formats, right?


Part 2.Roku supported video and audio formats are listed below:
Supported:
Video format: MKV, MP4, MOV, WMV
Audio format: AAC, MP3, WMA, FLAC, WAV

Unsupported:
Video format: 3GP, VOB, MTS, AVI, M4V, WMV, XviD, DV, MP4-XviD, DIVX, H.264, H.265 (HEVC), MP4-MC, OGV, ASF, MPEG-1 NTSC, MPEG-1 PAL, MPEG-1 SECAM, MPEG-2 NTSC, MPEG-2 PAL, MPEG-2 SECAM, DVD-Video NTSC, DVD-Video PAL, DVD-Video SECAM, FLV, F4V, SWF, 3GP, 3G2, etc.
Audio format: AC3, M4A, OGG, AIFF, AU, MKA, APE, M4B, M4R, etc.

Part 3.Guide on streaming Roku supported Video and Audio files
Step 1. Install Roku app for iOS or Android

Get Roku app for iOS and get Android version. 

Step 2. Connect to the same network
Get your phone or tablet connected to the same network as your Roku device, that is, the same route. Then you can open your Roku app with a list of Roku devices appearing. Choose one of the devices and get control of it with your phone or tablet. Before that, you may need to get login with your Roku account.

Step 3. Play on Roku
Now go to find the Play on Roku tab on your app and then choose a video that you want to cast to your TV. After some minutes, you will be able to watch the videos on your TV’s big screen. So just enjoy yourself.


Part 4. How to stream those unsupported video files to Roku?
For naturally unsupported formats of Roku, you will need a third-party tool to help you out. Here, may be the PavtubeVideo Converter for Windows/Mac could be your best choice. It can be much easier and more effective to let us to convert those incompatible videos to suitable ones for Roku. Here is the Mac Video Converter Review you can take a good reference. 

That’s done! Is that cool for us to smoothly enjoy any various video via Roku? In other words, the professional Roku video converter can help us in watching various movies on different media players. What are you waiting for?

More:

Wednesday, January 21, 2015

VOB Files to iMovie: Not Difficult Any More!

Get in trouble when importing vob videos to iMovie? Files with VOB in the folder are just grayed out? How to solve the problem?

Summary: If you are failed in putting VOB files into iMovie, I suggest you to read this article to get some help. This guide is written to help you learn how to transcode VOB to MOV for iMovie. I search the following issue from Apple forum. Failure of editing VOB files in iMovie must be a common phenomenon that exists in our daily life. Absolutely, it’s not the only one. 


“I'm running 10.9.5 an iMovie 10.0.5. I have a DVD of video that I created and I want to bring it into iMovie. I've tried a couple of recommended solutions, i.e. Steamclip and MacX Quicktime Converter, but I get a message saying they can't be used because the developer hasn't been approved...or something of that nature.” 

Why do we get errors from iMovie when importing VOB files to it? It is important to note that VOB is the core format of files in DVD. It isn’t the format that iMovie supported as same as other NLEs like After Effetcs, etc. No denying that iMovie gives us a wonderful experience. With iMovie, we can do film editing with its strong functions and share them with our friends. iMovie brings us far more than happiness. That’s why people want to put VOB or other videos to iMovie for nice enjoyment.

Since iMovie has no ability of working VOB files, here we highly recommend the professional converting tool calledPavtube Video Converter for Mac for you guys. (For Windows version?) By means of converting with this product, putting VOB files to iMovie is not a difficulty any more. There is no need to worry about the output quality. The result would be attractive no matter in video output or audio output. You can download our product from the official website and try the trial version first.

Guide: Let’s see how to put VOB files to iMovie 11 on Yosemite.
Step 1: Import your videos
Download our product Video Converter for Mac (Video Converter is for Windows users) and install it. Then, open the interface. Put your videos into Video Converter for Mac by drag and drop. Or you can click “Add from Folder” to add a few files at one time. It depends.


Step 2: Select the output format
Click the drop-down button on the right side of the “Format” button to select iMovie/Final Cut Express>>Apple InterMediate Codec (AIC) (*.mov) as the output format. The output format is designed for iMovie 11 specially.


Optional function: you can also set video resolution in the ‘Settings' button, frame rate, bit rate, codec and so on. Would you like to have a try?

Step 3: Start your conversion work?
Click the “Convert” button at the bottom right corner on the main interface. After the conversion finished, the output files can be put into iMovie 11 easily without any incompatibility issues. For Windows users, operation steps mentioned above are the same. 

Notes: For those who wanna convert and import VOB files in Final Cut Pro, Avid Media Composer, Adobe Premiere Pro, just apply to this VOB Video Converter and choose the right output on the output list. Go ahead and have a try!

More:

Tuesday, January 20, 2015

Sony PXW-FS7 XAVC 4K/HD to FCP 7/X Workflow with ProRes Codec

Any related questions on how to import your Sony PXW-FS7 XAVC 4K/HD files to FCP 7/X for further editing withProres 422/HQ/4444 codec? Let’s learn more below.


Looking for the easiest way of converting XAVC 4K/HD files to ProRes MOV for editing in FCP 7/X from Sony PXW-FS7 camcorder on Mac OS X operation system? Cause we know more about the FCP 7/X, here we would like to show you some issues appeared in this situation. Just be a good reader and you will find it will be easier to import our Sony PXW-FS7 XAVC 4K footage into FCP 7/X for a nice workflow. Additionally, not only for Sony, for other camera footage for FCP cannot be available too, such as Canon MP4 videos to FCP or Panasonic 1080p videos to FCP

‘I just read there has been an update to allow FCP 7 and QT 7 to play/work with AVC-Intra files natively I am new to this codec, so I was wondering if there is a tutorial of how the file structure works. However I cannot import either of those XAVC folders into FCP, and the file structure is not recognized by log and transfer. Do I have to import each mxf file individually? Or is there a way to import an entire card without changing file structure?’ 

If you are a loyal Sony camera lover, you may know that the XAVC as the most popular codec, what a pity it has not yet been accepted by most Mac NELs, XAVC to Premiere Pro is the typical one.

According to the situation mentioned above, it seems that there are some third plug-ins to import FS7 XAVC files to FCP. However, most users have been failed to try that again and again, right? Because of the instability of the 3rd party tools, some issues like crashing or screen errors can be frequently found during the importing process. Just make Sony footage from XAVC to ProRes MOV codec, that the top point. Fortunately we have the Pavtube HD Video Converter for Mac, which could be our best professional conversion tool that can work all various videos available for NELs and media devices. More details about this XAVC to FCP Converter review

How to convert Sony PXW-FS7 XAVC to ProRes codec 422/HQ/4444 as the suitable ones in FCP 7/X?
Step 1 Add original Sony XAVC files.
Launch this Mac XAVC to FCP Converter and open the main interface. Add your files in is the first workflow that we should work it well. ‘Add video’ or ‘Add from folder’ can help you out of the importing trouble.


Step 2.Choose the suitable format for FCP 7/X. 
As we mentioned above, how could we find the ProRes codec 422? Press on the ‘Format’ button and come to the output list, just select the ‘Final Cut Pro’>>’Apple ProRes Codec 422’ as the best one. Of course several other ProRes types we can also have a try.


Step 3.Adjust video/audio settings
Click the "Settings" button and customize proper video/audio parameters including Video size, bitrate and fame rate and mroe. Usually 1920*1080 video size and 30fps video frame rate are recommended for FCP editing. Well, if you prefer to work with 4K video, you can adjust video size to get 4K ProRes for FCP. 

Step 4.Start XAVC to ProRes conversion
After all necessary settings, hit the ‘Convert’ button to start converting XAVC video to ProRes for FCP 7/X on Mac OS X. 

Once the conversion starts, with a higher speed, we can easily get the output videos encoded by ProRes codec. Then follow the usual transferring steps, just transfer our XAVC footage to FCP 7/X for nice editing. Any other tips or suggestions you can leave as the comments below.

More:

Friday, January 16, 2015

Premiere Pro CC Won't Import Panasonic AF100 MTS (AVCHD)?

You got the problem in importing Panasonic AF100 MTS (AVCHD) to the latest version Premiere Pro CC? After reading this paper, you may find answers.


Recently from the Adobe forum, we have found the question about the latest version of Premiere Pro CC can’t accept some container formats such like AVCHD MTS files. Today here we are going to talking the reasons and solutions about this topic.

Latest Premiere Pro CC cannot accept AF100 AVCHD MTS files?
Limited by Premiere Pro CC which was produced by Adobe company, some users complained like this’ Premiere Pro CC 2014 won't import Panasonic AF100 *.MTS(AVCHD) files (wrong compression type). Previous version of CC has NO problem importing them. Paid CC Windows 7 x64. What's the deal? Thank goodness I didn't delete the previous version!’ Some errors appear frequently during the processing. But how about the common MP4 or the latest H.265 videos?

Do you find any solutions to get rid of the trouble?
Someone has asked whether Media Browser can solve the trouble or not. They have tried that instead of dragging MTS files into Adobe Premiere Pro. Unfortunately it still does not work. Here some friends also recommend a MTS/M2TS to Premiere Pro CC Converter for Mac to do a favor.(For Windows Version?)

Step-by-step in converting MTS files in MTS to Premiere Pro CC Converter
After downloading the program, in first way, directly drag your files from camera storage when you connect them for a preparation. In second way, from the interface, two items can help you a lot, ‘Add video’ or ‘Add from folder’. Then we are coming for the output format choosing, on the format list, from ‘Adobe Premiere Pro’ to ‘MPEG-2 (*.mpg). You won’t miss it!


Click on the "Settings" button, you will view the Profile Settings window where you can adjust video/audio parameters, like bitrates, frame rate, sample rate, codec, channels, etc. Please note that the larger bitrates, the bigger file size while the better video quality. You can also check "Merge into one file" to combine MTS videos into a big one instead.


For other friends who have not recognize Premiere Pro CC so much, open here to learn some primary knowledge of transferring files in. More opinions you can offer at the end of this paper.

See also:

Wednesday, January 14, 2015

Audio Changes: DTS/DTS-HD/DTS-MA Audio to AC3 5.1/MP3/WAV/FLAC/AAC

Here we are going to have a discussion on how to convert our DTS audios to AC3 5.1/MP3/WAV/FLAC/AAC for nice enjoyment. Do you have any good ideas?

Top point---Necessity of converting DTS audio to AC3 5.1/MP3/WAV/FLAC/AAC
Though all of the DTS audio files are famous for high definition audio quality and widely used for in-movie sound on film or DVD discs. However, DTS (Digital Theater Systems) encoded audio or video files are incompatible with most media players or portable devices. In order to successfully play DTS audio anywhere, a recommended solution is to convert DTS to more popular audio format like convert DTS to AC3 5.1, convert DTS to MP3, convert DTS to WAV and etc. 

Any best DTS converter to change your DTS audio files into AC3 5.1?
In order to make our DTS, DTS-HD, DTS-MA audios played well on media players or portable devices, such as converting MKV 5.1 to AC3 5.1? We need a best DTS converter to make our dream come true. So here the PavtubeVideo Converter Windows/Mac is highly recommended. Not only for converting all various common audios, but also has the strong ability of transcoding different videos.

This guide applies to the audios below:
  • Convert DTS audio to other audio formats like converting DTS to AC3, WAV, AAC, MP3, MP2, FLAC, AIFF, WMA, OGG, APE, M4A, AU and etc.
  • Convert video with DTS audio to video with AC3, AAC, MP2, PCM, or WMA audio like convert MKV DTS to MKV AC3/MP3/MP2/PCM, convert AVI DTS to AVI MP3, and etc.
  • Convert to DTS digital surround audio from WAV, AC3, FLAC, APE, PCM, AIFF, OGG, WMA, M4A, and Apple Lossless.
  • Convert video with non DTS audio codec to video with DTS codec files.

Specific Guide on converting DTS to AC3 5.1 audios is also allowed here:
Step 1. As soon as you step into the main interface, click the ‘Add file’ item on the left corner, we can easily load our original files in.


Step 2. Click the ‘Format’ bar on the left of the preview window, on the output list, the ‘Common Audio’ is obvious there. Then it’s not too hard to find the suitable ‘AC3-Dolby Digital AC-3 (*.ac3)’as the best one. Also ‘WAV’, ‘AAC’ are allowed there if you need.


Step 3. Don’t forget to get into the ‘Settings’ to adjust your audio channels. Here just click the ‘Audio Channel’ to the’5. Channel’ as you want.


For a final step, if you have done all your preparation work, why not press on the big red button ‘Convert’ to start your conversion? With this functional DTS Converter, just do not worry about how to convert your DTS audio files to AC3 and enjoy them nicely on media players and portable devices.

More:

Monday, January 12, 2015

Workflow: Convert MKV FLAC to MP4/M4V/MKV AC3 5.1 on PC/Mac

Why cannot we  directly watch MKV FLAC files on our PC/Mac? How about converting them to the common audios AC3 5.1 in MP4/M4V, which can both be the suitable one on PC/Mac? Let's see more details!

The common MKV files we see are coded with H.264 video and AAC audio. As the demand of high quality audio enjoyment, more and more MKV files are codec with DTS AC3, FLAC audio. MKV FLAC can give people extraordinary listening experience as audio coded is used the lossless audio format FLAC. Such as play our MKV files to QuickTimeHere is the truth that we need to convert our MKV FLAC to AC3/AAC 5.1 on PC/Mac for nice enjoyment with no difficulties.


Why we need to convert MKV FLAC to AC3 5.1 for playback on PC/Mac?
MKV FLAC can give people extraordinary listening experience as audio codec used the lossless audio format FLAC. However, the compatibility of MKV FLAC is quite limited. If you want to play MKV with FLAC audio on other devices, you will need to convert MKV FLAC to AC3 in MP4/M4V/MKV. Encoding channel to AC3 5.1 channel is not a bad idea for playback on PC/Mac.

Solutions to solve the problems of converting MKV FLAC files to AC3 5.1 on PC/Mac:

Cause we have some problems in smoothly playing our MKV FLAC on our computers, do you have any third-party tools that can handle the audios well? Though there are some audio assistants that could work your job, with the bundled-plug-ins or apps you have to download together, you will be confused a lot, right? Fortunately, we have the Pavtube Video Converter for Windows/Mac, which has the ability of converting our various audio files to be compatible for popular media players.

Specific guide on how to turn our MKV FLAC files to AC3 5.1 for a nice playback:
Step 1. Download and install the MKV FLAC to AC3 5.1 converter on PC, then we need to load our original files in with ‘Add video’ and ‘Add from folder’ buttons on the left corner. Just drag them in is also a good idea.


Step 2.How to convert your Audios from FLAC to AC3 5.1? Click the ‘Format’ bar to get into the output list. Come to the ‘Common Audio’ column to find the correct item ‘AC3-Dolby Digital AC-3(*.ac3)’ as the best output one. Just take the following screen shot as follows.


Notes: If you wanna convert your original MKV formats, we suggest you open the ‘Common Video’ on the output list, could your find the ‘MP4’ or ‘M4V’ as output there? Just select them as suitable ones if you want.

Step 3. When we come to the ‘Settings’, we can adjust our audio channels which means we can change our audio channel to 5.1 we need. What’s more, we can here adjust our video size, bitrates or frame rate to the meet our requirements on media players.


Finally, go back to the main interface, click the ‘Convert’ button to end your conversion work. With this MKV FLAC to AC3 5.1 audio assistant, we are surprise to handle the audio converting job well. So now, do you know clearly about it?

More related:

Friday, January 9, 2015

Sony AX100 XAVC S to PowerDirector 13: Export H.265/H264?

Receive XAVC S footage from the newest Sony FDR-AX100 camcorder? After editing your XAVC files in PowerDirector 13, both H.265 and H.264 codec videos you can get as output. but how to convert them freely to each other has become an important task.


'Last sunday I made my first shot with FDR-AX100. Then I edit the video with PowerDirector13 Ultra. I create 2 exports: One 4K-to-1080p H264 codec and One 4K-to-1080p H265 codec. Both videos are MP4 conteiners. In order to freely transcode the H.265 and H.264 to each other no matter for editing in NELs or playing on media players, I'm looking for a professional video converter that can work the issues well. Any good suggestions?'

Pavtube Video Converter---Best H.264/H.265 converter for us!

From H.264 to H.265, we can fully take advantage of the higher quality and smaller size. While from H.265 to H.264, it can help us edit or play H.265 videos on NELs and players much more eaisly. That's the truth! So here we strongly recommend the Pavtube Video Converter for you, with the newest version 4.8.2.0, it can support the H.265/HEVC videos encode and decode well.

Let’s see the great changes of this H.65 Video Converter(More details?)

Step 1.When you download and install this program in according to its instructions, open the main interface, drag your files with ‘Add video’ or ‘Add from folder’, we can easily let the source files in. The latest version 4.8.2.0 can support the H.265/HEVC videos for importing well.


Step 2.Next, let’s come to the output list for more details, there are some main changes we should know better in this new version. Such as the added item ‘H.264 Baseline/Main/High’ three standards we can choose as we want. Usually, for some older devices, we can choose the baseline for the best, but for new, we always choose the ‘High’ to get the best quality.


Step 3.What’s more, we can see the added ‘HD Video>>H.265 HD Video(*/mp4)’, here we can transcode our video to H.265 codec. With the smallest body of H.265 videos, I’m afraid it will take us a lot of time. So if you are free, why not have a try to presume the higher video quality? As mentioned above, we can choose this one for editing in PowerDirector for a nice editing.


What’s more, the upgraded version has already fixed the bug of the crash when importing XAVC files in for working. Additionally, the original ‘Settings’ and ‘Edit’ functions they have preserved well.

Tips: For now, the two versions are only available for Windows, the upgraded Mac version will release as soon as possible. So if you have already got this H.265 video converter, just click the ‘Help’>>’Update’ to the latest version for more enjoyment. Now, are you still worrying about how o deal with the H.264/H.265 videos after edited from PowerDirrector 13?

Related:

Wednesday, January 7, 2015

Upload Christmas Videos to YouTube/Vimeo/Facebook for Sharing

In order to review the 2014 Christams, is that a good idea to upload the Christmas videos on YouTube, Vimeo or Facebook for a nice sharing with others?

Hi guys! Have you shot some memorial videos with your families in the past 2014 Christmas? Or have you enjoyed yourselves among the Christmas holidays? Some guys have got the idea of uploading their Christmas videos on YouTube, Vimeo or Facebook to share with friends or someone else, how do you enjoy your YouTube Videos such as MP4 files? In this article, our purpose is teaching you how to share your Christmas movies on these video platforms successfully.


Cause these three popular video platforms cannot accept all different video formats as you know so when you shot the incompatible formats from your HD camcorders, it is necessary for us to do some changes to make them suitable for YouTube, Vimeo and Facebook, etc. In other words, it just like the such reasons: A wide variety of devices are used for shooting video: camcorders, digital cameras, webcams, cell phones, and more, but most of them save video in non-standard formats. 

So how to make all video formats accepted by YouTube/Vimeo/Facebook? Any good suggestions?
Well, good news for everyone! The old famous video converting studio has upgraded the Windows product HD Video Converter/Video Converter to the newest version 4.8.2.0, which has strong ability of converting all different footage to others, including the latest codec H.265/HEVC. Is that cool? The program supports almost all popular video formats, including AVI, MP4, FLV, 3GP, MOV, HD video and many more. It also lets you do minor editing: trim and rotate video, adjust brightness, contrast, etc.

Tips: If you are not familiar with the YouTube, Vimeo and Facebook, we can tell you the most suitable video formats for each one. Such as FLV for YouTube, AVI for Vimeo and Facebook. According to this warning, will it be easier for us to choose the right output formats?

Steps on details that can tell you how to make your Christmas videos go through the YouTube/Vimeo/Facebook(Example: Pavtube HD Video Converter for Mac)

Step 1: Download and launch this Mac program on your computer, open the main interface, with ‘Add videos’ or ‘Add from folder’ we can easily let our original files in. Or directly drag our files in is not a bad idea too.


Step 2: Choose individual output format for YouTube/Vimeo/Facebook.
Next, just come to the output list, as we mentioned above, we need to select the most compatible ones for these three guys. Click the ‘Format’ bar on the left of the preview window, select the ‘Flash Video’>>’FLV H.264(*.flv)’ as the best for YouTube.


While for Vimeo and Facebook, may be the AVI could be the best. So you can tap this one in the searching box. In another way, select the ‘HD Video’, let’s find the ‘AVI HD Video (*.avi)’ as the best one. You won’t miss it.


Step 3.(Optional) Wanna cut the video length and add some subtitles with your output? Why not go to the ‘Edit’ button to take around? With the ‘Trim’, we can decide where to start and where to end, also with the ‘Subtitles’ item, add some explanations would be much easier for us. Any other functions you can explore by yourselves.


At the end, when you have done all the preparation work, go back to the main interface, hit the ‘Convert’ button there we can easily get our work started. In other ways, I have to admit that it’s actually a good idea to record your 2014 Christmas movies on YouTube/Vimeo/Facebook as forgettable memories!

Related articles:

Monday, January 5, 2015

Convert My TiVo Recordings to HD MKV with High Quality?

Any good suggestions there offered for us to convert my Tivo recordings to HD MKV with High Quality? Waiting for your best adcices!


Summary: Seeking for tips and tricks on how to smoothly convert your Tivo files to HD MKV? As long as you get the professional Tivo converter, anything is possible!

HD videos have make up a necessary part of your digital world. At the same time, Tivo show also play an important role. But they are not a friendly companion to edit or smoothly playback. You may want to convert Tivo shows to an easy-to-play format. 

While for TiVo, the professional digital video recorder, provides us with marvelous videos, TV shows, and movies. However, we often meet the issue that TiVo videos cannot be played on Windows, Mac, media players or be transferred to portable devices or be edited in video editing tools.

To solve the compatibility and freely enjoy TiVo videos, we had better to convert TiVo videos to more popular video and audio formats just like the typical MKV, MP4, etc. Or play Tivo on Windows Media Player? Or transfer Tivo on PC? To get rid of these troubles, any best methods there we can take a reference?

So luckily, we here have searched a professional Tivo Video Converter which has the strong ability of working Tivo files with various formats or devices produced by Pavtube studio. With a high conversion speed and quality, it has a good reputation online. We also call it as Tivo Video Editor because it can merge TiVo files together, trim TiVo video clips, split TiVo files into chapters, adjust the video screen of TiVo files, remove black bars from TiVo files, add watermarks to TiVo files, add subtitles to TiVo files,etc.

P.S. If you are planning to encoding TiVo to HD MKV on Mac OS X(Yosemite included), please get the equivalent Mac version Pavtube Tivo Converter for Mac. There, you can learn how to convert Tivo to iPadtransfer Tivo to iPhone or something else.

Step by step guide on how to easily convert Tivo to MKV with high quality preserved:
Step 1.Download and launch the Windows Tivo Converter, click on the ‘Option’ button on the main interface, input your ‘Tivo Media Access Key’ to let your files in as the screen shot follows:


Tips: How to find your Tivo Media Access key? Just go to the ‘Tivo Cetral ‘menu>>’Message and Set up’ Account and system information’, your Media Access Key would be there.

Step 2. For example, transcode files from Tivo to HD MKV? Just Go to the output list to find the ‘HD Video’ >>’MKV HD Video(*.mkv)’ as your wanted. Surely you can tao the ‘MKV’ in the searching box to find is quickly.


Note: Good news here! Pavtube studio has announced that the all windows products has upgraded to version 4.8.2 which meand this Tivo converter also has the capability of encoding or decoding H.265/HEVC files well. More details about this upgraded version?

For other functional requirements? You can go to the main interface to click the ‘Edit’ as we mentioned above, there you can ‘Trim’ ‘Crop’ your output videos well. Or hit the big red button ‘Convert’, you can get your conversion work started!

More posts: