Friday, May 29, 2015

Convert Sony MTS Files to TV Playable Format for Playing on Mac/PC

Summary: In order to play Sony MTS files on TV smoothly, the direct and workable solution is to convert MTS to TV more compatible H.264 MP4 format. This article will introduce you an MTS Converter and a step by step guide.


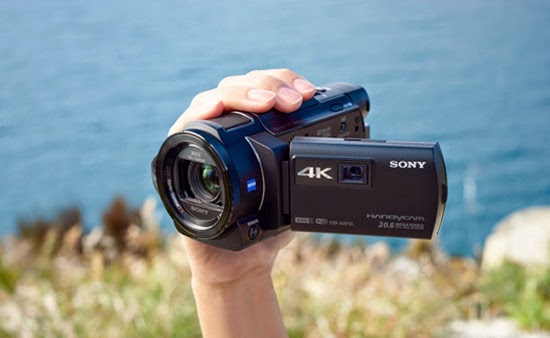
High definition camcorder is becoming a natural fit for its lighter weight, higher capacity memory. It is really fabulous that you can use your camcorder to capture each moment in your holiday, wedding, baby birthday and so on. The downside, of course, is the nagging question of what to do with this video in MTS format once you're done shooting with Sony camcorder.

These files in camcorder are often saved as .mts or .m2ts extensions of the AVCHD format, they are not playable with TV and etc. To work these MTS files from Sony camcorder with TV, you may need to convert MTS to TV playable format MP4 on Mac/PC. You may ask why. Cause MP4 is widely used on the most popular devices. More and more portable devices are support this file form. Besides, MP4 has a much smaller file size and meanwhile remain the high video quality.

So, if you are not such a technical guy, it’s better to try out the easier and quicker way- depend on third-party software. In order to save you from complex running steps, here suggest you Pavtube MTS/M2TS Converter for Mac/Windows. You may worry about the output quality and the degradation. No need to worry about this aspect, this all-in-one converter will maintain the quality as the original one and even bring it to a higher level.


How to convert Sony MTS files to TV playable format for playing on Mac/PC?

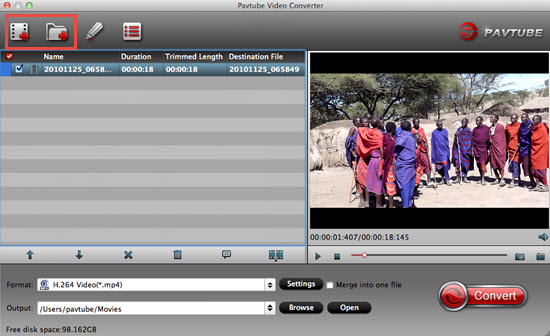
Step 1: Download and install the corresponding versions. Import Sony MTS files to Mac MTS Converter. Run it as the best Mac MTS Converter, and click the “Add video” button to load Sony MTS files. You may also directly drag and drop Sony MTS videos to application UI for importing files.


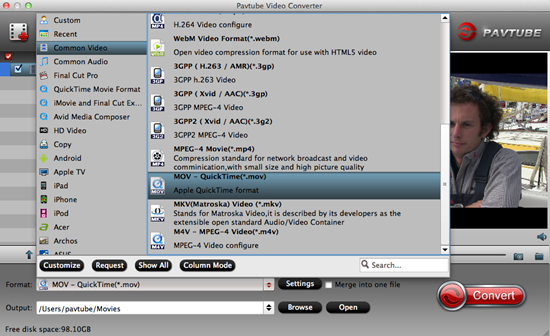
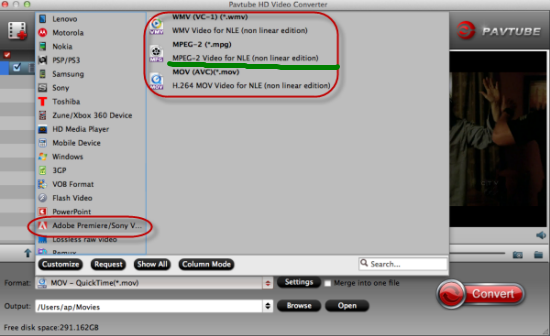
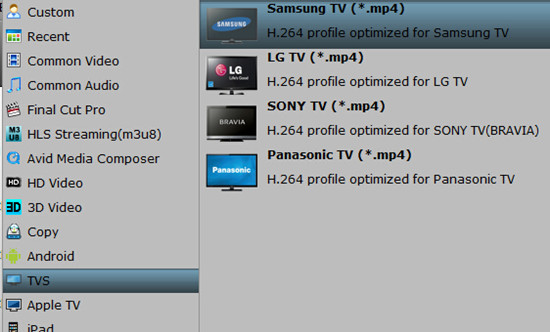
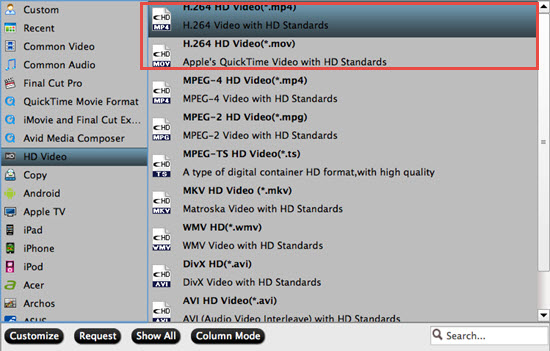
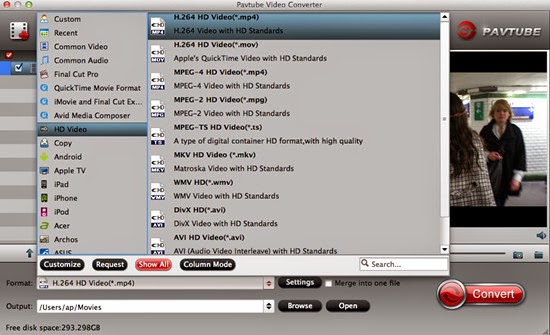
Step 2: Click “Format” bar to determine output format. Choose the suitable format from "TVs" category.


Step 3: Adjust video and audio parameters, including the bit rate of video and audio, the codec of video and audio, video size, sample rate, frame rate, audio channels, etc., in the Profile Settings by hitting “Settings” button.

Step 4: Click “Convert” button to start converting Sony MTS to MP4 for TV playing. You can get the generated files by clicking “Open” button.

Conclusion: Now, you can enjoy Sony MTS files on TV without any hassles. Good news! During May 29th to June 1st , you can get our part products 40% off. Why not take a close look at our event and have a try? Happy weekend!

Further Reading:

Monday, May 25, 2015

Convert Sony HD1550 XAVC 4K Video to QuickTime for Playing

Summary: This post details a fast and fluid workflow for Sony HD1550 XAVC 4K video to QuickTime. You can read on to figure out how to transcode XAVC 4K video to QuickTime for use with best quality.


The PDW-HD1550 XDCAM HD422 recorder provides advanced XAVC Intra 422 at 100 Mbps recording capabilities on all types of Professional Disc, including Quad Layer and Triple Layer disc. The recorder also provides an USB interface that supports an SxS and Professional Disc bridge solution. The compact yet powerful recorder can realize smooth jog/shuttle operation by creating proxy data, which feels to the user like tape-based operation.

“Hi, fellows, I’m wondering if you can help. I am trying to work with 4K video files from the Sony PDW-HD1550 recorder in QuickTime. The camera uses a flavor of MXF that is called XAVC. I have tried the traditional importing method and it’s a no-go. I have also tried AMA using Sony’s XAVC AMA plug-in, however the plug-in doesn’t seem to support QuickTime. Do you or anyone have any idea how to fix this? Is some kind of conversion step necessary, and if so what’s the best way to accomplish that? Please advise options. Thanks in advance.”

To be able to play HD1550 XAVC 4K video on QuickTime fast and smoothly, and if for some reason that Sony plug-in doesn’t work for you or you dislike using it, you’ll have to rewrap the HD1550 XAVC 4K video to QuickTime MOV files for playing. This requires third-party software like Pavtube Video Converter for Mac. By using this program, you are able to convert HD1550 XAVC 4K video to whatever format you need for editing and playing. It comes with very easy to use menus and produces very good quality QuickTime MOV conversion as well as bulk processing so you could load it with files and leave it alone to do the job. If you want to do conversion work at your PC, you can choose the corresponding Windows version Pavtube Video Converter.


Keep reading for a brief how-to on the simple process:

Step 1: Download and have a quick installation. The trial version will have a watermark on your converted files. Except for that, there are no time limitation, no virus, and no unnecessary bundle apps while downloading. After that, click “Add Video” button to load your XAVC 4K videos from Sony HD1550. You can load several files at once thanks to “Add from folder” button.


Step 2: Here, you need to choose what you want the output to be. Click “Format” drop-down list, and then select “Common Video>>MOV-QuickTime (*.mov)” as output format for using on QuickTime Player.


Step 3: It’s optional to edit video files before converting. If you want to do some edit work, just hit the clip first, and then click “Edit selected task” button. As it’s shown to us, the edit function is sufficient for you to make your videos wonderful.

Step 4: Click “Convert” button on the bottom of the screen to start XAVC 4K video to QuickTime MOV conversion process on Mac. The amount of time it takes will vary based on your system’s hardware and the quality settings you selected.

Conclusion: Do you follow the step and successfully put Sony HD1550 XAVC 4K video on QuickTime Player? I believe it solves your headache problem.

Further Reading:

Thursday, May 21, 2015

Convert Panasonic CM1 4K MP4 to MPEG-2 for After Effects CC on Mac

Summary: If you have such an amazing idea to convert CM1 4K MP4 to MPEG-2 for editing in After Effects CC, an intelligent MP4 to MPEG-2 converter is necessary. Move on to know more about it.


If you are considering a new 4K camcorder, Panasonic DMC-CM1 should be on your list. It features a large 1-inch MOS sensor and is capable of 4K video recording at 15fps, as well as Full HD recording at 30fps. Well, no matter you’re using or going to have Panasonic CM1, you may wanna know the compatibility of CM1 4K MP4 footage and After Effects CC.

After Effects CC will work with some MP4 files, but not all. The problem is that they are not the same, which may contain different codecs and various video frame rates. The 4K MP4 footage from Panasonic CM1 seems not to be an ideal editing format for After Effects CC. What’s more, editing 4K in After Effects CC is extremely hardware intensive. It’s not so easy to work CM1 4K MP4 with After Effects CC.

The quick workaround is to use the easy-to-use yet professional app called Pavtube HD Video Converter for Mac, which can be used as a Mac 4K MP4 to MPEG-2 Converter under OS X Yosemite, Mavericks, Mountain Lion. It’s free, clean and safe to install and use. With it, you can effortlessly transcode CM1 4K MP4 to MPEG-2 for After Effects CC, and it works well and converts flawlessly. Meanwhile, this HD Video Converter for Mac can create files compatible with various NLEs like Avid, iMovie/FCE and etc.


A detailed guide about importing Panasonic DMC-CM1 4K MP4 to MPEG-2 for After Effects CC editing:

Step 1: Download Mac HD Video Converter, and follow the prompts to install the program. When the installation is complete, the best DMC-CM1 MP4 Converter will launch automatically.

Step 2: Click “Add video” button to load Panasonic DMC-CM1 4K MP4 recordings or directly drag the files into file list. By default, the files are selected. You can delete files which you don’t want to import to.


Step 3: Click “Format” bar to determine output format. For best image quality, click the format bar and choose “Adobe Premiere/Sony Vegas>>MPEG-2 (*.mpg)” as output format.


Step 4: Click “Settings” button to customize the output video and audio settings by yourself. But if you are not good at it, you’d better use the default parameters, they will ensure you a good balance between file size and image quality basically. You can change the resolution, bit rate, frame rate as you need.

Step 5: You can preview to check the final result. Once you are satisfied with it, click the “Convert” button to start converting Panasonic CM1 4K MP4 to MPEG-2 for editing in After Effects CC flawlessly. It will take you a little while.

Conclusion: Once the conversion process is complete, you can click “Open Folder” button to get the generated files for editing CM1 4K MP4 in After Effects CC with optimum performance. During May 22nd to May 25th, we have special offer for you. You can get 40% off at appointed goods. Why not take a close look and have a try?

Further Reading:

Monday, May 18, 2015

How to Convert NX500 H.265/HEVC 4K Video to Ultra HDTV for Playing

Summary: Fond of enjoying 4K videos on Ultra HDTV with the high resolution? I wonder how did you play NX500 H.265/HEVC 4K video on Ultra HDTV, is that realizable? Here we’d like to offer you H.265 4K video to Ultra HDTV workflow. Would you like to join us for more details?


The newly released Samsung NX500 has the ability to support both 4K and UHD video recording. The built-in H.265/HEVC codec, the most advanced compression technology available, brings efficiency to the storage of video clips by compressing high quality video to half the size and the bit rate of H.264 footage without any compromise on quality. The only problem is, H.265/HEVC has not yet been accepted by Ultra HDTV. To make Samsung NX500 H.265 4K video widely supported, especially for a playback on Ultra HDTV, we teach you how to convert H.265 4K Video to Ultra HDTV best supported format with ease.

In order to play NX500 H.265 4K video on Ultra HDTV with no difficulties, a wise choice is to decode/re-encode NX500 H.265 4K video to MP4, a more common video format. To achieve the goal,a professional H.265/HEVC Converter is needed indeed. Overall, Pavtube Video Converter for Mac (Windows version) is such a powerful tool to handle H.265/HEVC codec, which is even far beyond your expectation. With the recent upgraded version 4.8.5.1, it can encode/decode H.265/HEVC videos so nicely.

With it, not only can you convert NX500 H.265/HEVC 4K video to MP4, AVI, WMV, MOV, FLV for easily playing, but also you can convert H.265/HEVC 4K video to the editing tools with professional codec, like MPEG-2 for Adobe Premiere Pro/Sony Vegas, DNxHD for Avid Media Composer, AIC MOV for iMovie/FCE, Apple ProRes codec for FCP X/7/6, and etc. Besides, the built-in video editor allows you to modify your videos by trimming, cropping, adjusting video effects and more. By the way, this H.265 converting application also enables you to convert videos from almost any SD/HD input (M2TS, MTS, MKV, H.264, MP4, AVI, WMV, MOV, MXF, MPEG, etc.) to H.265 HEVC codec up to 4K.

Mac download & buy:


Windows download & buy:


How to convert NX500 H.265/HEVC 4K video to Ultra HDTV for playing?

Step 1: Download and install the corresponding program. Click “Add video” button on the top side to open the file browser window and pick your Samsung NX500 H.265/HEVC 4K video. You can also drag and drop files to the main interface of this best H.265/HEVC converter.
Tips: You can add multiple files to the queue and convert them all at one time.


Step 2: Here, you need to choose what you want the output to be. Click “Format” drop-down list, and then select output video format from the powerful H.265/HEVC converter. For playing H.265/HEVC 4K video on Ultra HDTV, we suggest you to choose suitable formats from "TVs".


Step 3: Click “Settings” button to customize the output video and audio settings by yourself. But if you are not good at it, you’d better use the default parameters, they will ensure you a good balance between file size and image quality basically. You can change the resolution, bit rate, frame rate as you need.

Step 4: Click “Convert” button on the bottom of the screen to start NX500 H.265/HEVC 4K video conversion process. The amount of time it takes will vary based on your system’s hardware and the quality settings you selected.

Conclusion: When the conversion is done, you can click “Open” button to get the generated video files. Now, you can play NX500 H.265/HEVC 4K video on Ultra HDTV without any hassles.

Further Reading:

Tuesday, May 12, 2015

Convert AX30 4K XAVC S to ProRes/AVI/MPEG-2/WMV for Editing and Playing

Summary: The post will discuss how to convert 4K XAVC S files from Sony AX30 to ProRes/AVI/MPEG-2/WMV video formats, and help you edit and play AX30 4K XAVC S files on Windows/Mac anywhere you like.


Sony AX30, the most compact 4K Handycam camcorder. While, the users would get frustrated when converting AX30 recorded 4K XAVC S to ProRes/AVI/MPEG-2/WMV for editing and playing. In fact, XAVC S as a new codec does not appear to be supported by usual editing software and media players. Then how to convert AX30 4K XAVC S videos for using without any issue?

With the stable shooting ability and the high definition output footage 4K XAVC S, Sony AX30 is popular among our photographers. “As a teacher who teaches video production in the studying courses, I’m trying to use my Sony AX30 camera to shoot some recordings of my students and pick them out to show in the ‘Students’ Film Festival’. I need to edit the output videos on my Mac, I installed FCP X there. I know that ProRes codec is best compatible with FCP X. How can I convert my 4K XAVC S files to ProRes for FCP X use? How about converting 4K XAVC S to MPEG-2 for editing in Premiere, to AVI for VLC or to WMV for Windows Media Player playing?”

Considering the easy of use and the lossless quality, what we need is an AX30 best 4K XAVC S Converter. Here Pavtube Video Converter for Mac is highly recommended. With the recent upgraded version 4.8.5.1, it can encode/decode H.265/HEVC videos so nicely. If you are running on Windows, you can refer to the equivalent version Pavtube Video Converter. Easy operations to do with XAVC S files and make them accepted by common editing programs and media players with a high quality preserved.


Step-by-step on how to convert AX30 4K XAVC S to ProRes/AVI/MPEG-2/WMV for editing and playing:

Step 1: When you download and install the Mac Video Converter, open the main interface and choose the “Add video” button to load 4K XAVC S files from Sony AX30 to the program. For the multiple video clips we can hit the “Add from folder” button.


Step 2: To convert AX30 4K XAVC S to ProRes, you’d better hit the “Format” bar and choose “Final Cut Pro>>Apple ProRes 422 (*.mov)”. For higher quality, you can choose “Apple ProRes 422 (HQ) (*.mov)”. For smaller size, you can choose “Apple ProRes 422 (Proxy) (*.mov)”. It all depends on you!


Tips: Convert 4K XAVC S to AVI, choose “HD Video>>AVI HD Video (*.avi)”.
Convert 4K XAVC S to MPEG-2, choose “Adobe Premiere/Sony Vegas>>MPEG-2 (*.mpg)”.
Convert 4K XAVC S to WMV, choose “HD Video>>WMV HD (*.wmv)”.


Step 3: Click the “Convert” button under the preview window and the Mac Video Converter starts converting. By the way, you can take a screenshot at your favorite frame.

Conclusion: If the default A/V settings cannot fit your needs, you can click “Settings” button to custom the output video and audio settings by yourself. But if you are not good at it, you’d better use the default parameters, they will ensure you a good balance between file size and image quality basically.

Further Reading:

Monday, May 11, 2015

Upload OBS FLV Video to YouTube/Vimeo for Sharing on Windows/Mac

Summary: Some users complain that “My attempts at uploading OBS FLV video to YouTube/Vimeo fail during processing.” It’s obvious that import OBS FLV video to YouTube/Vimeo may cause some issues.


Open Broadcaster Software is free and open source software for video recording and live streaming. Have you ever recorded some game footage with OBS? Generally OBS saves files as MP4 or FLV. It says that the files can be uploaded straight to YouTube or other video hosting site just fine. But why I encounter incompatible issues when importing OBS FLV video to YouTube/Vimeo or other situations like OBS videos to PremiereOBS FLV to AvidOBS FLV to DaVinci Resolve?

FLV usually comes from a video-sharing website like YouTube, Vimeo or from OBS (Open Broadcaster Software), etc. Though FLV is the same format with YouTube supported one, the codec of OBS FLV videos is totally different from YouTube best accepted one. Since YouTube is the most popular website where we can upload our favorite videos to it for sharing online with other people, any good solutions to transcode OBS FLV video to YouTube/Vimeo directly?

To upload OBS FLV video to YouTube/Vimeo flawlessly, you’ll need to convert OBS FLV to YouTube/Vimeo both compatible format. In this case, Pavtube Video Converter for Mac is the first and best choice for you. With the recent upgraded version 4.8.5.1, it can encode/decode H.265/HEVC videos so nicely. If you are running on Windows, you can refer to the equivalent version Pavtube Video Converter.


How to upload OBS FLV video to YouTube/Vimeo for sharing on Windows/Mac? (Take Mac version as an example.)

Step 1: When you download and install the Mac Video Converter, open the main interface and choose the “Add video” to load your OBS FLV videos in. For the multiple video clips we can hit the “Add from folder” button.


Step 2: Before choosing the format, you can check about the supported formats of YouTube and Vimeo first then decide which output format to choose. As we can see from those two sites, both the H.264 codec contained with MP4 can be supported by them both. So we go to the “Format” bar then choose “HD Video>>H.264 HD Video (*.mp4)” as the output format.


Step 3: Most of you guys must have the desire of a further editing with your output videos, right? On the main interface, “Edit” is waiting for you. “Trim” to decide where to start and where to end, “Crop” to cut some unwanted clips, “Subtitles” to add some explanations to your audience.

Step 4: Click the “Convert” button under the preview window and the Mac Video Converter starts converting. By the way, you can take a screenshot at your favorite frame.

Conclusion: After converting, you can click the “Open” button to find your converted files. Now, you can upload OBS FLV video to YouTube/Vimeo for sharing on Windows/Mac without any worries! What are you waiting for? Just go ahead and have a try! Enjoy it!

Further Reading:

Thursday, May 7, 2015

Free Import H.265/HEVC Videos to iTunes 12/11 on Mac Yosemite


At present, the hottest codec must be the H.265/HEVC, which has already occupied a large part of the codec market. For users, it is great to enjoy the better video quality of H.265 while only with half of file size, which totally free the local disk space and not drop down the quality. In order to enjoy the H.265/HEVC movies, some users would like to use iTunes to manage their videos in local on Mac devices, but how can they transfer H.265/HEVC videos to iTunes 12/11 to watch smoothly?


H.265/HEVC codec, as a new codec technology and new video compression standard compared to H.264, has the higher quality and smaller size which can be the most import point loved by all video lovers. While as the specialty of this new codec, H.265 has not been available for iTunes yet so we still need some tools to ask for help.

Just few camcorders can shoot the H.265/HEVC recordings, Samsung NX1 is the typical one as you know. If you have recorded some H.265 videos from NX1, add H.265 videos to iTunes for syncing and playback on Apple devices for killing time on the move is a wise choice. However, no mater by dragging and dropping or by selecting Add File to Library... from iTunes menu, iTunes won't import H.265 videos since iTunes have no ability of playing HEVC/H.265 format and iTunes has it’s own best supported video formats as we all know.

To solve H.265 and iTunes incompatible problem, an ideal tool- Pavtube Video Converter for Mac can help you out. With the recent upgraded version 4.8.5.1, it can encode/decode H.265/HEVC videos so nicely. If you are running on Windows, you can refer to the equivalent version Pavtube Video Converter.


Detailed steps on how to freely import H.265/HEVC videos to iTunes 12/11 on Mac Yosemtie:

Step 1: Download, install and launch the smart Mac Video Converter. Click “Add video” or “Add from folder” button to import H.265/HEVC videos to the program. You can also directly drag the files to the main interface.


Step 2: To import H.265/HEVC videos to iTunes 12/11 on Mac Yosemite, you’d better hit the “Format” button to choose “HD Video>>H.264 HD Video (*.mp4)” as the best output format.


Step 3: Click “Settings” button to customize the output video and audio settings by yourself. But if you are not good at it, you’d better use the default parameters, they will ensure you a good balance between file size and image quality basically. You can change the resolution, bit rate, frame rate as you need.

Step 4: Now everything has been settled, and don’t forget to set the file location. Click “Convert” button to start the conversion work and click “Open” when you finish your conversion to check your converted files.

Conclusion: Now, you can enjoy importing H.265/HEVC videos to iTunes 12/11 on Mac Yosemite freely. From May 7th to May 14th, all Facebook users can enjoy a 50% discount of each Pavtube products during the 2015 Mother’s Day celebration! Just “Follow” the Pavtube official topic and “Like” it and you can own the qualification. Come on!

Further Reading:

Pavtube Biggest Promotion for 2015 Mother’s Day


What gift would you like to send to your mother on this 2015 Mother’s Day? To show our thanks to our mother, we are all thinking how to make this year’s Mother’s Day special with special gifts. If your mom likes watching the latest movies or videos, how about a professional video converter to get rid of the incompatible troubles to enjoy the favorite movies so smoothly? Pavtube Studio has upgraded all products to the latest version, which could be a warm gift for mom. Big discount will be offered by Pavtube Studio!


Pavtube Big Deal for Mom (Mother’s Day Only)
40% off discount we can enjoy if we get into the official promotion page and give the comments below: ‘What do you want say to your mom”. All of us can get the big coupon with the best Pavtube HD Video Converter for Windows/Mac, which is a professional converter to transcode all video formats nicely for any NLEs or media devices with a high quality preserved.

Other Special Off on Facebook(For Facebook users)
From May 7th to May 14th, all facebook users can enjoy a 50% discount of each Pavtube products during the 2015 Mother’s Day celebration! Just “Follow” the Pavtube official topic and “Like” it and you can own the qualification. Come on!

Other Official Website 20% – 40% discount:

Pavtube Video Converter for Mac(for Windows)
Have full access to SD videos,digital camcorder recordings, DVR videos on devices such as Apple/Android/Windows series, media players, game consoles and video editing programs.
Pavtube MTS/M2TS Converter for Mac(for Windows)
Convert Sony/Canon/JVC/Panasonic recorded MTS/M2TS/M2T/TS/MOD/TOD footage to play on media players or edit with Premiere Pro, Avid Media Composer, Final Cut Pro, etc.
Pavtube MXF Converter for Mac(for Windows)
Converting MXF video files generated by Canon/Sony/Panasonic camcorders to various video formats such as H.264/MPEG-4, MKV, MP4, AVI, MPEG, WMV, FLV, SWF, F4V, etc.
Pavtube iMixMXF(for Windows)
Transcoding MXF video files to Multi-track Apple Prores MOV for Final Cut Pro or Multi-track MP4/MKV format for other video editing program and media playback devices.

Additional Tips: With the recent upgraded version of Pavtube Mac products, all products have been upgraded to support the H.265/HEVC decode and encode. Some other bugs and fixed well there! Just come to Pavtube to know more and enjoy ourselves on 2015 Mother’s Day!

Tuesday, May 5, 2015

Edit H.265 Files in iMovie on Mac Yosemite/Mavericks


H.265 is a new video coding standard that specifies how to decode video. It’s basically the video equivalent of a JPEG file. The codec helps your computer understand how a stream of data can be displayed as a video file rather than gobs of randomly distributed colors.


“When is full support for H.265 going to be implemented into iMovie? I want to buy the Samsung NX500 4K camera that will be out this month. Only $799 with kit lense and most of the NX1 capabilities.”

“The H.265 codec and its lack of compatibility with the Apple ecosystem is one of the primary reasons I selected the Panasonic GH4 over the Samsung NX1 for 4k video. I've read that many people expect Apple to implement H.265 in its video applications sooner rather than later because H.265 is the codec used for Face time already; however, I did not want to deal with the trans coding hassles in the interim. Also, just because Apple embraces a codec for one medium does not mean that they will embrace it for another.”

iMovie is a Mac OS X or iOS based video editing software application created by Apple Inc. iMovie supports multiple video formats and allows you to create projects that are tailored to your specific video format. You can use the following formats in iMovie: DV, HDV, AVCHD, Apple Intermediate Codec, Apple Animation Codec, Motion JPEG/A, iFrame, H.264, some, but not all, varieties of MP4, MOV. As .mov or .mov is a container, if it contains video codec in one of the above, it will import to iMovie, or it will fail to import to iMovie.

What if you have video files which are incompatible with iMovie, such as importing H.265 files to iMovie for editing. Is it possible that to add those unsupported video files to iMovie for editing? Of course you can! As long as you depend on Pavtube Video Converter for Mac, which is an all-in-one Mac Video Converter. With the recent upgraded version 4.8.5.1, it can also decode and encode the H.265/HEVC videos so nicely.


How to convert H.265 files to iMovie best supported format for further editing?

Step 1: Click “Add video” icon to load your source H.265 files to the main interface. Or you can directly drag&drop H.265 files into program.


Step 2: When you come to the output list, just click “Format” bar to determine output format. Follow “iMovie and Final Cut Express” and select “Apple InterMediate Codec (AIC) (*.mov)” as the output format.


Additional Tips:
Click the “Effect” button to open the Video Edit window to achieve editing H.265 files like trim, crop, image, watermark, effect, subtitles and rotate and etc. in the corresponding editing pane.
Click the “Setting…” button to open the Advanced Settings window to adjust the output video codec, resolution, bitrates, frame rate, aspect ratio, audio codec, channel, volume and etc in the advanced tab.


Step 3: Go back to the main interface if you have finished all the preparation work. Here just hit the “Convert” button and we can easily get the work started.

Conclusion: After conversion, you can get the encoded file under “Open” panel. When you finished transferring H.265 files to iMovie, we can enjoy editing the videos so nicely. Good news! All users can enjoy 30% discount from May 4th to May 6th after the upgraded days! Come on!

Further Reading: