Monday, June 29, 2015

Convert TiVo to AVI with High Quality for Watching

Summary: When you transfer your recorded shows by TiVo, you’ll find these files are not so easy to play back and edit as common video files. There is a way to fix it, converting TiVo to something more common. Converting TiVo to AVI for watching is highly recommended.


TiVo, the professional digital video recorder, provides us with marvelous videos, TV shows, and movies. However, we often meet the issue that TiVo videos cannot be played on Windows, Mac, media players or be transferred to portable devices or be edited in video editing tools. It is quite hard to upload TiVo videos to YouTube or burn TiVo files to DVDs. As a matter of fact, all these issues are caused by the file format compatibility.

As a result, it is required to convert the TiVo files to a decent format you need on your computer. One common movie file type is AVI. A video file has two parts: a container and a codec. The container packages the video and all of its other components, such as audio and metadata, and provides the identification of the file extension, which could be AVI. The container is the structure of the file, including how the different elements of the movie are stored and how they interconnect. The codec is the device that encodes the audio or video into the stream of bytes. Simply put, the container is the file and the codec is the contents. Most container formats can hold many different types of codecs.

When you import the file to either edit or play, the software reading the file has to know how to draw out the different codecs, or different parts of the file, in order to play. When a program does not recognize a file type, then you run into problems and have to convert the file to a compatible file. So, how to convert TiVo to AVI with high quality for watching?

Don’t bother trying sorts of TiVo hacking methods, there is easier way to go! Pavtube Video Converter (Mac version) can help you achieve your goal smoothly. In fact, this TiVo Converter is an all-in-one video convert app. It can help you quickly and easily convert TiVo to any format like MP4, MKV, AVI, WMV, MOV, MPG, M4V and etc. with least quality loss. Besides TiVo, this video convert program can also help to convert between any popular video and audio formats as you need. You could get wonderful output files and never worry about out of audio/video sync. Plus, with the built-in video editing feature of the program, you can trim, crop, add watermark, add subtitle and more to your video files.


Other Download:
- Pavtube old official address: http://www.pavtube.com/video_converter/
- Amazon Download: http://download.cnet.com/Pavtube-Video-Converter/3000-2194_4-75734821.html
- Cnet Download: http://download.cnet.com/Pavtube-Video-Converter/3000-2194_4-75734821.html

Refer to the below guide for converting TiVo to AVI:

Step 1: Download and install the corresponding program. Press “Options” button. Switch to “TiVo” tab in Option window and enter TiVo Media Access Key.


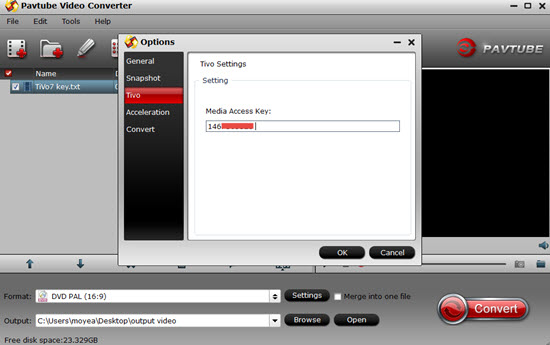
Tips: How to find your Media Access Key on TiVo? Go to “TiVo Central”> “Messages and Set Up” “Account and System Information”, and your Media Access Key would be there.

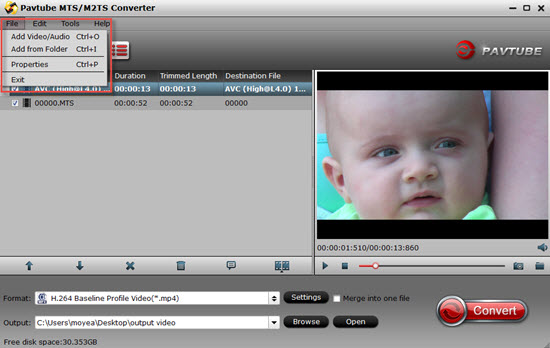
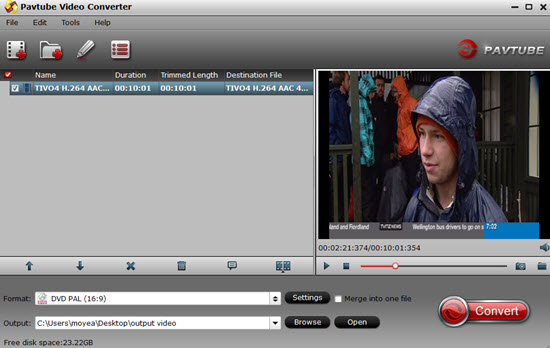
Step 2: Click “Add video” button to load TiVo files to the program. You can load several files at once thanks to “Add from folder” button. Or you can drag and drop TiVo files to the main interface directly.


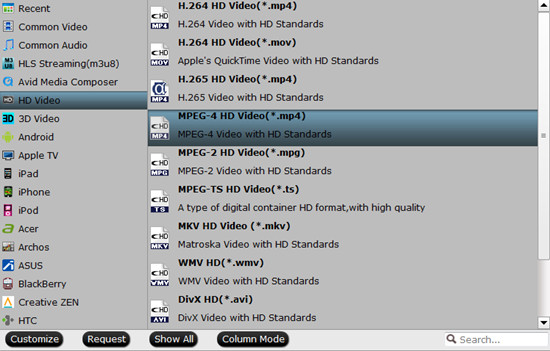
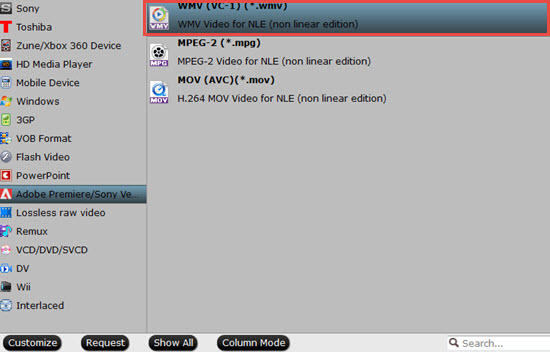
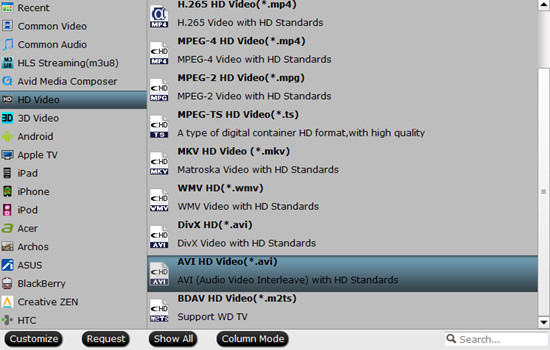
Step 3: Click “Format” bar and select “HD Video>>AVI HD Video (*.avi)” as best output format.


Step 4: Press “Convert” button to convert TiVo to AVI for watching with high quality.

Conclusion: When the conversion is done, you can click “Open” to get your generated files. There is no need to worry about how to convert TiVo to AVI with high quality preserved for watching and enjoying!

Further Reading:

Friday, June 26, 2015

Convert Panasonic DMC-G7 4K to iMovie/FCE for Editing

Summary: This article mainly talks about the way to convert Panasonic DMC-G7 4K to iMovie/FCE for editing. Keep reading to learn how to.


Panasonic has introduced the G7 to replace the G6, and it sits just below the Panasonic GH4–but alongside the GX7. That's a lot of G numbers, but basically, the G7 is the company's mid-range compact system camera. Formerly the preserve of professional filmmakers and photographers, LUMIX G7 is opening up the world of 4K to everyone. Whether you're making movie memories to last a lifetime, or taking amazing stills from your 4K footage, the G7 is changing photography, for good.

With Panasonic DMC-G7, you can record 4K MP4 video and Full HD AVCHD video easily. 4K footage looks amazing but if you don’t have a fast computer with a high end RAM and speedy processor it can make video editing a real nightmare. Your computer may freeze or crash when editing G7 4K MP4 in iMovie/FCE.

iMovie is one of the best video editing tools for Mac. With it, you can beautify your videos simply by cutting, cropping, merging, adding effects etc. to them. It works stable on Mac computer, so it's loved by millions of users. On the official site, it says iMovie 11 can support DV, MPEG-4, MPEG-2, MOV and M4V file types. According to this, you are enabled to import MP4 to iMovie. Thus, why iMovie 11 fails to recognize some MP4 videos? You'd better to know the reason clearly in order to avoid stumbling upon the same trouble repeatedly.

First and foremost, I wanna tell you that iMovie only accepts MP4 file which contains MPEG-4 and H.264 codecs. While, the audio, subtitle or other media source that embed in MP4 might have different codecs. In this case, we cannot judge the video format by examining the file extension name only. So it is impossible for the MP4 file to determine the type of streams in an MPEG-4 file based on its filename extension alone. Therefore, you may have some clues that why people using Mac always meet difficulty in importing MP4 to iMovie.

All in all, to smoothly import DMC-G7 4K MP4 files to iMovie/FCE, you'd better to convert these MP4 files to iMovie/FCE totally compatible formats as we searched above. To get the job well done, we need to use an all-in-one program-Pavtube HD Video Converter for Mac. With it, you can effortlessly encode/re-encode Panasonic G7 4K MP4 footage for smoothly importing and editing in various non-linear editing systems, including FCPAdobe Premiere ProAvid Media Composer and more.


Other Download:
- Pavtube old official address: http://www.pavtube.com/hd-video-converter-mac/
- Amazon Store Download: http://www.amazon.com/Pavtube-Video-Converter-Mac-Download/dp/B00QI9GNZS
- AppStore Download: https://itunes.apple.com/de/app/pavtube-hd-video-converter/id502792488?mt=12
- Cnet Download: http://download.cnet.com/Pavtube-HD-Video-Converter/3000-2194_4-76177786.html

How to edit Panasonic DMC-G7 4K MP4 in iMovie/FCE?

Step 1: Download and have a quick installation. The trial version will have a watermark on your converted files.Except for that, there are no time limitation, no virus, and no unnecessary bundle apps while downloading. After that, click “Add Video” button to load your 4K MP4 files. You can load several files at once thanks to “Add from folder” button.


Step 2: Click the “Format” bar to get the drop-down menu and you can get “iMovie and Final Cut Express”. Choose “Apple InterMediate Codec (AIC) (*.mov)” as output format.


Step 3: Click “Settings” button to customize the output video and audio settings by yourself. But if you are not good at it, you’d better use the default parameters, they will ensure you a good balance between file size and image quality basically. You can change the resolution, bit rate, frame rate as you need.

Step 4: Click “Convert” button on the bottom of the screen to start 4K MP4 to AIC MOV conversion process. The amount of time it takes will vary based on your system’s hardware and the quality settings you selected.

Conclusion: When the conversion is done, you can click “Open” to get your generated files. Now, you can edit DMC-G7 4K files in iMovie/FCE without any hassles.

Further Reading:

Thursday, June 18, 2015

Import DJI Phantom 2 Vision+ Video to Magix Video Pro X for Editing

Summary: With the Phantom 2 Vision+, you can records MP4 formats, but most users may find a problem when converting DJI Phantom 2 Vision+ MP4 to Magix Video Pro X for editing. These MP4 files are clunky to edit requiring much rendering when in a Magix Video Pro X timeline.


As we know, MP4 is widely used for saving media datum. And it can be found in lots of places, such as camcorders (GoPro/Sony or other camcorders), websites (YouTube/Fox or other Video websites) and even the newly aerial apparatus like DJI Phantom 2 Vision+. It is a common video format for users to share.

Although MP4 is in the supported file formats of Magix Video Pro X, sometimes, you will find it's not easy to import MP4 to Magix Video Pro X for editing. There are some video or audio codec problems when you try to use a MP4 file in Magix Video Pro even with the latest version. Actually, this is due to the MP4 files codec: Magix Video Pro X only accept MPEG-4 codec instead of others. While, MP4 is a container format which hold various video and audio codecs and that's why you will encounter problems when you attempt to edit MP4 videos in Magix Video Pro X.

Afterwards, when you got a pile of MP4 files from different source, there’s no luck Magix Video Pro X can support all of your MP4 media. To fix the problem, you can try to install MP4 codecs for Magix Video Pro X. If the method does not work, there is also an easy way to fix the issue. The easy option is to convert DJI Phantom 2 Vision+ H.264 MP4 to Magix Video Pro X supported file format like MPEG-4 MP4. Actually, it's not as difficult as you imagine. What's need is just a common video converter like Pavtube Video Converter, which can help you transcode H.264 MP4 to MPEG-4 MP4 with maximum editing quality and efficiency when working with Magix Video Pro X under Windows operating system.


Several simple clicks to convert DJI Phantom 2 Vision+ video to Magix Video Pro X:

Step 1: Download and follow the prompts to install the program. When the installation is complete, the best DJI Phantom 2 Vision+ MP4 Converter will launch automatically.

Step 2: Click “Add video” button to load DJI Phantom 2 Vision+ H.264 MP4 recordings or directly drag the files into file list. By default, the files are selected. You can delete files which you don’t want to import to.


Step 3: Click “Format” bar to determine output format. For best image quality, click the format bar and choose “HD Video>>MPEG-4 HD Video (*.mp4)” as output format.


Step 4: Click “Settings” button to customize the output video and audio settings by yourself. But if you are not good at it, you’d better use the default parameters, they will ensure you a good balance between file size and image quality basically. You can change the resolution, bit rate, frame rate as you need.

Step 5: You can preview to check the final result. Once you are satisfied with it, click the “Convert” button to start converting DJI Phantom 2 Vision+ H.264 MP4 to MPEG-4 MP4 for editing in Magix Video Pro X flawlessly. It will take you a little while.

Conclusion: Once the conversion process is complete, you can click “Open Folder” button to get the generated files for editing DJI Phantom 2 Vision+ H.264 MP4 in  Magix Video Pro X with optimum performance. Good news about Father’s Day event! Why not seize the chance to buy fantastic goods with attractive price?

Further Reading:

Tuesday, June 16, 2015

Tips of Importing Canon C100 MTS to Premiere/Sony Vegas

Summary: How to import Canon C100 MTS to Premiere/Sony Vegas? There’s no native way to do this—and I’ll give an alternative method to import MTS from C100 to Premiere/Sony Vegas for editing without any loss.


There is a well documented bug with editing long AVCHD clips in Premiere/Sony Vegas. One of the affected camera is the C100. Adobe acknowledged the existence the bug some time ago and although they final announced that they are committed to fixing the bug. However, it’s still painful experience for C100 owners who want to edit Canon C100 MTS footage in Premiere Pro, as so many issues still exist.

Q: “I just installed the new updates and tried to start a new project in Premiere CC and import MTS files. I get an error message saying ‘The file has an unsupported compression type.’ I’m really excited about all the new features in this update and want to be able to use them for work but right now I'm super disappointed.”

Sometimes, if you are currently using an older version of the Adobe (for instance prior to Adobe version CS5), maybe an upgrade of the Adobe version could help. Still stuck with unsuccessful attempts? Perhaps there is some required codec missing or it is an incompatible video file format.

Actually, it’s not so hard to do the trick. Why we always have trouble editing because Premiere Pro still cannot accept all codecs contained in an MTS file to go natively. From Adobe Premiere Pro supported file formats list, you may get some clues about how to successfully import C100 MTS to Premiere. There is no doubt to convert MTS to MPEG-2, which is best accepted by Premiere as well as Sony Vegas. Read related posts about the MTS to Premiere/Sony Vegas issue, some guys recommend the Media Browser, so I tried that instead of dragging MTS files into Adobe Premiere. Unfortunately it still does not work. To get rid of the issue, transcoding MTS files to Premiere/Sony Vegas from C100 is recommended an efficient and ultimate workaround. Here you can depend on Pavtube MTS/M2TS Converter, an easy-to-use yet powerful high-quality MTS converter, player and editor under Windows operation system.


How to import C100 MTS to Premiere/Sony Vegas for editing?

Step 1: Download MTS/M2TS Converter, and follow the prompts to install the program. When the installation is complete, the best program will launch automatically.

Step 2: Click “Add video” button to load C100 MTS files or directly drag the files into file list. By default, the files are selected. You can delete files which you don’t want to import to.


Step 3: Click “Format” bar to determine output format. For best image quality, click the format bar and choose “Adobe Premiere/Sony Vegas>>MPEG-2 (*.mpg)” as output format.


Step 4: Click “Convert” button to start to convert C100 MTS to MPEG-2 MPG format. After conversion, import the converted MTS videos to Premiere/Sony Vegas for real time editing and mastering.

Conclusion: You can set auto shutdown in progress window or leave it there and come back later. There is no more difficulty in editing C100 MTS in Premiere and Sony Vegas.

Further Reading:

Friday, June 12, 2015

How to Import Panasonic AG-DVX200 4K to FCP 7/X for Editing?

Summary: Learn from this article, you can easily convert and import Panasonic AG-DVX200 4K footage to Final Cut Pro 7/X for further editing on Mac OS X (Yosemite and Mavericks included).


Panasonic AG-DVX200 is a hot 4K hand held camcorder announced this year. Are you planning to get one? Well, before buying one, some guys are eager to know the Panasonic AG-DVX200 4K to FCP workflow so as to have a smooth post production on Mac OS X Yosemite.

Panasonic AG-DVX200 captures 4K videos in MP4/MOV format. Based on our testing, when transfer Panasonic AG-DVX200 4K video to FCP, the importing issues always occurred. Although it has been possible to create 4K timelines in Final Cut Pro X, smooth editing of 4K footage in FCP X still requires instant playback of more than one stream of video footage at once.

The basic reason is that although FCP X 10.1. has been updated for the next-generation architecture in the new Mac Pro, providing unprecedented performance when editing and monitoring 4K video. Final Cut Pro X natively supports 4K ProRes, Sony XAVC and REDCODE RAW. However, the old version FCP X or Final Cut Pro 6/7 like many editors use 1080p as primary delivery format and will continue to do so for a long time. And the MP4/MOV video from Panasonic DVX200 seems to beyond the format compatibility of Final Cut Pro.

To make it easier for editing Panasonic AG-DVX200 4K MP4/MOV in FCP 7/X, you’d better to convert 4K to Apple ProRes first, as it is the best codec for Final Cut Pro editing. There are numbered tools and utilities can convert and compress the ultra HD videos, few of them can process at a fast speed. Pavtube Video Converter for Mac is considered to be the best 4K video converting tool. It can help you to convert Panasonic AG-DVX200 4K MP4/MOV to FCP, iMovieAdobe Premiere ProAvid Media Composer and more editing programs compatible format like Apple ProRes, Apple InterMediate Codec, MPEG-2, DNxHD, etc.


How to import Panasonic AG-DVX200 4K to FCP 7/X for editing?

Step 1: Download and have a quick installation. The trial version will have a watermark on your converted files. Except for that, there are no time limitation, no virus, and no unnecessary bundle apps while downloading. After that, click “Add Video” button to load your 4K files. You can load several files at once thanks to “Add from folder” button.


Step 2: Click the “Format” bar to get the drop-down menu and you can get “Final Cut Pro”. Choose “Apple ProRes 422 (*.mov)” as output format.


Step 3: It’s optional to edit video files before converting. If you want to do some edit work, just hit the clip first, and then click “Edit selected task” button. As it’s shown to us, the edit function is sufficient for you to make your videos wonderful.

Step 4: Click “Convert” button on the bottom of the screen to start 4K files to ProRes 422 MOV conversion process. The amount of time it takes will vary based on your system’s hardware and the quality settings you selected.

Conclusion: When the conversion is done, you can click “Open” button to get the generated video files. Now, you can edit Panasonic AG-DVX200 4K files in FCP 7/X freely.

Further Reading:

Monday, June 8, 2015

Edit Panasonic DMC-G7 4K MP4 in Premiere Pro on Mac

Summary: If for whatever reason you need to convert Panasonic DMC-G7 4K MP4 footage for editing in NLEs such as Premiere Pro, you may wish to read this post. It introduces a simple and small app to transcode DMC-G7 4K MP4 video to an intermediate codec that is suitable for use in Premiere Pro.


Panasonic has introduced the G7 to replace the G6, and it sits just below the Panasonic GH4–but alongside the GX7. That's a lot of G numbers, but basically, the G7 is the company's mid-range compact system camera. Formerly the preserve of professional filmmakers and photographers, LUMIX G7 is opening up the world of 4K to everyone. Whether you're making movie memories to last a lifetime, or taking amazing stills from your 4K footage, the G7 is changing photography, for good.

With Panasonic Lumix DMC-G7, you can record 4K MP4 video and Full HD AVCHD video easily. 4K footage looks amazing but if you don’t have a fast computer with a high end RAM and speedy processor it can make video editing a real nightmare. Your computer may freeze or crash when editing G7 4K MP4 in Premiere Pro.

As far as we know, the latest version Premiere Pro CS6, CC usually can handle 4K files without much problem, but it is extremely hardware intensive. What's more, the older version Premiere Pro CS4/CS5 are not able to support 4K video. Thus, you can't get a flawless 4K workflow in most cases.

Thankfully you probably don’t have to buy a new computer, but you do need to convert G7 4K MP4 to a format that is suitable for use in Premiere. The process is surprisingly easy and can be done with the help of Pavtube Video Converter for Mac. With it, you can effortlessly encode/re-encode Panasonic G7 4K MP4 footage for smoothly importing and editing in various non-linear editing systems, including Adobe Premiere Pro, Avid Media ComposerFinal Cut ProiMovie, FCE and more. If you work Panasonic G7 4K MP4 files in Premiere Pro on Windows, please get Pavtube Video Converter.


How to edit Panasonic DMC-G7 4K MP4 in Premiere Pro on Mac?

Step 1: Download and have a quick installation. The trial version will have a watermark on your converted files. Except for that, there are no time limitation, no virus, and no unnecessary bundle apps while downloading. After that, click “Add Video” button to load your 4K MP4 files. You can load several files at once thanks to “Add from folder” button.


Step 2: Click the “Format” bar to get the drop-down menu and you can get “Adobe Premiere/Sony Vegas”. Choose “MPEG-2 (*.mpg)” as output format.


Step 3: It’s optional to edit video files before converting. If you want to do some edit work, just hit the clip first, and then click “Edit selected task” button. As it’s shown to us, the edit function is sufficient for you to make your videos wonderful.

Step 4: Click “Convert” button on the bottom of the screen to start 4K MP4 to MPEG-2 MPG conversion process. The amount of time it takes will vary based on your system’s hardware and the quality settings you selected.

Conclusion: When the conversion is done, you can click “Open” button to get the generated video files. Now, you can edit Panasonic DMC-G7 4K MP4 in Premiere Pro freely. If you think this article is helpful, you can share it with your friend.

Further Reading:

Friday, June 5, 2015

Edit DJI Phantom 2 Vision+ Video in Final Cut Studio

Summary: With the Phantom 2 Vision+, you can records 1080p H.264 MP4 formats, but most users may find a problem when importing DJI Phantom 2 Vision+ H.264 MP4 to Final Cut Studio for editing.


Final Cut Studio is a professional video and audio production suite for Mac OS X from Apple Inc., and a direct competitor to Avid Media Composer in the high-end movie production industry. The suite was discontinued in 2011, and three of its primary applications - Final Cut Pro X, Motion, and Compressor - continue to be developed and were made available as separate applications for purchase through the Mac App Store.

Question: Does anyone know of a plugin for Final Cut Studio or a standalone editing application (Mac based) for H.264 MP4 files? It seems that is the standard and most recommended method for working with MP4 HD camera footage.

MP4: These files are compressed using H.264/MPEG-4 codec which is a final delivery codec not use for editing.

MPEG-4: It is an instance of the more general ISO/IEC 14496-12:2004 which is directly based upon the QuickTime File Format. MP4 (MPEG-4 Part 14) is a digital multimedia format most commonly used to store video and audio, but can also be used to store other data such as subtitles and still images.

From a further learning of MPEG-4 and H.264 and in order to smoothly edit the H.264 files in Final Cut Studio, we here can share this professional H.264 MP4 to Final Cut Studio converter- Pavtube HD Video Converter for Mac for all Mac users. Yes, we can use Log and Transfer or Log and Capture to import H.264 MP4 to Final Cut Studio for editing, but don’t expect it to result in top quality. So, we’re suggested to convert H.264 MP4 to Final Cut Studio best accepted ProRes codec with the help of third-party software. The one used here can meet your demands with its simple interface but rich functions.


How to import DJI Phantom 2 Vision+ Video to Final Cut Studio for editing?

Step 1: Download and have a quick installation. The trial version will have a watermark on your converted files. Except for that, there are no time limitation, no virus, and no unnecessary bundle apps while downloading. After that, click “Add Video” button to load DJI Phantom 2 Vision+ H.264 MP4 videos. You can load several files at once thanks to “Add from folder” button.


Step 2: Here, you need to choose what you want the output to be. Click “Format” drop-down list, and then select “Final Cut Pro>>Apple ProRes 422 (*.mov)” as the best output format.


Step 3: Click “Settings” button to customize the output video and audio settings by yourself. But if you are not good at it, you’d better use the default parameters, they will ensure you a good balance between file size and image quality basically. You can change the resolution, bit rate, frame rate as you need.

Step 4: When everything is done, you can take a preview by hitting “Play” button. If you are satisfied with the final result, you can click “Convert” button to finish the conversion work.

Conclusion: When the conversion is done, you can click “Open” to get your generated files. Now, you can edit DJI Phantom 2 Vision+ H.264 MP4 in Final Cut Studio without any hassles.

Further Reading:

Monday, June 1, 2015

Convert Sony EX3 MP4 to Avid Media Composer

Summary: If you have problems for importing and editing EX3 MP4 video clips in Avid Media Composer, you can follow this simple tutorial to convert Sony EX3 MP4 to DNxHD for Avid MC.


When you got a Sony PMW-EX3, you can easily shot some MP4 footage. Then you would probably expressed concern about how to use the MP4 footage that is recorded to SxS cards on the Sony PMW-EX3 camera. Since there are users complained that Avid Media Composer doesn’t work with Sony EX3 MP4 natively, I will share two easy solutions in the following part.

Solution 1: In usual, we can use Avid Media Access (AMA) to directly link with Sony XDCAM HD, XDCAM EX videos. So just link your Sony EX3 XDCAM EX MP4 files to Avid Media Composer via AMA.

Cons: Based on own experience and other users feedback, XDCAM AMA plugin for Avid MC 7 is not available. If you want to edit XDCAM EX in Avid MC 7, you need an alternative way.

Solution 2: Since AMA Plugin is not workable in Avid Media Composer 7, to have a smooth Sony EX3 MP4 to Avid MC 7 workflow, an alternative solution is to transcode Sony XDCAM to DNxHD, Avid Media Composer (5/5.5/6/6.5/7) most compatible format.

Cons: It needs third-party software to convert Sony EX3 XDCAM media.

Well, if you don’t mind it and yearn for a smooth workflow, you can try this way anyhow. I got a big success in this try. Pavtube Video Converter for Mac can be of great help in this task. With it, you can effortlessly transcode EX3 MP4 files to DNxHD encoded MOV for Media Composer 5/5.5/6/6.5/7, and it works well and converts flawlessly. Meanwhile, the Mac Video Conversion tool can create files compatible with various non-linear editing systems like FCP, FCE, iMovie, and Adobe Premiere (Pro), etc. If you are running on Windows, get Pavtube Video Converter. Now, just download the program and achieve your goal smoothly.

Mac download & buy:


Windows download & buy:


More details are allowed here for you to take the advice:

Step 1: Download and install the corresponding version. Click “Add video” on the main interface to load MP4 files to the program. You can also drag the files to the program’s window list directly. This program can also support the batch video clips.


Step 2: Select the right formats for editing in Avid MC. Here we suggest you to go to the “Avid Media Composer” list, you will get the “Avid DNxHD (*.mov)” as the best output.


Step 3: Wanna compress your MP4 videos? Well, in the “Settings” button, you can adjust video and audio settings, including codec, bit rate, frame rate, sample rate, and audio channel.

Step 4: With all the preparations work done? Why not go back to the main interface to click the “Convert” button to get the work started?

Conclusion: Once the conversion is finished, click “Open” to quickly find the converted files. Then, Avid Media Composer will recognize, catalog, play and stream them just fine. You can edit Sony EX3 MP4 in Avid MC flawlessly.

Further Reading: