Showing posts with label Apple. Show all posts

Thursday, December 18, 2014

Troubled in Adding MP4 to iTunes library? Here We Go!

Why our MP4 files failed in adding to iTunes library? In the following page we can learn more details on how to change the different MP4 codec and make them accepted well with iTunes library.


Generally speaking, for most Mac users, they only know that MP4 may be the most compatible format for iTunes or some other Mac devices such like iPad, iPhone, etc. What they didn’t know much is the hot extension, MP4 if encoded by different codec, they also will be failed when importing to iTunes, upload on YouTube, or edit in  FCP do you know? This is exactly the reason why we usually cannot add MP4 files in iTunes.

Expand knowledge of MP4 format could be allowed here: MP4 is widely used for saving media data and can be found in lots of places online or off line, which means, you may download MP4 videos from video sharing sites such as YouTube and Fox, or shared some MP4 videos from others. But the problem with MP4 is, when you plan to add MP4 videos to iTunes library, you may be able to do this, but may be unable to. That why we have the first topic above.

iTunes supported file specifications are listed below:


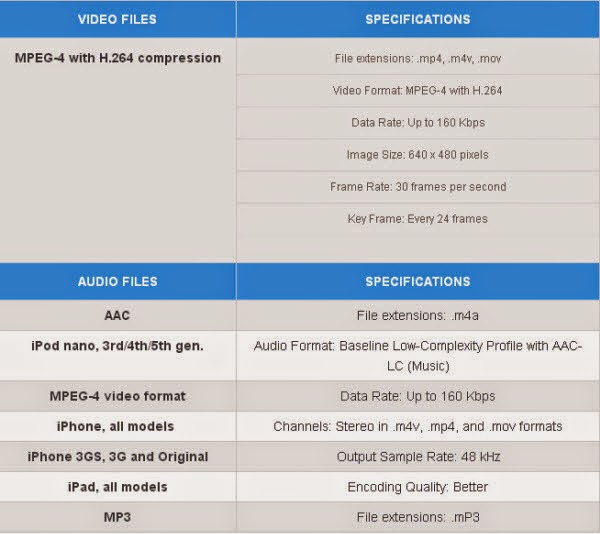
What could we do to solve such problems? Well, iTunes surely can recognize the MP4 videos but only in the condition of compressing with the supported codec like MPEG-4 or H.264. So here we can make this situation clearly, how about encode the incompatible MP4 to the suitable codec like MPEG-4 or H.264? A MP4 to iTunes Converter could help you out of this situation.

First you need to download, install the great Pavtube Video Converter for Mac(Windows version) correctly according to the right instructions. What I have to mention here is this MP4 to iTunes video converter has optimized presets to let you set output format both compatible with iTunes but also with your corresponding Apple device. Besides, you can just edit your MP4 video to make your own movie by trimming, adding effects, adding subtitle, etc. Below are the steps on how to convert and import MP4 videos to iTunes library with ease.

Let’s convert MP4 files to the compatible iTunes MP4 codec:
  
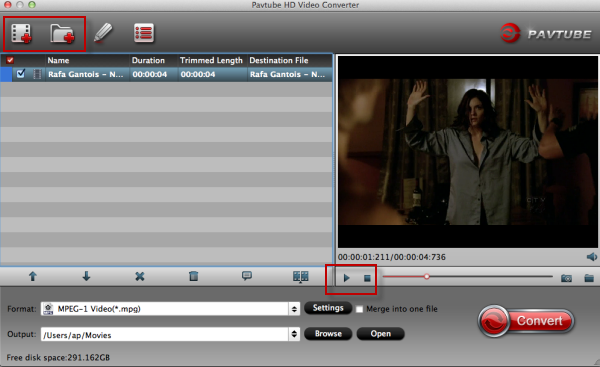
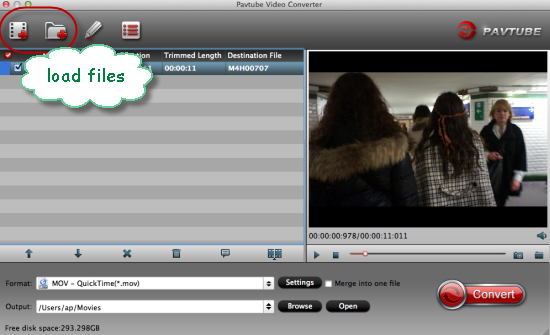
Simply drag-and-drop your MP4 video to the program window or click “Add Video” button to load MP4 files. This MP4 to iTunes Converter supports batch conversion to import multiple files at a time. Additionally, with the ‘Merge into one file’ button, we can easily combine our video clips into one.


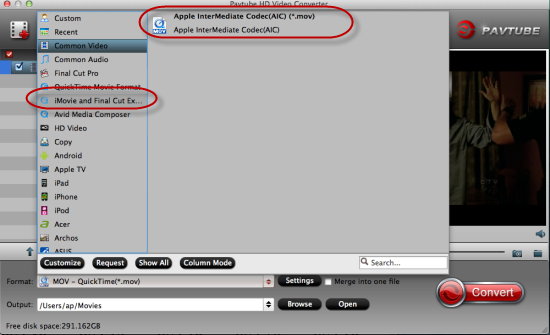
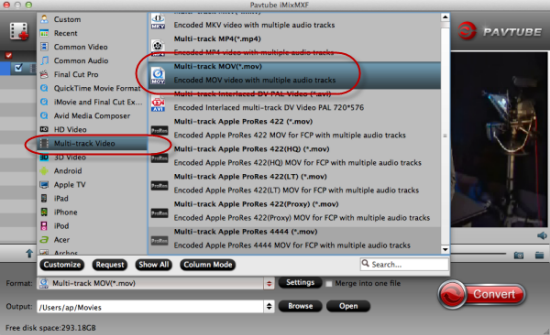
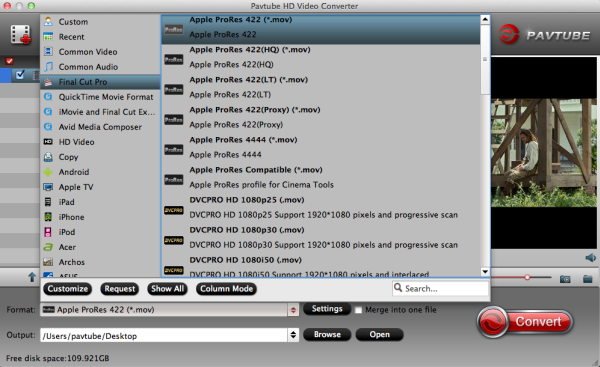
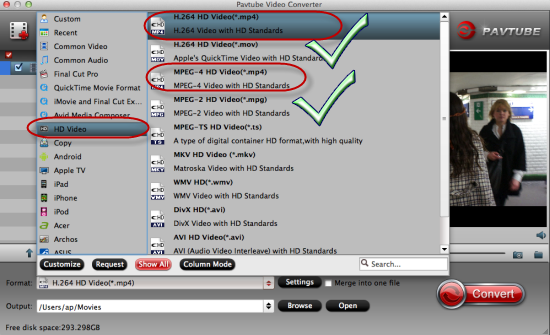
In order to click the supported MP4 codec for iTunes library, let’s come to the otput list to pick one best. For iTunes? Just click the ‘HD Video’ item, two guys there both you can choose as the best. ‘HD Video H.264(*.mp4)’and ‘MPEG-4 HD Video(*.mp4)’ are available. Look as the following screen shots.


Finally, when all the settings are in place, you can press the Convert button to start the process of converting MP4 to iTunes. After doing this, the program will complete the necessary tasks and you can watch the conversion progress to know when the process ends.

As usual, when you get the compatible format for iTunes, you should launch the iTunes and click ‘File’ > ‘Add Files’ to Library to add the converted MP4 files to iTunes library. After that, you can play the MP4 files in iTunes smoothly or sync them to your iPhone, iPad, iPod, etc. for playing on the go.

More guides:

Wednesday, December 17, 2014

Good Advice on Playing MKV on Mac with QuickTime or iTunes?

If you have no ideas on how to watch your MKV files on Mac with QuickTime or iTunes, why not move on to know more details below. Several main solutions are offered below which we can take as reference for watching MKV movies smoothly on Mac.

When you tried to open WMV files on your Mac QuickTime, something wrong would happen there along the lines of ‘This is not a movie file’ This gets really annoying if you come across a MKV files for a playback on Mac, right? As an open source container format developed by Matroska, MKV can hold different types and unlimited number of video, audio, picture or subtitle tracks in one file. However, it is not associated with the QuickTime player or some other NELs. Or even enjoy MKV movies on Apple TV? Fortunately, some good solutions are offered here:


Solution1.Perian---A nice plugin for playing MKV on QuickTime

Perian is a free, open source QuickTime component that adds native support for many popular video formats like the MKV. When you’ve had Perian installed, you have to quit QuickTime completely and then restart it. Note that you don’t just close the QuickTime Window; in fact, it’s still running in the background. To do this, QuickTime can update its format and encoding library.

Note: If the Perian plugin is no longer working in your Mountain lion or Mavericks, there is another doable workaround. You can take this article for a reference about how to watch MKV on Mac Yosemite and Maverricks.

Solution 2.VLC Media Player---Play MKV well on Mac
As one of the best free MKV players on Mac,  it can also play various other regular video/audio formats, including AVI, WMV, MP4, MOV, FLV, MPEG, etc. and even DVDs and CDs. With it, you don’t need to install any codecs or filters to play MKV videos on Mac


Solution 3. MPlayer OS X---Handle MKV files well
Media Player Classic is another great free MKV video player for all the Mac users. This player emerged out of the Google Codes project as an attempt to create an all-round player. MPlayer OSX is a simple but powerful video player designed specifically for Mac and can handle MKV playback. 

To play MKV files with it, you need to first install the updated Matroska Pack: run Media Player Classic and click View > Options to disable Matroska and then install the latest Pack. After that, you can add the MKV videos to it and start playing them on your Mac without any troubles. In addition to MKV, MPlayer OS X can also play AVI, MOV, RM, MPEG, DVD, etc. files.


Another Popular Solution: Pavtube Video Converter for Mac
If you don’t want to install so many different media players on Mac, have you ever thought of converting your MKV files to MOV or MP4 as the compatible formats for QuickTime or iTunes? This program can easily help you convert MKV to MOV,MP4, M4V, AVI, WMV, ASF, FLV, etc. popular video formats on Mac while keeping the video quality. After the conversion, you ca easily play MKV using QuickTime on Mac for another way.

Free download and install this program with general ways. Open it and when the main interface pops up there, just click the ‘Add video’ and ‘Add from folder’, we can easily import out original MKV files. For QuickTime, we can choose the ‘Common Video’>>’MOV QuickTime (*.mov)’ as the best one.


While for iTunes, maybe we should change with another way, as we all know iTunes supports the MP4 for the best as we here suggest the ‘HD Video’>>’H.264 HD Video (*.mp4) to be the most suitable one.


Of course you can here click the ‘Convert’ button to get your work started or we can also take around the ‘Settings’ or ‘Edit’ for advanced adjustments. Additionally, if you have no ideas on how to import files to iTunes, here we have the related guide offered for you.

For more?

Friday, December 12, 2014

Nicely Edit Panasonic HC-X920 AVCHD in iMovie

Follow this guide below you will get to know the MTS to iMovie solution. Now keep on reading the info about how to convert Panasonic HC-X920 AVCHD to iMovie for editing without rendering.

Edit Panasonic HC-X920 AVCHD in iMovie

I recently bought iMovie to konw if my Panasonic x920 is compatible with it. I tried importing all my .mts files but iMovie cannot recognize this kind of file. We are wondering if anything simple workflow to help with this? This is a question that many AVCHD users may meet, why does it happens? The problem lies in the unsupported codec. AVCHD is a non-standard format that most NLE cannot accept. So in order to get theses Full HD AVCHD files from Panasonic HC-X920 to perfectly work with iMovie, we need to convert Panasonic AVCHD to iMovie native and preferred format like AIC .mov. 

I tested one MTS/M2TS Converter for Mac on the market with a single AVCHD .MTS clip from my Panasonic X920 Camcorder. The transcoding appeared to work fine. However, once I batch processed a number of clips together (about 3.5GB in total size), the resulting transcoded footage was choppy and not as good as the original sample I had tested.

While looking for the most reliable AVCHD converting tool to transcode HC-X920 recorded AVCHD videos to edit in iMovie, I find this Mac Panasonic AVCHD to iMovie Converter from Pavtube Studio, with which you are able to convert Panasonic HC-X920 AVCHD to AIC codec quickly, and easily make HC-X920 HD camcorder AVCHD video footage editable on iMovie on Mac. Below is a simple instruction for you to import and edit Panasonic HC-X920 MTS to iMovie on Mac. For those 3D lovers, do you want to change 3D MTS movies for playback?

See Also:
Free Mac MTS/M2TS Converter in App Store with FIVE stars

How to Transcode Panasonic HC-X920 AVCHD to iMovie for editing without rendering?
  
Step 1. Import HC-X920 MTS/M2TS files.
  
Click the add button to import the AVCHD resource files from X920 to Pavtube MTS/M2TS converter for Mac. Then the files will be listed on the file list tab, you can choose to check the properties of the video or preview it.

Pavtube MTS/M2TS converter for Mac

Step 2. Choose suitable output format for HC-X920 AVCHD to AIC conversion.
  
Click the format bar, and there will bemany output formats on the format list. You are recommended to choose "iMovie and Final Cut Express > Apple Intermediate Codec (AIC) (*.mov)".

Transcode HC-X920 AVCHD to AIC

Step 3. Convert Panasonic HC-X920 AVCHD video footages to iMovie.
  
Click the "Convert" button and start to transcode Panasonic HC-X920 AVCHD MTS/M2TS footage to AIC for iMovie.

When the conversion finished, you candirectly import the output AIC MOV files to iMovie for editing and make your movies. The importing needn’t any rendering because the AIC MOV isone of the compatible video formats in iMovie on Mac.

Related gudie:

Thursday, December 11, 2014

Edit Nikon D5300 H.264 Footage in iMovie with AIC MOV Format

In this guide, you will learn how to import and edit Nikon D5300 recorded H.264 mov footages in iMovie smoothly on Mac by transcoding Nikon D5300 videos to iMovie AIC .mov friendly format.

Nikon D5300 is a mid-range model, designed for consumers looking for an everyday interchangeable-lens camera with good performance and solid image quality. The D5300 is Nikon’s first DSLR with built-in WiFi. Incredible color. Incredible detail. When it comes to preserving your most unforgetable memories, the D5300 delivers both.


The video will be recorded into MOV format as your required frame sizes and frame rates: 1920×1080, 60p (progressive)/50p/30p/25p/24p; 1280 x 720, 60p/50p; 640 x 424, 30p/25p. Can't find your cherished h.264 mov videos from Nikon D5300 when editing in iMovie?

Never mind, now with the best Nikon H.264 MOV Converter for Mac, you can convert/transcode Nikon D5300 MOV to a compatible format for iMovie on mac quickly and easily. After installing the first-class Nikon MOV to iMovie Converter on your mac, all the editing issues with Nikon D5300 mov footage and iMovie will be solved!
Step-by-step guide to learn how to convert Nikon D5300 1080p MOV to AIC for iMovie

Step 1. Download and install the Nikon MOV to iMovie converter on your Mac. Launch it and import your Nikon D5300 clips into it.


Step 2. Choose AIC as output for iMovie. Click on "Format > iMovie and Final Cut Express > Apple InterMediate Codec (AIC) (*.mov)" format.


Step 3. Click on Settings to adjust audio and video parameters including video size, video frame rate, bitrate, sample rate, audio channel. (Optional)

Step 4. Start transcoding Nikon D5300 h.264 MOV to AIC by clicking on "Convert" button.

After the conversion is done, you can easily import and use h.264 mov footage from Nikon D5300 into iMovie. This is the quick and easy Solution to Solve iMovie Won't Import Nikon D5300 MOV Problem (Lion and OS X Mavericks included). Hope this article helps!

Related guide:

Tuesday, December 9, 2014

Transcode Canon XF200 MXF to MOV for Editing in iMovie and FCE

In this article, you will get to know how to transcode Canon XF200 MXF videos to MOV for iMovie/FCE editing with keeping multi aduio channels on Mac

Further building upon the successful features of the XF105 and XF100 Professional Camcorders, the Canon XF205 and XF200 Professional Camcorders support two recording formats – MXF, a file format used by broadcast stations, and MP4, which offers high versatility through its compatibility with various viewing and content providers such as web browsers and television news outlets.


Have you got one? According to test,problems are coming up when we import the Canon XF200 MXF files into iMovie or FCE for editing on Mac. So This article is mainly to solve the Canon XF200 recordings to iMovie/FCE importing problems, meanwhile, we will give you the way for converting MXF to iMovie/FCE supported mov format with best video quality as well as preserving the original multi audio channels.

Software that can help: 

Here recommend you to try 
iMixMXF. I think it's much easier for me. It can not only convert Canon XF200 MXF to iMovie/FCE best editing MOV format, FCP supported Prores MOV format, Avid MC, Premiere Pro, etc., but also has unique multi-track preserving feature. Becides, it can get your MXF footage deinterlaced by default.

For guys who may find it difficult to import and edit Canon XF200 MXF files in iMovie/FCE with keeping multi audio channels, here is the fast guide to mix and convert Canon XF200 multi audio channels MXF to MOV for iMovie/FCE.

See Also:
Top MXF Converter for Mac Review
Importing JVC GY-HM650U MXF Files to iMovie

How to transcode Canon XF200 MXF to AIC MOV for iMovie/FCE editing? 

Step 1. Get this multi-track MXF Converter for Mac installed, click 'Add Video' to load individual mxf videos; or click 'Add from folder' to load the entire folder. It will recognize all the audio channels.

Step 2. Click "Format" and choose Multi-track Video>Multi-track MOV(*.mov) for natively editing in iMovie/FCE.


Tip 1. Click "Settings" to customize your video size, bitrate, frame rate and other specs; and check video channels that you want to keep.

Follow the bottom left icon to "mix into one channel"; or that it will keep all the audio tracks apart.


Tip2: Your Canon XF200 1080i MXF files is deinterlaced for iMovie/FCE by default, you needn't to do any operation to get it done.

Step 4. Click "Convert" to start converting Canon XF200 multi audio channels MXF to MOV saving multi audio channels for iMovie/FCE editing.

You can also follow this guide to learn more How to Import Media Files to iMovie.

Tips: For users don't need to deal with multi-track thing, just simple want to convert MXF to other formats, the MXF Converter for Mac ($29) is highly recommended.

Read More: 

No Methods of Importing JVC GY-HM650U MXF Files to iMovie?

This guide will show you how to easily convert and import JVC GY-HM650U ProHD MXF footage into iMovie for further editing on Mac (OS X 10.9 Mavericks included).

Import JVC GY-HM650U MXF Files to iMovie

"I have a JVC GY-HM650U ProHD camcorder that records .MXF video format, now I would like to import these projects to iMovie for editing. What I want is to edit MXF files smoothly without codec problems, what video codec should I use? Can you recommend some software which can help me import and convert JVC MXF to iMovie smoothly?"

Everything goes perfect until you try to edit JVC GY-HM650U .mxf file in iMovie. Fail in import the MXF file into iMovie as iMovie can't recognize this file. Why does it happen? The answer is MXF file format incompatibility with iMovie (even iMovie'11). For a further editing MCF files in iMovie on Mac, here are some effective ways 

As far as I know, in order to edit JVC GY-HM650U ProHD MXF files in iMovie flawlessly, the best best method is to convert Panasonic MXF to Apple InterMediate Codec (AIC) which is a best editing codec for iMovie.

At first, you need 3rd-party tool- Pavtube MXF Converter for Mac

It is a professional MXF to iMovie Converter which can not only convert JVC GY-HM650U ProHD recorded MXF files to AIC for iMovie editing on Mac OS X Mavericks, but also provide simple video editing functions for you. This Mac MXF Converter is especially designed for converting Panasonic P2 MXF, Sony XDCAM MXF, Canon XF MXF files for editing in Final Cut Pro X, Final Cut Express, iMovie, Avid, Adobe Premiere etc. Below is how.

Guide - Encode JVC GY-HM650U ProHD MXF to AIC MOV for iMovie editing on Yosemite/Mavericks

Step 1. Import MXF files from JVC GY-HM650U to the top MXF to iMovie Converter for Mac.

(Note: Before conversion, you need to transfer MXF files from your JVC GY-HM650U to Mac Hard Drive, then click the "add" button to browse to import MXF videos. This MXF Converter for Mac support batch conversion)


Step 2. Click the Format bar, and move mouse cursor to "iMovie and Final Cut Express -> Apple InterMediate Codec (AIC) (*.mov)", it's the best format for editing in iMovie.


Step 3. Click "Convert" button to start transcoding JVC GY-HM650U ProHD MXF files to AIC Codec for iMovie under Mac OS X 10.9 Mavericks.

iMovie Importing: How to import video files or projects to iMovie?

Some more helpful features of the app:

1. Settings- click to set video resolution(1920×1080/1440×1080/1280×720/720×480), bitrate(from 1Mbps to 20Mbps), frame rate (24p/30p)

2. Editor (next to "Add" icon)- click to set deinterlace, denoise, mute, volume up, trim, crop, etc.

So there you have it. Pretty simple. After the workflow, you can go to the output folder to find the converted video files. Now you are free to start importing/editing JVC GY-HM650U ProHD MXF files in iMovie under Maveircks without problems.

Tips: 

If your videos files have more than two audio channels, and you want to convert to MOV file with all multiple audio tracks preservation, Pavtube iMixMXF can help you to get it done. With it you are allowed to preserve all or any audio tracks for output MOV and mix the multiple audio tracks into one if you need.

Read more guides:

Monday, December 8, 2014

Easily Edit Canon PowerShot G1 X Mark II 1080p MP4 in FCP X

This guide is applied to solve the problem importing and editing Canon PowerShot G1 X Mark II 1080p MP4 videos in FCP X on Mac

With the 'Mark II' version of the PowerShot G1 X, Canon has addressed many of the shortcomings of its predecessor. For a start, the G1 X II has a faster lens that covers a wider focal range and can shoot much closer to a subject. With G1 X Mark II, you can get 1080/30p video recordings in MP4 format.

Edit Canon PowerShot G1 X Mark II 1080p MP4  in FCP X

If you like sharing your video on YouTube, Google, Facebook etc., maybe you need edit Canon PowerShot G1 X Mark II MP4 in FCP X on Mac in advance. This guide will share a Canon G1 X Mark II video solution with you which enable you import and edit Canon PowerShot G1 X Mark II MP4 video in FCP X without any problem on Mac.

In order to edit Canon G1 X II MP4 clips in FCP X without crashing problem and avoid rendering, you’d better transcode the Canon MP4 footages to FCP X native format, say, ProRes codec mov format.

How to Import Canon PowerShot G1 X Mark II MP4 to FCP X for editing?

Pavtube’s HD Video Converter for Mac – a top Canon Video Converter for Mac.

The Mac Canon Video to FCP Converter is an easy to use yet professional which can not only transcode Canon PowerShot G1 X Mark II MP4 videos to Prores codec for Mac editing, but also provide simple video editing functions for you. Besides, the program can also convert HD videos from HD camcorders or DVs (like JVC, Panasonic, Sony and Cannon) for editing in Final Cut Pro 6/7, Final Cut Express, iMovie, Avid, Adobe Premiere, After Effects, Premiere Elements, Aperture 3, DaVinci Resolve 9, iPhoto, Kdenlive, Keynote, etc. Below is how.


Steps for Transcoding Canon PowerShot G1 X Mark II MP4 footage to use in FCP X

Step 1. Import Canon PowerShot G1 X Mark II MP4 videos to the best Mac Canon Video Converter for FCP X.


Step 2. Select to rewrap your mts files to "Apple Prores 422(*.mov)" or "Apple Prores 422(HQ)(*.mov)" to work fine with FCP X.


Learn more Apple ProRes, please refer to Types of Apple ProRes Codecs

Tips: You can click on Settings to adjust audio and video parameters including video size, video frame rate, bitrate, sample rate, audio channel.

Step 3. Click “Convert” button to start transcoding Canon PowerShot G1 X Mark II MP4 files to ProRes .mov for FCP X under Mac OS.

After a shot conversion, you will be able to import MP4 videos into FCP X for editing without rendering. Now issues with importing PowerShot G1 X Mark II 1080p MP4 videos in FCP X is solved!

Read More Guides: