Summary: Some users complain that “My attempts at uploading OBS FLV video to YouTube/Vimeo fail during processing.” It’s obvious that import OBS FLV video to YouTube/Vimeo may cause some issues.
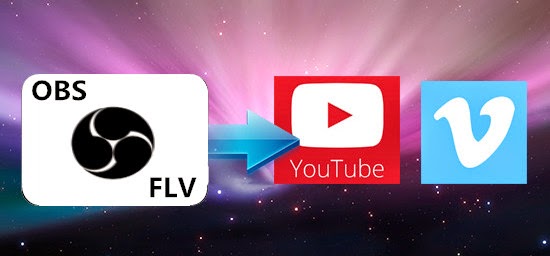 Open Broadcaster Software is free and open source software for video recording and live streaming. Have you ever recorded some game footage with OBS? Generally OBS saves files as MP4 or FLV. It says that the files can be uploaded straight to YouTube or other video hosting site just fine. But why I encounter incompatible issues when importing OBS FLV video to YouTube/Vimeo or other situations like OBS videos to Premiere, OBS FLV to Avid, OBS FLV to DaVinci Resolve?FLV usually comes from a video-sharing website like YouTube, Vimeo or from OBS (Open Broadcaster Software), etc. Though FLV is the same format with YouTube supported one, the codec of OBS FLV videos is totally different from YouTube best accepted one. Since YouTube is the most popular website where we can upload our favorite videos to it for sharing online with other people, any good solutions to transcode OBS FLV video to YouTube/Vimeo directly?To upload OBS FLV video to YouTube/Vimeo flawlessly, you’ll need to convert OBS FLV to YouTube/Vimeo both compatible format. In this case, Pavtube Video Converter for Mac is the first and best choice for you. With the recent upgraded version 4.8.5.1, it can encode/decode H.265/HEVC videos so nicely. If you are running on Windows, you can refer to the equivalent version Pavtube Video Converter.
 How to upload OBS FLV video to YouTube/Vimeo for sharing on Windows/Mac? (Take Mac version as an example.)Step 1: When you download and install the Mac Video Converter, open the main interface and choose the “Add video” to load your OBS FLV videos in. For the multiple video clips we can hit the “Add from folder” button.
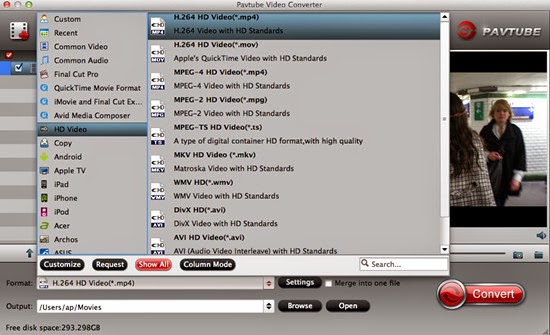
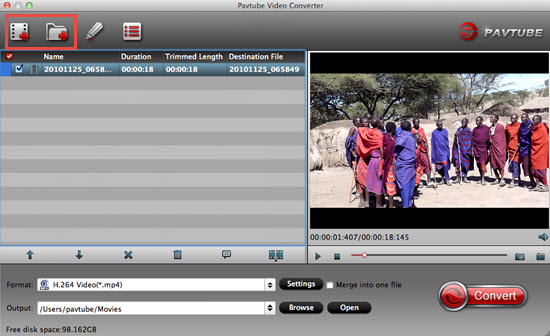 Step 2: Before choosing the format, you can check about the supported formats of YouTube and Vimeo first then decide which output format to choose. As we can see from those two sites, both the H.264 codec contained with MP4 can be supported by them both. So we go to the “Format” bar then choose “HD Video>>H.264 HD Video (*.mp4)” as the output format.
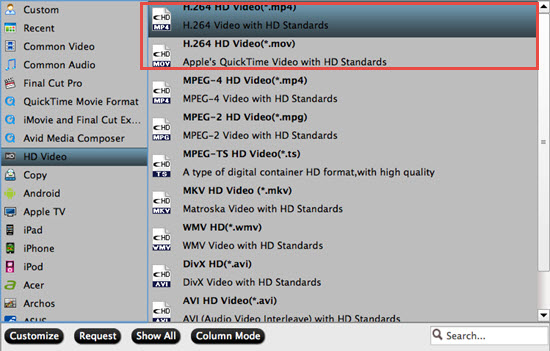 Step 3: Most of you guys must have the desire of a further editing with your output videos, right? On the main interface, “Edit” is waiting for you. “Trim” to decide where to start and where to end, “Crop” to cut some unwanted clips, “Subtitles” to add some explanations to your audience.Step 4: Click the “Convert” button under the preview window and the Mac Video Converter starts converting. By the way, you can take a screenshot at your favorite frame.Conclusion: After converting, you can click the “Open” button to find your converted files. Now, you can upload OBS FLV video to YouTube/Vimeo for sharing on Windows/Mac without any worries! What are you waiting for? Just go ahead and have a try! Enjoy it!Further Reading:
At present, the hottest codec must be the H.265/HEVC, which has already occupied a large part of the codec market. For users, it is great to enjoy the better video quality of H.265 while only with half of file size, which totally free the local disk space and not drop down the quality. In order to enjoy the H.265/HEVC movies, some users would like to use iTunes to manage their videos in local on Mac devices, but how can they transfer H.265/HEVC videos to iTunes 12/11 to watch smoothly?
 H.265/HEVC codec, as a new codec technology and new video compression standard compared to H.264, has the higher quality and smaller size which can be the most import point loved by all video lovers. While as the specialty of this new codec, H.265 has not been available for iTunes yet so we still need some tools to ask for help.
Just few camcorders can shoot the H.265/HEVC recordings, Samsung NX1 is the typical one as you know. If you have recorded some H.265 videos from NX1, add H.265 videos to iTunes for syncing and playback on Apple devices for killing time on the move is a wise choice. However, no mater by dragging and dropping or by selecting Add File to Library... from iTunes menu, iTunes won't import H.265 videos since iTunes have no ability of playing HEVC/H.265 format and iTunes has it’s own best supported video formats as we all know.
To solve H.265 and iTunes incompatible problem, an ideal tool- Pavtube Video Converter for Mac can help you out. With the recent upgraded version 4.8.5.1, it can encode/decode H.265/HEVC videos so nicely. If you are running on Windows, you can refer to the equivalent version Pavtube Video Converter.
Detailed steps on how to freely import H.265/HEVC videos to iTunes 12/11 on Mac Yosemtie:
Step 1: Download, install and launch the smart Mac Video Converter. Click “Add video” or “Add from folder” button to import H.265/HEVC videos to the program. You can also directly drag the files to the main interface.
H.265/HEVC codec, as a new codec technology and new video compression standard compared to H.264, has the higher quality and smaller size which can be the most import point loved by all video lovers. While as the specialty of this new codec, H.265 has not been available for iTunes yet so we still need some tools to ask for help.
Just few camcorders can shoot the H.265/HEVC recordings, Samsung NX1 is the typical one as you know. If you have recorded some H.265 videos from NX1, add H.265 videos to iTunes for syncing and playback on Apple devices for killing time on the move is a wise choice. However, no mater by dragging and dropping or by selecting Add File to Library... from iTunes menu, iTunes won't import H.265 videos since iTunes have no ability of playing HEVC/H.265 format and iTunes has it’s own best supported video formats as we all know.
To solve H.265 and iTunes incompatible problem, an ideal tool- Pavtube Video Converter for Mac can help you out. With the recent upgraded version 4.8.5.1, it can encode/decode H.265/HEVC videos so nicely. If you are running on Windows, you can refer to the equivalent version Pavtube Video Converter.
Detailed steps on how to freely import H.265/HEVC videos to iTunes 12/11 on Mac Yosemtie:
Step 1: Download, install and launch the smart Mac Video Converter. Click “Add video” or “Add from folder” button to import H.265/HEVC videos to the program. You can also directly drag the files to the main interface.
 Step 2: To import H.265/HEVC videos to iTunes 12/11 on Mac Yosemite, you’d better hit the “Format” button to choose “HD Video>>H.264 HD Video (*.mp4)” as the best output format.
 Step 3: Click “Settings” button to customize the output video and audio settings by yourself. But if you are not good at it, you’d better use the default parameters, they will ensure you a good balance between file size and image quality basically. You can change the resolution, bit rate, frame rate as you need.
Step 4: Now everything has been settled, and don’t forget to set the file location. Click “Convert” button to start the conversion work and click “Open” when you finish your conversion to check your converted files.
Conclusion: Now, you can enjoy importing H.265/HEVC videos to iTunes 12/11 on Mac Yosemite freely. From May 7th to May 14th, all Facebook users can enjoy a 50% discount of each Pavtube products during the 2015 Mother’s Day celebration! Just “Follow” the Pavtube official topic and “Like” it and you can own the qualification. Come on!
Further Reading:
Step 3: Click “Settings” button to customize the output video and audio settings by yourself. But if you are not good at it, you’d better use the default parameters, they will ensure you a good balance between file size and image quality basically. You can change the resolution, bit rate, frame rate as you need.
Step 4: Now everything has been settled, and don’t forget to set the file location. Click “Convert” button to start the conversion work and click “Open” when you finish your conversion to check your converted files.
Conclusion: Now, you can enjoy importing H.265/HEVC videos to iTunes 12/11 on Mac Yosemite freely. From May 7th to May 14th, all Facebook users can enjoy a 50% discount of each Pavtube products during the 2015 Mother’s Day celebration! Just “Follow” the Pavtube official topic and “Like” it and you can own the qualification. Come on!
Further Reading:
What gift would you like to send to your mother on this 2015 Mother’s Day? To show our thanks to our mother, we are all thinking how to make this year’s Mother’s Day special with special gifts. If your mom likes watching the latest movies or videos, how about a professional video converter to get rid of the incompatible troubles to enjoy the favorite movies so smoothly? Pavtube Studio has upgraded all products to the latest version, which could be a warm gift for mom. Big discount will be offered by Pavtube Studio! Pavtube Big Deal for Mom (Mother’s Day Only)40% off discount we can enjoy if we get into the official promotion page and give the comments below: ‘What do you want say to your mom”. All of us can get the big coupon with the best Pavtube HD Video Converter for Windows/Mac, which is a professional converter to transcode all video formats nicely for any NLEs or media devices with a high quality preserved.Other Special Off on Facebook(For Facebook users)From May 7th to May 14th, all facebook users can enjoy a 50% discount of each Pavtube products during the 2015 Mother’s Day celebration! Just “Follow” the Pavtube official topic and “Like” it and you can own the qualification. Come on!Other Official Website 20% – 40% discount:Pavtube Video Converter for Mac(for Windows)Have full access to SD videos,digital camcorder recordings, DVR videos on devices such as Apple/Android/Windows series, media players, game consoles and video editing programs.Pavtube MTS/M2TS Converter for Mac(for Windows)Convert Sony/Canon/JVC/Panasonic recorded MTS/M2TS/M2T/TS/MOD/TOD footage to play on media players or edit with Premiere Pro, Avid Media Composer, Final Cut Pro, etc.Pavtube MXF Converter for Mac(for Windows)Converting MXF video files generated by Canon/Sony/Panasonic camcorders to various video formats such as H.264/MPEG-4, MKV, MP4, AVI, MPEG, WMV, FLV, SWF, F4V, etc.Pavtube iMixMXF(for Windows)Transcoding MXF video files to Multi-track Apple Prores MOV for Final Cut Pro or Multi-track MP4/MKV format for other video editing program and media playback devices.Additional Tips: With the recent upgraded version of Pavtube Mac products, all products have been upgraded to support the H.265/HEVC decode and encode. Some other bugs and fixed well there! Just come to Pavtube to know more and enjoy ourselves on 2015 Mother’s Day!
H.265 is a new video coding standard that specifies how to decode video. It’s basically the video equivalent of a JPEG file. The codec helps your computer understand how a stream of data can be displayed as a video file rather than gobs of randomly distributed colors. “When is full support for H.265 going to be implemented into iMovie? I want to buy the Samsung NX500 4K camera that will be out this month. Only $799 with kit lense and most of the NX1 capabilities.”“The H.265 codec and its lack of compatibility with the Apple ecosystem is one of the primary reasons I selected the Panasonic GH4 over the Samsung NX1 for 4k video. I've read that many people expect Apple to implement H.265 in its video applications sooner rather than later because H.265 is the codec used for Face time already; however, I did not want to deal with the trans coding hassles in the interim. Also, just because Apple embraces a codec for one medium does not mean that they will embrace it for another.”iMovie is a Mac OS X or iOS based video editing software application created by Apple Inc. iMovie supports multiple video formats and allows you to create projects that are tailored to your specific video format. You can use the following formats in iMovie: DV, HDV, AVCHD, Apple Intermediate Codec, Apple Animation Codec, Motion JPEG/A, iFrame, H.264, some, but not all, varieties of MP4, MOV. As .mov or .mov is a container, if it contains video codec in one of the above, it will import to iMovie, or it will fail to import to iMovie.What if you have video files which are incompatible with iMovie, such as importing H.265 files to iMovie for editing. Is it possible that to add those unsupported video files to iMovie for editing? Of course you can! As long as you depend on Pavtube Video Converter for Mac, which is an all-in-one Mac Video Converter. With the recent upgraded version 4.8.5.1, it can also decode and encode the H.265/HEVC videos so nicely. How to convert H.265 files to iMovie best supported format for further editing?Step 1: Click “Add video” icon to load your source H.265 files to the main interface. Or you can directly drag&drop H.265 files into program.Step 2: When you come to the output list, just click “Format” bar to determine output format. Follow “iMovie and Final Cut Express” and select “Apple InterMediate Codec (AIC) (*.mov)” as the output format.
 Additional Tips:
Click the “Effect” button to open the Video Edit window to achieve editing H.265 files like trim, crop, image, watermark, effect, subtitles and rotate and etc. in the corresponding editing pane.
Click the “Setting…” button to open the Advanced Settings window to adjust the output video codec, resolution, bitrates, frame rate, aspect ratio, audio codec, channel, volume and etc in the advanced tab.Step 3: Go back to the main interface if you have finished all the preparation work. Here just hit the “Convert” button and we can easily get the work started.Conclusion: After conversion, you can get the encoded file under “Open” panel. When you finished transferring H.265 files to iMovie, we can enjoy editing the videos so nicely. Good news! All users can enjoy 30% discount from May 4th to May 6th after the upgraded days! Come on!Further Reading:
The latest high definition 4K XAVC S video format from Sony FDR-X1000V is still not supported well by FCP X so far. If you want to edit Sony X1000V 4K XAVC S files in FCP X, a wise solution is to convert X1000V 4K XAVC S files to FCP X best accepted ProRes for editing and using flawlessly.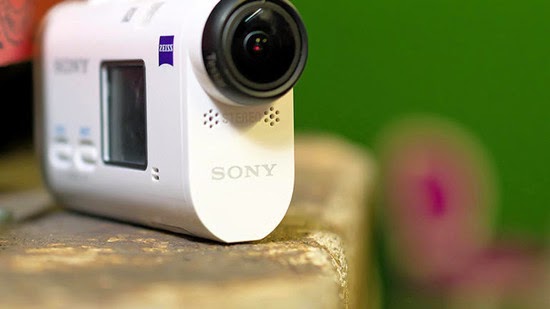 The Sony FDR-X1000V is a true 4K Action Camcorder that is ideal for capturing fast moving action at close quarters. It is also splashproof and shockproof, with a supplied 10m underwater housing. With its Wi-Fi and GPS connectivity, you can go just about anywhere, prove you are there in glorious 4K quality and share your experiences with your online friends wherever they are in the world.Maybe you have recorded some footages by Sony FDR-X1000V and you are wondering how to import it recorded XAVC S files to FCP X for editing natively on Mac. As we know, Sony FDR-X1000V recordings are in XAVC S or MP4 format and XAVC S codec is not well supported by Final Cut Pro X/7/6 on Mac. You may encounter importing problems, or can’t edit Sony FDR-X1000V in FCP X/7/6 smoothly, besides, it will take a long time to render.At present XAVC S, a long GOP inter-frame codec, does not appear to be supported by Final Cut Pro. Apple does not respond on the issues and no one here knows or can say when, if ever, XAVC S will be natively supported by FCP (X). In this case, to smoothly edit FDR-X1000V 4K XAVC S files in FCP X, the easy workaround is to convert Sony X1000V XAVC S to ProRes MOV which is the best codec with best results when working with Final Cut Pro. For this purpose, considering the easy of use and lossless quality, Pavtube Video Converter for Mac is highly recommended. With it, you don’t need to render again and it saves your time. How to edit FDR-X1000V 4K XAVC S files in FCP X?Step 1: Download and have a quick installation. The trial version will have a watermark on your converted files. Except for that, there are no time limitation, no virus, and no unnecessary bundle apps while downloading. After that, click “Add Video” button to load your 4K XAVC S files. You can load several files at once thanks to “Add from folder” button.Step 2: Click the “Format” bar to get the drop-down menu and you can get “Final Cut Pro>>Apple ProRes codec”, including ProRes 422, ProRes 422 (HQ), ProRes 422 (LT), ProRes 422 (Proxy) and ProRes 4444. Choose the proper one you want. Here, we suggest you to choose “Apple ProRes 422 (*.mov)” as the best output format.
 Tips: Apple ProRes 422 and Apple ProRes 422 (HQ) have higher qualities. Apple ProRes 422 (LT) and Apple ProRes 422 (Proxy) have smaller sizes. You can choose according to your requirement.Step 3: Click “Settings” button to customize the output video and audio settings by yourself. But if you are not good at it, you’d better use the default parameters, they will ensure you a good balance between file size and image quality basically. You can change the resolution, bit rate, frame rate as you need.Step 4: When everything is done, you can take a preview by hitting “Play” button. If you are satisfied with the final result, you can click “Convert” button to finish the conversion work.Conclusion: When the conversion is done, you can click “Open” to get your generated files. Now, you can edit Sony FDR-X1000V 4K XAVC S files in FCP X without any hassles. Good news for everyone! All of us can get 40% discount off before May, 1st, 2015. Come on! Why not seize the chance and take a close look at the event?Further Reading:
As the newest codec and with features of smaller size and higher quality, H.265/HEVC has become more and more popular in our video codec area. What brought to us was the related questions. What's the true meaning of H.265/HEVC? How could we convert, edit or play H.265/HEVC videos? Is there any best methods provided for us to handle the H.265 encode and decode workflow well?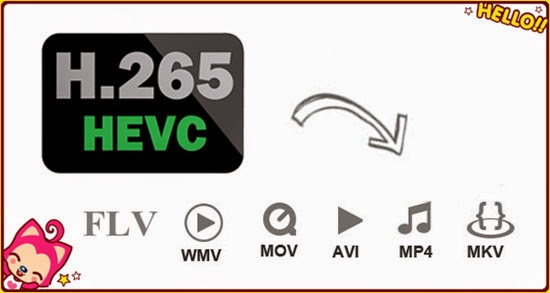 Q1: What is H.265/HEVC?High Efficiency Video Coding (HEVC) is the latest generation video compression standard developed by the ISO/IEC Moving Picture Experts Group and ITU-T Video Coding Experts Group, through their Joint Collaborative Team on Video Coding. HEVC is also known as ISO/IEC 23008-2 MPEG-H Part 2 and ITU-T H.265. HEVC provides superior video quality and up to twice the data compression as the previous standard (H.264/MPEG-4 AVC). HEVC can support 8K Ultra High Definition video, with a picture size up to 8192×4320 pixels.Q2: What’s the difference between H.265 and the previous standard H.264?H.264 has been a huge success. It’s a flexible codec standard that’s used by streaming services, satellite providers, and for Blu-ray discs. It’s scaled remarkably well since it was first proposed and is capable of handling 3D, 48-60 fps encodes, and even 4K. The Blu-ray disc standard doesn’t currently include provisions for some of these technologies, but the H.264 codec itself is capable of handling them.However, while it can handle these types of encodes, it can’t do so while simultaneously keeping file sizes low. A new standard is necessary to push file/stream sizes back down while driving next-generation adoption, and that’s where H.265 comes in. It’s designed to utilize substantially less bandwidth thanks to advanced encoding techniques and a more sophisticated encode/decode model.Q3: How to encode/decode H.265/HEVC to MKV, MP4, AVI, MOV, WMV, FLV on Mac Yosemite?After testing countless freeware and commercial software, considering the ease of use and lossless quality, we would recommend Pavtube Video Converter for Mac to you which is an all-in-one H.265 Converter. As upgraded to the latest version 4.8.5.0, this Mac Video Converter can definitely support H.265 encoder/decoder very well. Moreover, it can encode/decode H.265 to MKV, MP4, AVI, MOV, WMV, FLV on Mac Yosemite with fast speed, easy operation and quality maintained. Specific guide on how to encode/decode H.265 to MKV, MP4, AVI, MOV, WMV, FLV on Mac Yosemite:Step 1: Run the upgraded Mac Video Converter, and click the “Add video” button to load your original H.265 recordings. If you want to load several files at one time, “Add from folder” button is available. Besides, you can also drag and drop the files to the main interface directly.
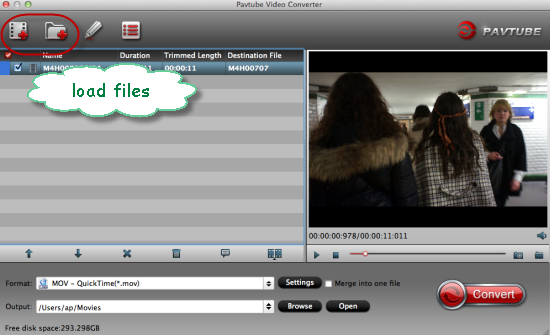 Step 2: When you launch the program and load your H.265 files in , then we can choose the suitable output formats. To convert H.265 to MKV, you can choose “HD Video>>MKV HD Video (*.mkv)”. To convert H.265 to MP4, you can choose “HD Video>>H.264 HD Video (*.mp4)”. To convert H.265 to AVI, you can choose “HD Video>>AVI HD Video (*.avi)”. To convert H.265 to MOV, you can choose “HD Video>>H.264 HD Video (*.mov)”. To convert H.265 to WMV, you can choose “HD Video>>WMV HD (*.wmv)”. To convert H.265 to FLV, you can choose “Flash Video>>FLV H.264 (*.flv)”.
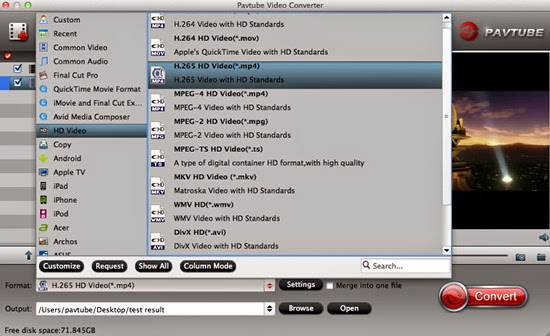 Step 3: Click “Settings” button to customize the output video and audio settings by yourself. But if you are not good at it, you’d better use the default parameters, they will ensure you a good balance between file size and image quality basically. You can change the resolution, bit rate, frame rate as you need.Step 4: When everything is ready, you can take a preview by hitting “Play” button. If you are satisfied with the final result, you can click “Convert” button to finish the conversion work.Conclusion: When the conversion is done, you can click “Open” to get your generated files. Now, you can use them for editing, playing, uploading, sharing and all you want. Good news for everyone! All of us can get 40% discount off before May, 1st, 2015. Come on! Why not seize the chance and take a close look at the event?
Further Reading:
Good news for everyone! Thanks to the Pavtube Studio, we can realize our hope to enjoy the super high quality videos encoded by H.265. With the stronger and stronger function of the upgraded Pavtube Video Converter for Mac, XAVC MXF supported and VPx series decoder can be done excellently. Pavtube Video Converter for Mac- upgrade to the version 4.8.5.0This upgraded Pavtube Video Converter for Mac is the professional and easy-to-use Mac Video Converter, which is specially designed for Mac users to easily convert between various video formats including H.265/HEVC, H.264, MP4, MOV, MKV, AVI, MPEG, Xvid, DivX, 3GP, WMV, FLV, MOD, TOD, WTV, MXF, MVI, F4V, WebM, VP8, 720p, 1080p, 1080i HD, AVCHD videos and more, convert between various audio formats including APE, MP3, AAC, AC3, WAV, WMA, and even extract audio from movie files. You can know more details on the official website.What’s new of Pavtube Video Converter for Mac (version 4.8.5.0)?1.Support H.265 decoder and refine asm.2.Support XAVC codec contained in MXF.3.Better support for VPx series decoder.Key features of Pavtube Video Converter for Mac (version 4.8.5.0):1. Convert various videos/audios as input and output.2. So many popular editing tools and media players are available.3. Easy operation workflow and faster conversion speed.4. Extra acceleration function for Mac users.5. Strong ability of setting and editing output videos. Tips: Before May 1st, you can get a discount on Pavtube Video Converter for Mac. Why not click the link to know more about this 40% off event and seize the chance to buy excellent products with such pretty attractive price?Simple guide on how to convert videos with this Mac Video Converter:Step 1: Run the upgraded Mac Video Converter, and click the “Add video” button to load your original recordings. If you want to load several files at one time, “Add from folder” button is available. Besides, you can also drag and drop the files to the main interface directly.
 Step 2: When you launch the program and load your files in , then we can choose the suitable output formats. For example, if you want to convert XAVC MXF to FCP X/7/6 for editing, you can click the “Format” bar and choose “Final Cut Pro>>Apple ProRes 422 (*.mov)” as target output. There are many presets in the software, you can choose the output format according to your requirements.
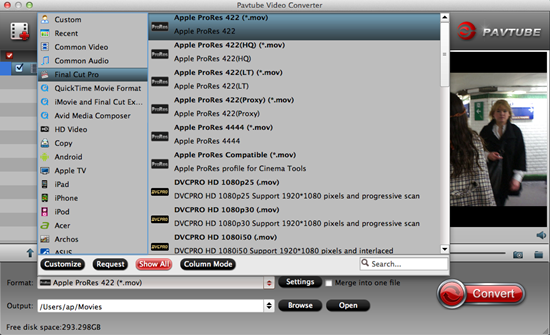 Tips: If you want to convert your recordings to H.265 codec, let’s go to the “Common Video” to get the “H.265 Video (*.mp4)” as the best. You can also choose “HD Video>>H.265 HD Video (*.mp4)” to get higher definition.
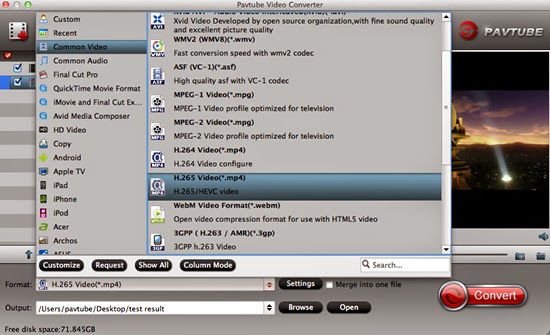 Step 3: Click “Settings” button to customize the output video and audio settings by yourself. But if you are not good at it, you’d better use the default parameters, they will ensure you a good balance between file size and image quality basically. You can change the resolution, bit rate, frame rate as you need.
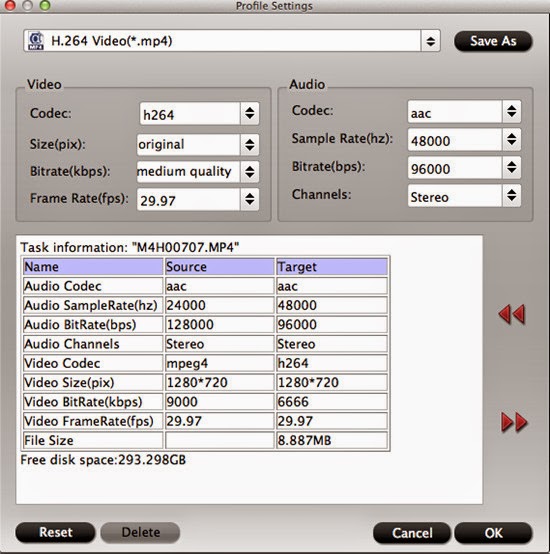 Step 4: Most of you guys must have the desire of a further editing with your output videos, right? On the main interface, “Edit” is waiting for you. “Trim” to decide where to start and where to end, “Crop” to cut some unwanted clips, “Subtitles” to add some explanations to your audience.
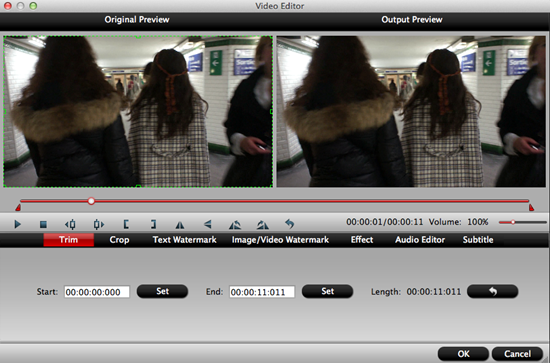 Step 5: When everything is ready, you can take a preview by hitting “Play” button. If you are satisfied with the final result, you can click “Convert” button to finish the conversion work.Conclusion: When the conversion is done, you can click “Open” to get your generated files. Now, you can use them for editing, playing, uploading, sharing and all you want.Download Address:Official download:http://download.pavtube.com/video-converter-mac/videoconvertermac_setup.dmgAmazon download:http://www.amazon.com/Pavtube-Video-Converter-Mac-Download/dp/B00QIBK0TQ/ref=sr_1_3/175-5152965-3528837?ie=UTF8&qid=1430103806&sr=8-3&keywords=pavtubeFurther Reading: