Friday, February 20, 2015

Can't Play MKV on Roku 3/2 via USB Interface?

‘I have a setup running with plex. I play files on my apple tv, but it only supports mp4 files, which makes plex transcode, and my nas can't handle that. Therefore I want to know whether it is possible to buy a Roku 3, set it up, and have it play files like MKV (mostly MKV) and MP4 without any transcoding? Directplay works on all our samsung tv's because they have a vast support of filetypes, does Roku have that too? How can I stream any videos to Roku for nice watching?


Why Can't Play some MKV on Roku via USB?
Though Roku USB channel has the ability to read and play MKV files, there are some restrictions on the MKV files. Roku USB Media Player channel only plays MKV files encoded with H.264 video codec and AAC/MP3/DTS/AC3 audio codec. If the MKV is encoded with other video or audio codec like MPEG-2, WAV and etc, we will fail to play MKV on Roku via USB drive. Such the related question also happened when playing MKV in iTunes.

Preparation: Run MKV files in Roku?
To get those MKV files and Roku 3 to play nicely, the easy workaround is to transcode them to a compatible format. Pavtube Video Converter for Windows/Mac is a great application to convert your video files. It has a codec pack that enables conversion between different video and audio file formats. With the fast speed and easy workflow, it is so convenient for us to make MKV files available for Roku.

Steps on encoding MKV to Roku compatible format MP4:
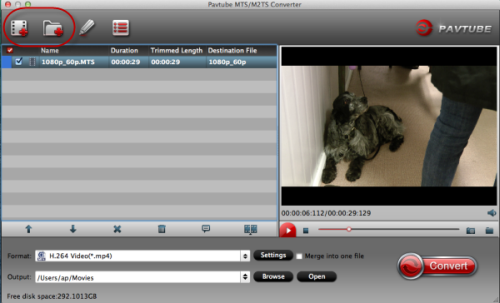
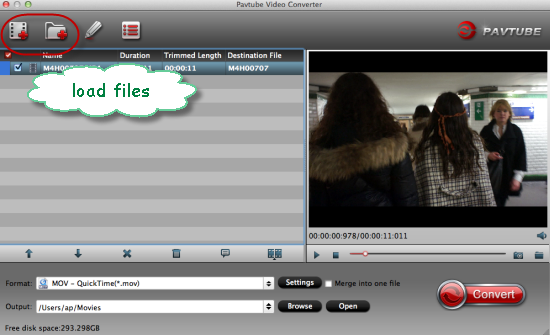
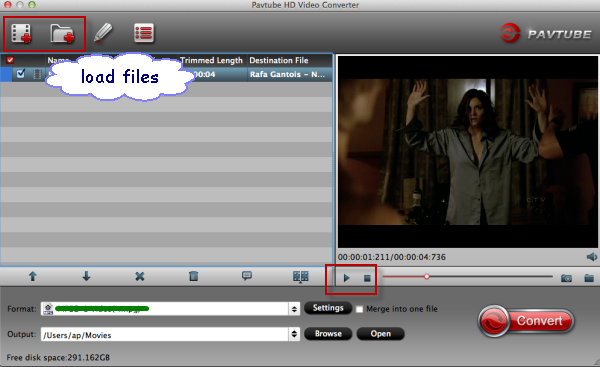
Step 1.Download and install video converter for Roku on your computer. Run it and directly drag and drop the MKV files that you want into the main window of this converter. You can also add MKV files by clicking the "Add Video" button on the left bottom


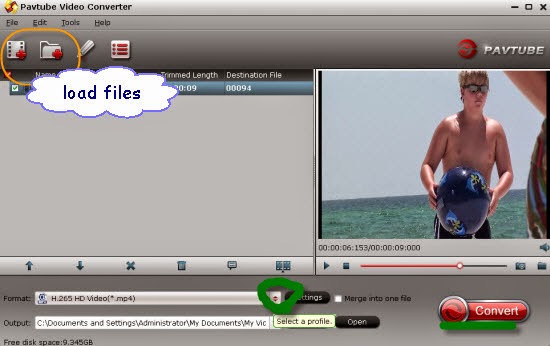
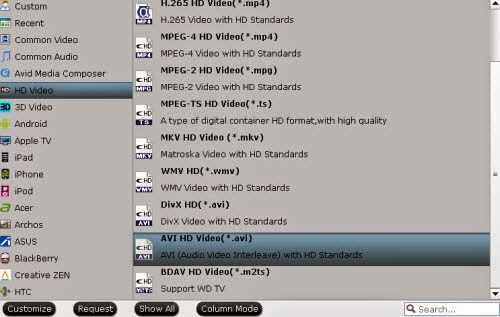
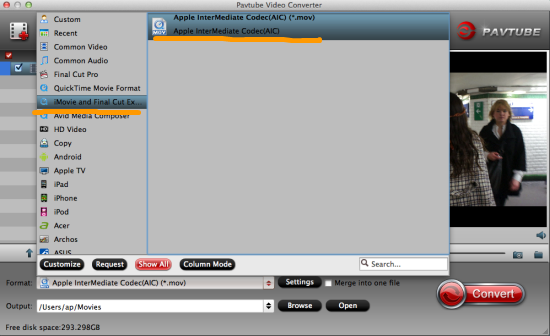
Step 2. Choose the right output format. As MP4 is the target format that supported by Roky, thus we are going to select the ‘HD Video’>>’H.264 HD Video (*mp4)’ as the best format after clicking the item ‘Fomrat’ bar.


Step 3. Tap the ‘Convert’ button on the main interface you can easily start your work, then with the right MP4 format, do you still have the problems of importing MKV files to Roku? 

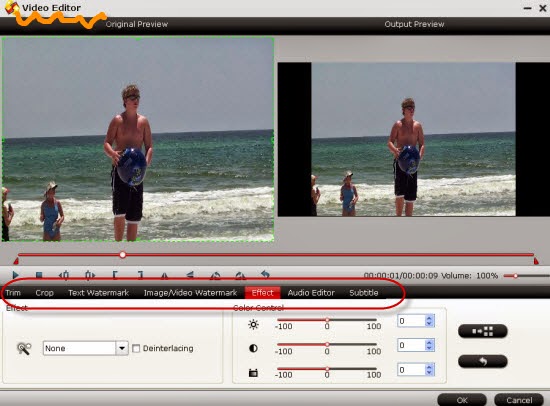
Additional tips: Before we start to convert the MKV workflow, we can also adjust the video files in ‘Settings’ and ‘Edit’ to make more video effects there. Do you wanna a try?

More:

Monday, February 16, 2015

Convert TiVo Files for Playback on Android Tablet

Got an idea of transferring recorded TiVo files to Android tablets from PC? How did you successfully watch TiVo videos smoothly on Android tablet? If you got any problems there, in this tutorial, we are glad to show how to transfer TV shows from TiVo to Android devices so that you can take favorite TV shows when away from home.


Why most users wanna play TiVo recordings on Android Tablet?
TiVo has finally decided to show some love to Android users with its TiVo app for Android tablets. Now you can do just about everything you can do with your TiVo remote control — find and explore shows, schedule recordings, control live TV and recorded shows, and more — from your Android tablet! However, it seems that we need to convert TiVo to other common ones like HD MKVMP4 or even play TiVo on PC

Preparation we need to watch TiVo files nicely on Android tablet.
To get rid of these troubles of importing TiVo files to Android Tablet, we here luckily recommend the Pavtube Video Converter for Windows/Mac, which has the strong ability of working Tivo files with various formats or devices. With a high conversion speed and quality, it has a good reputation online. We also call it as Tivo Video Editor because it can merge TiVo files together, trim TiVo video clips, split TiVo files into chapters, adjust the video screen of TiVo files, remove black bars from TiVo files, add watermarks to TiVo files, add subtitles to TiVo files,etc.

Step by step guide on how to easily convert Tivo to MP4 for playback on Android Tablet:

Step 1.Download and launch the Windows Tivo Converter, click on the ‘Option’ button on the main interface, input your ‘Tivo Media Access Key’ to let your files in as the screen shot follows.


Tips: How to find your Tivo Media Access key? Just go to the ‘Tivo Cetral ‘menu>>’Message and Set up’ Account and system information’, your Media Access Key would be there.
Step 2. Choose the best output for Android tablet. Come to the output list by clicking the ‘Format’ bar there. Drop the list down, here we suggest you to select the ‘HD Video’>>’H.264 HD Video(*.mp4)’ as the suitable one for Android.


Note: Good news here! Pavtube studio has announced that the all windows products has upgraded to version 4.8.2 which meand this Tivo converter also has the capability of encoding or decoding H.265/HEVC files well.

What’s more, you can also tap the ‘Settings’ or ‘Edit’ button to adjust your output videos. Finally, ‘Convert’ to start your conversion and you can watch them on Android tablets. Smoothly working with TiVo files, do you still have any other worries?

More:

Monday, February 2, 2015

How to Convert MTS/M2TS Files to DV-AVI/MOV for Editing

‘I'm probably taking the plunge into an HD camcorder in the near future. However, I'm still using Premiere Pro 2.0 for editing, and upgrading that, my computer system will cost a bit. So I'm wondering about converting AVCHD MTS to DV-AVI so I can edit it (or try to edit it) with my current rig, until I spring for a new one. What are the tradeoffs-- I mean, other than massive files on my hard drive?’


Have you ever meet the troubles like above? I’m sure most of you are fond of recording the HD videos no matter in your gathering parties or some significant moments, right? In order to make the recordings more beautiful and meaningful for a nice sharing or memory, we are interested in editing those HD movies like MTS or M2TS in some popular NLEs, just like FCPAdobe Premiere Pro, etc, and the upload MTS/M2TS to YouTube/Vimeo for nice sharing? That’s really cool! However, you may be failed in importing them directly in these popular editing tools because they usually can only handle footages from DV, MP4, and MOV etc. not give good support for MTS files.

Compared with MP4, MOV (encoded with inter-frames), DV provides videos with intra-frames, with each frame having being a self-contained picture. So could we easily convert our MTS/M2TS files to DV AVI/MOV as the suitable formats for these editing software? That’s really the hot topic. In order to successfully transcoding MTS/M2TS to DV AVI/MOV, this tutorial provides a simple workaround to convert MTS to DV quickly and easily with professional and intuitive Pavtube MTS/M2TS Converter for Mac. It’s a professional MTS/M2TS converting assistant that can additionally edit and adjust your output videos in a nice way. More related reviews?

Several steps we should know clearly for converting MTS/M2TS to DV-AVI/MOV for editing.

Step 1.Add MTS/M2TS to this MTS to DV Converter
If you have downloaded and installed this program on your computer, Click "File">"Add Media Files" to load the MTS videos you want to convert. 


Step 2.Choose the best output AVI for editing
Come to the output list by clicking the ‘Format’ bar on the left of the preview window, we suggest you to select the ‘HD Video’>>’AVI HD Video (*.avi)’as the best one. For other NLEs? You can also choose one as your favorite.


Step 3. Start your conversion of MTS/M2TS to DV AVI
Once you confirm everything goes as you plan, just click "Convert". The progress bar will show you the conversion processing. With such as easy workflow, we can transcode MTS/M2TS to DV AVI for editing, is that cool? 

Further reading:

Friday, January 30, 2015

How to Stream FLV/F4V Videos to Google Chromecast

Have you ever tried to play movies on Google Chromecast? It will be so cool that allows you to stream some video formats on your High Definition Television (HDTV), such like the AVI, FLV, WebM, VOB, etc. However, you must meet some issues when importing FLV and F4V files, right? So what did that happen? 


It requires a wireless connection using the Internet or a network connected computer, tablet, or smart phone. You can play various multimedia content, but only Google Cast supported formats can be streamed directly. According to this way, in order to smoothly watch HD movies on HD TV via Google Chromecast, we should know more details on Chromecast Supported and Unsupported Video Formats below.

Part 1.Introduction of Chromecast Supported and Unsupported Video Formats:

A: Standard supported Chromecast video formats include:
MP4- MPEG 4 or MP4 video files uses the standard .mp4 extension. It is most commonly used to store video and audio files.
WebM – An open video format for the web that allows everyone to stream video and audio codecs.
B: Some unsupported video formats include:
AVI – AVI (Audio Video Interleave), the most common format for audio/video data on the PC, is a multimedia container format with video and audio.
MKV – The Matroska Multimedia Container holds video, audio, picture, or subtitle tracks in one file.
FLV – Flash video formats are video files that are streamed over the Internet using the Adobe Flash Player.
MOV – MOV is a multimedia file format that contains one and more tracks of data, such as audio, video or text.
VOB – VOB (Video object) files are DVD-Video file formats that contain digital video audio, audio, and subtitles relevant to DVDs.
3G2 – This is video container file for audio, video, and text that is an extension of MP4.

Part 2.How to stream your supported video formats to Google Chromecast?

Method 1.Connect with your Mobile device
To stream videos using your mobile device, you will need to download and open the Chromecast app on your Android or iOS smartphone or tablet using Google Play or the App store. The Chromecast app is available for Android tablets and smartphones through Google Play and for iPhones and iPads in the App store.
Note: You should ensure that your mobile device is connected to your Wi-Fi and not your mobile network. Also, you must have the latest app installed and be on the same network as your Chromecast digital media player.

Method 2.Connect with your computer
Chromecast allows you to stream videos on your TV using your Mac or PC running the Chrome browser. This is the only browser that Chromecast is compatible with. Follow the instructions below to connect with your computer.
Step 1. Open the Chrome browser on your computer and then navigate to this page to see how to setup Chromecast.
Step 2. Dwnload the Chromecast app to your computer.
Step 3. Select the instruction below that is applicable to your computer.
i. On your Windows computer, Save the file, Run the Chromecast app and follow the prompts to complete setting up Chromecast. 
ii. On your Mac OS X computer, drag and drop the Chromecast app into your Applications folder. You will need to open the folder, run the application, and then select the Chromecast device. Follow the instructions to complete the setup process.

Method 3. Connect with YouTube:
Step 1. Connect your Chromecast device to an available HDMI slot on your HDTV. 
Step 2. When your Chromecast digital media player is securely connected to your TV you will see the Chromecast Home screen with your Wi-Fi name at the bottom of the screen. 
Step 3. Now, download the YouTube app on your Android or Apple tablet or smartphone. 
Step 4. Connect your Android or Apple device to the same Wi-Fi network as your Chromecast device.
Step 5. Open the YouTube app on your Android or Apple device and click the Cast button  to start streaming videos/

Part 3. How to stream those unsupported video formats to Google Chromecast?
Since we know the MP4 and WebM can be the two best ones for watching on Google Chromecast, what we need here is a professional FLV/F4V to MP4 Converter for us to smoothly work the original FLV files with Google Chromecast. Fortunately, Pavtube Video Converter for Windows/Mac is such a good choice for us to enjoy movies on Google Chromecast well.

Any more details to learn the conversion of FLV/F4V and MP4 for watching on Google Chromecast”

Step 1. Add your FLV/F4V files
Launch the program and open the main interface, we’d better to click the ‘Add video’ or ‘Add from folder’ to let our original files in.


Step 2. Choose suitable one for Google Chromecast
Come to the output list by hitting the ‘Format’ bar on the left of the preview window, here we suggest you to select the ‘HD Video’>>’H.264 HD Video (*.mp4)’ as the best output one.


Step 3. As the additional functional button, on the main interface we can get into the ‘Edit’ button to adjust our output videos such like the video length with ‘Trim’, get rid of the edges with ‘Crop’, or even add some subtitles with ‘Subtitle’, etc. Just be a good editor here.


Notes: More talking on this professional Windows Video Converter, we have to tell you with the latest upgrade version, it can support the H.265/HEVC videos encode and decode, with the higher quality and smaller size, do you wanna a try?

For a final step, click the ‘Convert’ button we can easily get our work start. Next, we can take the part 2 as the reference to stream out compatible output movies to Google Chromecast for nice enjoyment. Now, do you still find it is hard for us to watch FLV/F4V movies on HD TV via Google Chromecast?

More:

Wednesday, January 28, 2015

Stream Any Videos and Audios to Roku for Nice Watching?

Part 1.Introduction of Roku and what can Roku bring to us?
As a widely-accepted media player, Roku can help us stream videos directly on your TV with lots of channel choices. But do you know that it can also be used as a streamer to cast your local video files on mobile to HDTV that you have at home? However, as the most media players, like VLCQuickTime, etc. For next step, we should know better about the Roku supported video and audio formats, right?


Part 2.Roku supported video and audio formats are listed below:
Supported:
Video format: MKV, MP4, MOV, WMV
Audio format: AAC, MP3, WMA, FLAC, WAV

Unsupported:
Video format: 3GP, VOB, MTS, AVI, M4V, WMV, XviD, DV, MP4-XviD, DIVX, H.264, H.265 (HEVC), MP4-MC, OGV, ASF, MPEG-1 NTSC, MPEG-1 PAL, MPEG-1 SECAM, MPEG-2 NTSC, MPEG-2 PAL, MPEG-2 SECAM, DVD-Video NTSC, DVD-Video PAL, DVD-Video SECAM, FLV, F4V, SWF, 3GP, 3G2, etc.
Audio format: AC3, M4A, OGG, AIFF, AU, MKA, APE, M4B, M4R, etc.

Part 3.Guide on streaming Roku supported Video and Audio files
Step 1. Install Roku app for iOS or Android

Get Roku app for iOS and get Android version. 

Step 2. Connect to the same network
Get your phone or tablet connected to the same network as your Roku device, that is, the same route. Then you can open your Roku app with a list of Roku devices appearing. Choose one of the devices and get control of it with your phone or tablet. Before that, you may need to get login with your Roku account.

Step 3. Play on Roku
Now go to find the Play on Roku tab on your app and then choose a video that you want to cast to your TV. After some minutes, you will be able to watch the videos on your TV’s big screen. So just enjoy yourself.


Part 4. How to stream those unsupported video files to Roku?
For naturally unsupported formats of Roku, you will need a third-party tool to help you out. Here, may be the PavtubeVideo Converter for Windows/Mac could be your best choice. It can be much easier and more effective to let us to convert those incompatible videos to suitable ones for Roku. Here is the Mac Video Converter Review you can take a good reference. 

That’s done! Is that cool for us to smoothly enjoy any various video via Roku? In other words, the professional Roku video converter can help us in watching various movies on different media players. What are you waiting for?

More:

Wednesday, January 21, 2015

VOB Files to iMovie: Not Difficult Any More!

Get in trouble when importing vob videos to iMovie? Files with VOB in the folder are just grayed out? How to solve the problem?

Summary: If you are failed in putting VOB files into iMovie, I suggest you to read this article to get some help. This guide is written to help you learn how to transcode VOB to MOV for iMovie. I search the following issue from Apple forum. Failure of editing VOB files in iMovie must be a common phenomenon that exists in our daily life. Absolutely, it’s not the only one. 


“I'm running 10.9.5 an iMovie 10.0.5. I have a DVD of video that I created and I want to bring it into iMovie. I've tried a couple of recommended solutions, i.e. Steamclip and MacX Quicktime Converter, but I get a message saying they can't be used because the developer hasn't been approved...or something of that nature.” 

Why do we get errors from iMovie when importing VOB files to it? It is important to note that VOB is the core format of files in DVD. It isn’t the format that iMovie supported as same as other NLEs like After Effetcs, etc. No denying that iMovie gives us a wonderful experience. With iMovie, we can do film editing with its strong functions and share them with our friends. iMovie brings us far more than happiness. That’s why people want to put VOB or other videos to iMovie for nice enjoyment.

Since iMovie has no ability of working VOB files, here we highly recommend the professional converting tool calledPavtube Video Converter for Mac for you guys. (For Windows version?) By means of converting with this product, putting VOB files to iMovie is not a difficulty any more. There is no need to worry about the output quality. The result would be attractive no matter in video output or audio output. You can download our product from the official website and try the trial version first.

Guide: Let’s see how to put VOB files to iMovie 11 on Yosemite.
Step 1: Import your videos
Download our product Video Converter for Mac (Video Converter is for Windows users) and install it. Then, open the interface. Put your videos into Video Converter for Mac by drag and drop. Or you can click “Add from Folder” to add a few files at one time. It depends.


Step 2: Select the output format
Click the drop-down button on the right side of the “Format” button to select iMovie/Final Cut Express>>Apple InterMediate Codec (AIC) (*.mov) as the output format. The output format is designed for iMovie 11 specially.


Optional function: you can also set video resolution in the ‘Settings' button, frame rate, bit rate, codec and so on. Would you like to have a try?

Step 3: Start your conversion work?
Click the “Convert” button at the bottom right corner on the main interface. After the conversion finished, the output files can be put into iMovie 11 easily without any incompatibility issues. For Windows users, operation steps mentioned above are the same. 

Notes: For those who wanna convert and import VOB files in Final Cut Pro, Avid Media Composer, Adobe Premiere Pro, just apply to this VOB Video Converter and choose the right output on the output list. Go ahead and have a try!

More:

Tuesday, January 20, 2015

Sony PXW-FS7 XAVC 4K/HD to FCP 7/X Workflow with ProRes Codec

Any related questions on how to import your Sony PXW-FS7 XAVC 4K/HD files to FCP 7/X for further editing withProres 422/HQ/4444 codec? Let’s learn more below.


Looking for the easiest way of converting XAVC 4K/HD files to ProRes MOV for editing in FCP 7/X from Sony PXW-FS7 camcorder on Mac OS X operation system? Cause we know more about the FCP 7/X, here we would like to show you some issues appeared in this situation. Just be a good reader and you will find it will be easier to import our Sony PXW-FS7 XAVC 4K footage into FCP 7/X for a nice workflow. Additionally, not only for Sony, for other camera footage for FCP cannot be available too, such as Canon MP4 videos to FCP or Panasonic 1080p videos to FCP

‘I just read there has been an update to allow FCP 7 and QT 7 to play/work with AVC-Intra files natively I am new to this codec, so I was wondering if there is a tutorial of how the file structure works. However I cannot import either of those XAVC folders into FCP, and the file structure is not recognized by log and transfer. Do I have to import each mxf file individually? Or is there a way to import an entire card without changing file structure?’ 

If you are a loyal Sony camera lover, you may know that the XAVC as the most popular codec, what a pity it has not yet been accepted by most Mac NELs, XAVC to Premiere Pro is the typical one.

According to the situation mentioned above, it seems that there are some third plug-ins to import FS7 XAVC files to FCP. However, most users have been failed to try that again and again, right? Because of the instability of the 3rd party tools, some issues like crashing or screen errors can be frequently found during the importing process. Just make Sony footage from XAVC to ProRes MOV codec, that the top point. Fortunately we have the Pavtube HD Video Converter for Mac, which could be our best professional conversion tool that can work all various videos available for NELs and media devices. More details about this XAVC to FCP Converter review

How to convert Sony PXW-FS7 XAVC to ProRes codec 422/HQ/4444 as the suitable ones in FCP 7/X?
Step 1 Add original Sony XAVC files.
Launch this Mac XAVC to FCP Converter and open the main interface. Add your files in is the first workflow that we should work it well. ‘Add video’ or ‘Add from folder’ can help you out of the importing trouble.


Step 2.Choose the suitable format for FCP 7/X. 
As we mentioned above, how could we find the ProRes codec 422? Press on the ‘Format’ button and come to the output list, just select the ‘Final Cut Pro’>>’Apple ProRes Codec 422’ as the best one. Of course several other ProRes types we can also have a try.


Step 3.Adjust video/audio settings
Click the "Settings" button and customize proper video/audio parameters including Video size, bitrate and fame rate and mroe. Usually 1920*1080 video size and 30fps video frame rate are recommended for FCP editing. Well, if you prefer to work with 4K video, you can adjust video size to get 4K ProRes for FCP. 

Step 4.Start XAVC to ProRes conversion
After all necessary settings, hit the ‘Convert’ button to start converting XAVC video to ProRes for FCP 7/X on Mac OS X. 

Once the conversion starts, with a higher speed, we can easily get the output videos encoded by ProRes codec. Then follow the usual transferring steps, just transfer our XAVC footage to FCP 7/X for nice editing. Any other tips or suggestions you can leave as the comments below.

More: