Tuesday, January 20, 2015

Sony PXW-FS7 XAVC 4K/HD to FCP 7/X Workflow with ProRes Codec

Any related questions on how to import your Sony PXW-FS7 XAVC 4K/HD files to FCP 7/X for further editing withProres 422/HQ/4444 codec? Let’s learn more below.


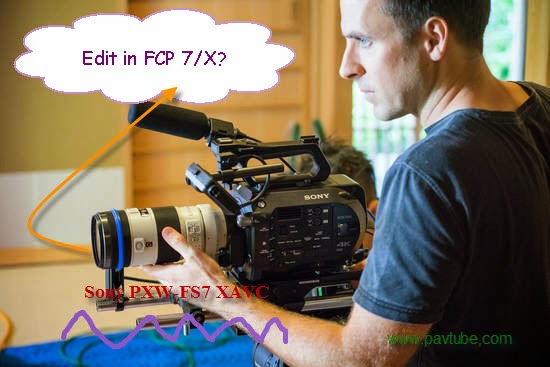
Looking for the easiest way of converting XAVC 4K/HD files to ProRes MOV for editing in FCP 7/X from Sony PXW-FS7 camcorder on Mac OS X operation system? Cause we know more about the FCP 7/X, here we would like to show you some issues appeared in this situation. Just be a good reader and you will find it will be easier to import our Sony PXW-FS7 XAVC 4K footage into FCP 7/X for a nice workflow. Additionally, not only for Sony, for other camera footage for FCP cannot be available too, such as Canon MP4 videos to FCP or Panasonic 1080p videos to FCP

‘I just read there has been an update to allow FCP 7 and QT 7 to play/work with AVC-Intra files natively I am new to this codec, so I was wondering if there is a tutorial of how the file structure works. However I cannot import either of those XAVC folders into FCP, and the file structure is not recognized by log and transfer. Do I have to import each mxf file individually? Or is there a way to import an entire card without changing file structure?’ 

If you are a loyal Sony camera lover, you may know that the XAVC as the most popular codec, what a pity it has not yet been accepted by most Mac NELs, XAVC to Premiere Pro is the typical one.

According to the situation mentioned above, it seems that there are some third plug-ins to import FS7 XAVC files to FCP. However, most users have been failed to try that again and again, right? Because of the instability of the 3rd party tools, some issues like crashing or screen errors can be frequently found during the importing process. Just make Sony footage from XAVC to ProRes MOV codec, that the top point. Fortunately we have the Pavtube HD Video Converter for Mac, which could be our best professional conversion tool that can work all various videos available for NELs and media devices. More details about this XAVC to FCP Converter review

How to convert Sony PXW-FS7 XAVC to ProRes codec 422/HQ/4444 as the suitable ones in FCP 7/X?
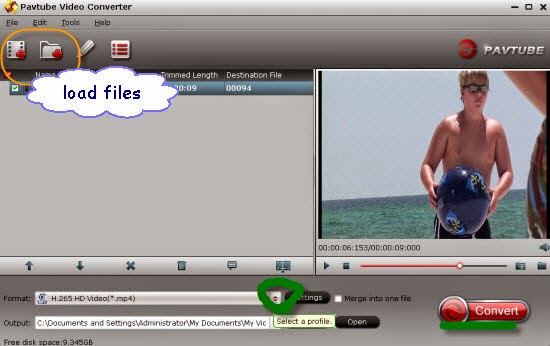
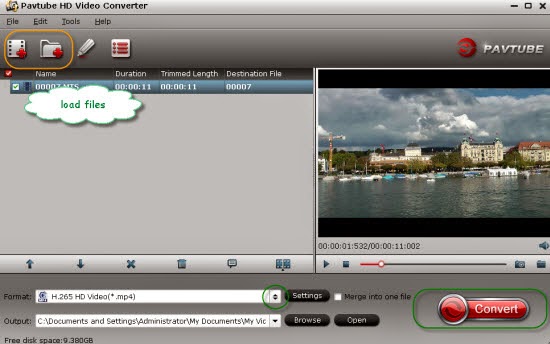
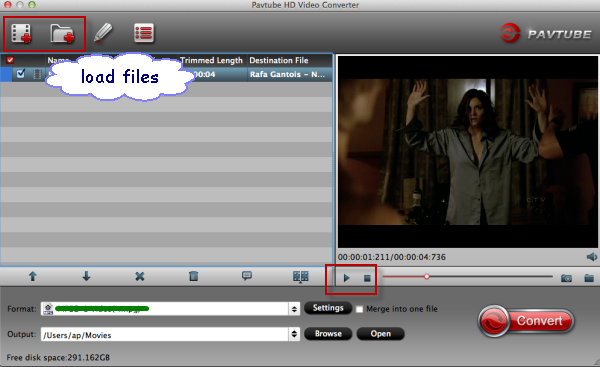
Step 1 Add original Sony XAVC files.
Launch this Mac XAVC to FCP Converter and open the main interface. Add your files in is the first workflow that we should work it well. ‘Add video’ or ‘Add from folder’ can help you out of the importing trouble.


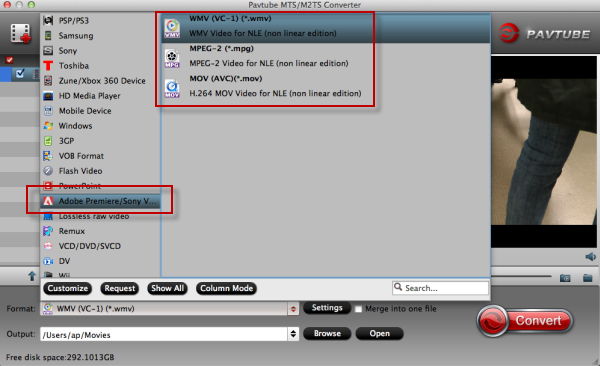
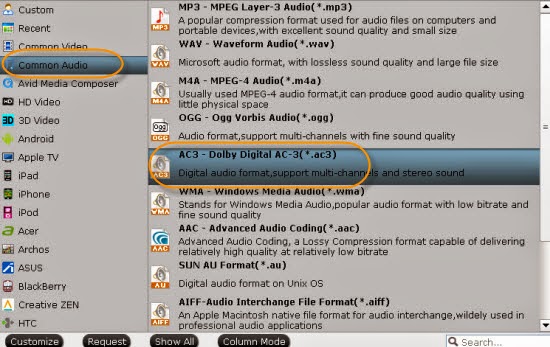
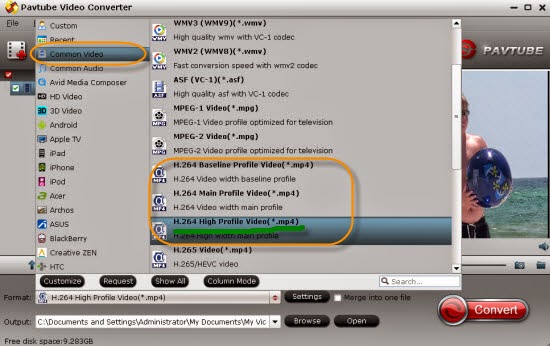
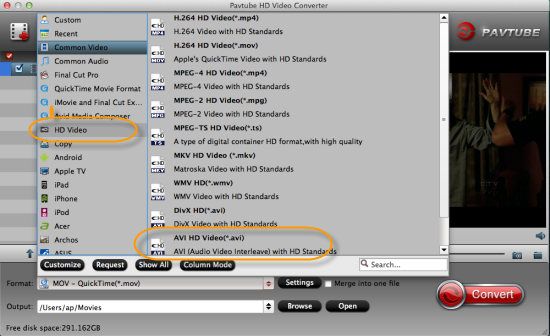
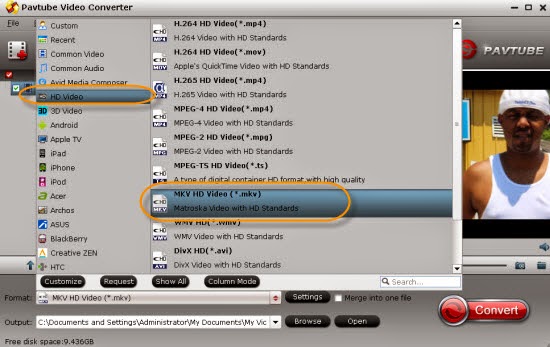
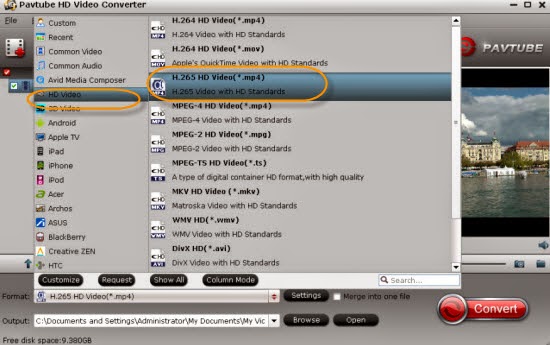
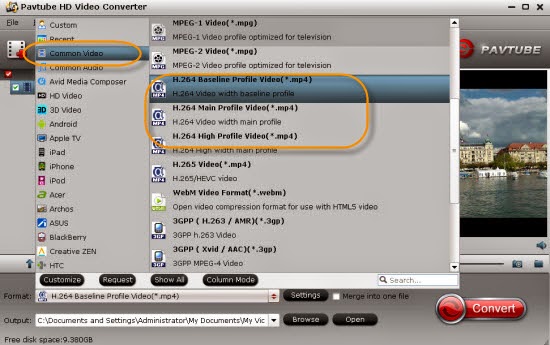
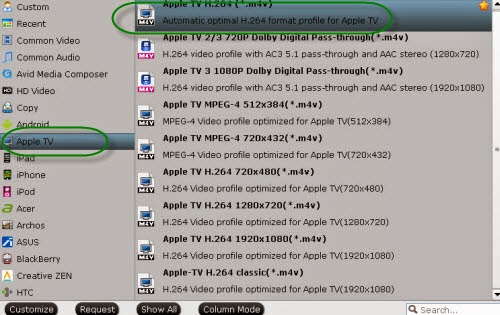
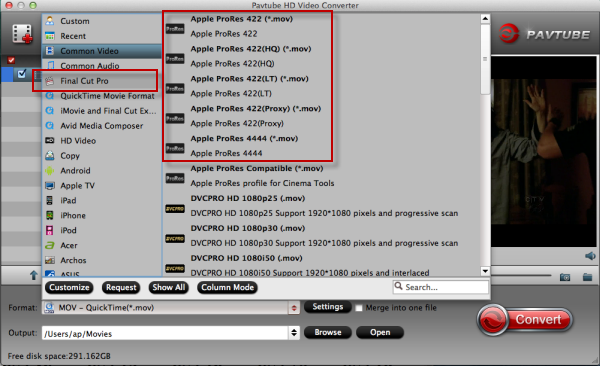
Step 2.Choose the suitable format for FCP 7/X. 
As we mentioned above, how could we find the ProRes codec 422? Press on the ‘Format’ button and come to the output list, just select the ‘Final Cut Pro’>>’Apple ProRes Codec 422’ as the best one. Of course several other ProRes types we can also have a try.


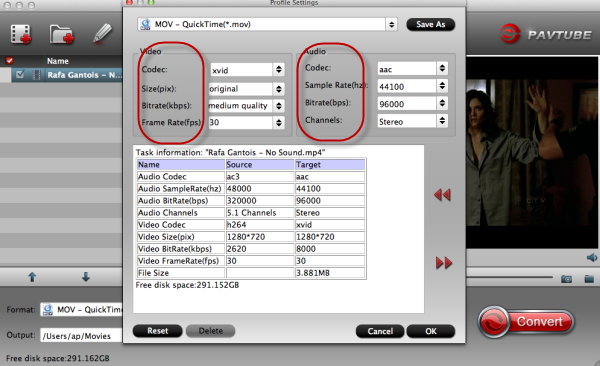
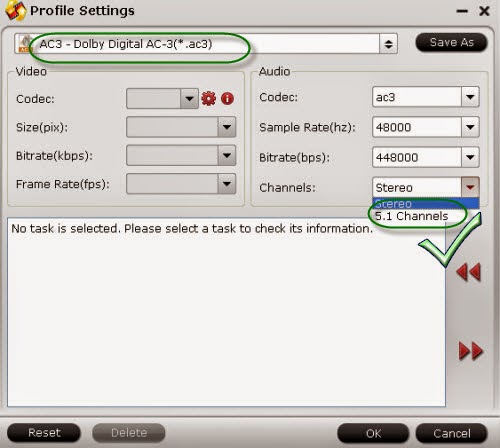
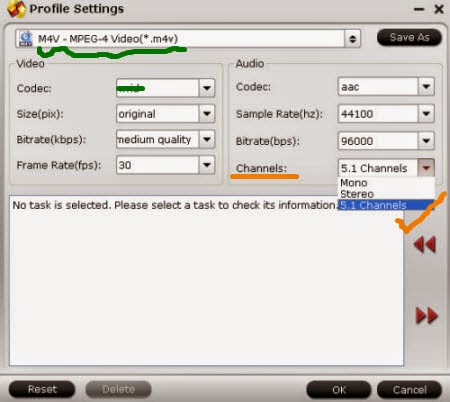
Step 3.Adjust video/audio settings
Click the "Settings" button and customize proper video/audio parameters including Video size, bitrate and fame rate and mroe. Usually 1920*1080 video size and 30fps video frame rate are recommended for FCP editing. Well, if you prefer to work with 4K video, you can adjust video size to get 4K ProRes for FCP. 

Step 4.Start XAVC to ProRes conversion
After all necessary settings, hit the ‘Convert’ button to start converting XAVC video to ProRes for FCP 7/X on Mac OS X. 

Once the conversion starts, with a higher speed, we can easily get the output videos encoded by ProRes codec. Then follow the usual transferring steps, just transfer our XAVC footage to FCP 7/X for nice editing. Any other tips or suggestions you can leave as the comments below.

More:

Friday, January 16, 2015

Premiere Pro CC Won't Import Panasonic AF100 MTS (AVCHD)?

You got the problem in importing Panasonic AF100 MTS (AVCHD) to the latest version Premiere Pro CC? After reading this paper, you may find answers.


Recently from the Adobe forum, we have found the question about the latest version of Premiere Pro CC can’t accept some container formats such like AVCHD MTS files. Today here we are going to talking the reasons and solutions about this topic.

Latest Premiere Pro CC cannot accept AF100 AVCHD MTS files?
Limited by Premiere Pro CC which was produced by Adobe company, some users complained like this’ Premiere Pro CC 2014 won't import Panasonic AF100 *.MTS(AVCHD) files (wrong compression type). Previous version of CC has NO problem importing them. Paid CC Windows 7 x64. What's the deal? Thank goodness I didn't delete the previous version!’ Some errors appear frequently during the processing. But how about the common MP4 or the latest H.265 videos?

Do you find any solutions to get rid of the trouble?
Someone has asked whether Media Browser can solve the trouble or not. They have tried that instead of dragging MTS files into Adobe Premiere Pro. Unfortunately it still does not work. Here some friends also recommend a MTS/M2TS to Premiere Pro CC Converter for Mac to do a favor.(For Windows Version?)

Step-by-step in converting MTS files in MTS to Premiere Pro CC Converter
After downloading the program, in first way, directly drag your files from camera storage when you connect them for a preparation. In second way, from the interface, two items can help you a lot, ‘Add video’ or ‘Add from folder’. Then we are coming for the output format choosing, on the format list, from ‘Adobe Premiere Pro’ to ‘MPEG-2 (*.mpg). You won’t miss it!


Click on the "Settings" button, you will view the Profile Settings window where you can adjust video/audio parameters, like bitrates, frame rate, sample rate, codec, channels, etc. Please note that the larger bitrates, the bigger file size while the better video quality. You can also check "Merge into one file" to combine MTS videos into a big one instead.


For other friends who have not recognize Premiere Pro CC so much, open here to learn some primary knowledge of transferring files in. More opinions you can offer at the end of this paper.

See also:

Wednesday, January 14, 2015

Audio Changes: DTS/DTS-HD/DTS-MA Audio to AC3 5.1/MP3/WAV/FLAC/AAC

Here we are going to have a discussion on how to convert our DTS audios to AC3 5.1/MP3/WAV/FLAC/AAC for nice enjoyment. Do you have any good ideas?

Top point---Necessity of converting DTS audio to AC3 5.1/MP3/WAV/FLAC/AAC
Though all of the DTS audio files are famous for high definition audio quality and widely used for in-movie sound on film or DVD discs. However, DTS (Digital Theater Systems) encoded audio or video files are incompatible with most media players or portable devices. In order to successfully play DTS audio anywhere, a recommended solution is to convert DTS to more popular audio format like convert DTS to AC3 5.1, convert DTS to MP3, convert DTS to WAV and etc. 

Any best DTS converter to change your DTS audio files into AC3 5.1?
In order to make our DTS, DTS-HD, DTS-MA audios played well on media players or portable devices, such as converting MKV 5.1 to AC3 5.1? We need a best DTS converter to make our dream come true. So here the PavtubeVideo Converter Windows/Mac is highly recommended. Not only for converting all various common audios, but also has the strong ability of transcoding different videos.

This guide applies to the audios below:
  • Convert DTS audio to other audio formats like converting DTS to AC3, WAV, AAC, MP3, MP2, FLAC, AIFF, WMA, OGG, APE, M4A, AU and etc.
  • Convert video with DTS audio to video with AC3, AAC, MP2, PCM, or WMA audio like convert MKV DTS to MKV AC3/MP3/MP2/PCM, convert AVI DTS to AVI MP3, and etc.
  • Convert to DTS digital surround audio from WAV, AC3, FLAC, APE, PCM, AIFF, OGG, WMA, M4A, and Apple Lossless.
  • Convert video with non DTS audio codec to video with DTS codec files.

Specific Guide on converting DTS to AC3 5.1 audios is also allowed here:
Step 1. As soon as you step into the main interface, click the ‘Add file’ item on the left corner, we can easily load our original files in.


Step 2. Click the ‘Format’ bar on the left of the preview window, on the output list, the ‘Common Audio’ is obvious there. Then it’s not too hard to find the suitable ‘AC3-Dolby Digital AC-3 (*.ac3)’as the best one. Also ‘WAV’, ‘AAC’ are allowed there if you need.


Step 3. Don’t forget to get into the ‘Settings’ to adjust your audio channels. Here just click the ‘Audio Channel’ to the’5. Channel’ as you want.


For a final step, if you have done all your preparation work, why not press on the big red button ‘Convert’ to start your conversion? With this functional DTS Converter, just do not worry about how to convert your DTS audio files to AC3 and enjoy them nicely on media players and portable devices.

More:

Monday, January 12, 2015

Workflow: Convert MKV FLAC to MP4/M4V/MKV AC3 5.1 on PC/Mac

Why cannot we  directly watch MKV FLAC files on our PC/Mac? How about converting them to the common audios AC3 5.1 in MP4/M4V, which can both be the suitable one on PC/Mac? Let's see more details!

The common MKV files we see are coded with H.264 video and AAC audio. As the demand of high quality audio enjoyment, more and more MKV files are codec with DTS AC3, FLAC audio. MKV FLAC can give people extraordinary listening experience as audio coded is used the lossless audio format FLAC. Such as play our MKV files to QuickTimeHere is the truth that we need to convert our MKV FLAC to AC3/AAC 5.1 on PC/Mac for nice enjoyment with no difficulties.


Why we need to convert MKV FLAC to AC3 5.1 for playback on PC/Mac?
MKV FLAC can give people extraordinary listening experience as audio codec used the lossless audio format FLAC. However, the compatibility of MKV FLAC is quite limited. If you want to play MKV with FLAC audio on other devices, you will need to convert MKV FLAC to AC3 in MP4/M4V/MKV. Encoding channel to AC3 5.1 channel is not a bad idea for playback on PC/Mac.

Solutions to solve the problems of converting MKV FLAC files to AC3 5.1 on PC/Mac:

Cause we have some problems in smoothly playing our MKV FLAC on our computers, do you have any third-party tools that can handle the audios well? Though there are some audio assistants that could work your job, with the bundled-plug-ins or apps you have to download together, you will be confused a lot, right? Fortunately, we have the Pavtube Video Converter for Windows/Mac, which has the ability of converting our various audio files to be compatible for popular media players.

Specific guide on how to turn our MKV FLAC files to AC3 5.1 for a nice playback:
Step 1. Download and install the MKV FLAC to AC3 5.1 converter on PC, then we need to load our original files in with ‘Add video’ and ‘Add from folder’ buttons on the left corner. Just drag them in is also a good idea.


Step 2.How to convert your Audios from FLAC to AC3 5.1? Click the ‘Format’ bar to get into the output list. Come to the ‘Common Audio’ column to find the correct item ‘AC3-Dolby Digital AC-3(*.ac3)’ as the best output one. Just take the following screen shot as follows.


Notes: If you wanna convert your original MKV formats, we suggest you open the ‘Common Video’ on the output list, could your find the ‘MP4’ or ‘M4V’ as output there? Just select them as suitable ones if you want.

Step 3. When we come to the ‘Settings’, we can adjust our audio channels which means we can change our audio channel to 5.1 we need. What’s more, we can here adjust our video size, bitrates or frame rate to the meet our requirements on media players.


Finally, go back to the main interface, click the ‘Convert’ button to end your conversion work. With this MKV FLAC to AC3 5.1 audio assistant, we are surprise to handle the audio converting job well. So now, do you know clearly about it?

More related:

Friday, January 9, 2015

Sony AX100 XAVC S to PowerDirector 13: Export H.265/H264?

Receive XAVC S footage from the newest Sony FDR-AX100 camcorder? After editing your XAVC files in PowerDirector 13, both H.265 and H.264 codec videos you can get as output. but how to convert them freely to each other has become an important task.


'Last sunday I made my first shot with FDR-AX100. Then I edit the video with PowerDirector13 Ultra. I create 2 exports: One 4K-to-1080p H264 codec and One 4K-to-1080p H265 codec. Both videos are MP4 conteiners. In order to freely transcode the H.265 and H.264 to each other no matter for editing in NELs or playing on media players, I'm looking for a professional video converter that can work the issues well. Any good suggestions?'

Pavtube Video Converter---Best H.264/H.265 converter for us!

From H.264 to H.265, we can fully take advantage of the higher quality and smaller size. While from H.265 to H.264, it can help us edit or play H.265 videos on NELs and players much more eaisly. That's the truth! So here we strongly recommend the Pavtube Video Converter for you, with the newest version 4.8.2.0, it can support the H.265/HEVC videos encode and decode well.

Let’s see the great changes of this H.65 Video Converter(More details?)

Step 1.When you download and install this program in according to its instructions, open the main interface, drag your files with ‘Add video’ or ‘Add from folder’, we can easily let the source files in. The latest version 4.8.2.0 can support the H.265/HEVC videos for importing well.


Step 2.Next, let’s come to the output list for more details, there are some main changes we should know better in this new version. Such as the added item ‘H.264 Baseline/Main/High’ three standards we can choose as we want. Usually, for some older devices, we can choose the baseline for the best, but for new, we always choose the ‘High’ to get the best quality.


Step 3.What’s more, we can see the added ‘HD Video>>H.265 HD Video(*/mp4)’, here we can transcode our video to H.265 codec. With the smallest body of H.265 videos, I’m afraid it will take us a lot of time. So if you are free, why not have a try to presume the higher video quality? As mentioned above, we can choose this one for editing in PowerDirector for a nice editing.


What’s more, the upgraded version has already fixed the bug of the crash when importing XAVC files in for working. Additionally, the original ‘Settings’ and ‘Edit’ functions they have preserved well.

Tips: For now, the two versions are only available for Windows, the upgraded Mac version will release as soon as possible. So if you have already got this H.265 video converter, just click the ‘Help’>>’Update’ to the latest version for more enjoyment. Now, are you still worrying about how o deal with the H.264/H.265 videos after edited from PowerDirrector 13?

Related:

Wednesday, January 7, 2015

Upload Christmas Videos to YouTube/Vimeo/Facebook for Sharing

In order to review the 2014 Christams, is that a good idea to upload the Christmas videos on YouTube, Vimeo or Facebook for a nice sharing with others?

Hi guys! Have you shot some memorial videos with your families in the past 2014 Christmas? Or have you enjoyed yourselves among the Christmas holidays? Some guys have got the idea of uploading their Christmas videos on YouTube, Vimeo or Facebook to share with friends or someone else, how do you enjoy your YouTube Videos such as MP4 files? In this article, our purpose is teaching you how to share your Christmas movies on these video platforms successfully.


Cause these three popular video platforms cannot accept all different video formats as you know so when you shot the incompatible formats from your HD camcorders, it is necessary for us to do some changes to make them suitable for YouTube, Vimeo and Facebook, etc. In other words, it just like the such reasons: A wide variety of devices are used for shooting video: camcorders, digital cameras, webcams, cell phones, and more, but most of them save video in non-standard formats. 

So how to make all video formats accepted by YouTube/Vimeo/Facebook? Any good suggestions?
Well, good news for everyone! The old famous video converting studio has upgraded the Windows product HD Video Converter/Video Converter to the newest version 4.8.2.0, which has strong ability of converting all different footage to others, including the latest codec H.265/HEVC. Is that cool? The program supports almost all popular video formats, including AVI, MP4, FLV, 3GP, MOV, HD video and many more. It also lets you do minor editing: trim and rotate video, adjust brightness, contrast, etc.

Tips: If you are not familiar with the YouTube, Vimeo and Facebook, we can tell you the most suitable video formats for each one. Such as FLV for YouTube, AVI for Vimeo and Facebook. According to this warning, will it be easier for us to choose the right output formats?

Steps on details that can tell you how to make your Christmas videos go through the YouTube/Vimeo/Facebook(Example: Pavtube HD Video Converter for Mac)

Step 1: Download and launch this Mac program on your computer, open the main interface, with ‘Add videos’ or ‘Add from folder’ we can easily let our original files in. Or directly drag our files in is not a bad idea too.


Step 2: Choose individual output format for YouTube/Vimeo/Facebook.
Next, just come to the output list, as we mentioned above, we need to select the most compatible ones for these three guys. Click the ‘Format’ bar on the left of the preview window, select the ‘Flash Video’>>’FLV H.264(*.flv)’ as the best for YouTube.


While for Vimeo and Facebook, may be the AVI could be the best. So you can tap this one in the searching box. In another way, select the ‘HD Video’, let’s find the ‘AVI HD Video (*.avi)’ as the best one. You won’t miss it.


Step 3.(Optional) Wanna cut the video length and add some subtitles with your output? Why not go to the ‘Edit’ button to take around? With the ‘Trim’, we can decide where to start and where to end, also with the ‘Subtitles’ item, add some explanations would be much easier for us. Any other functions you can explore by yourselves.


At the end, when you have done all the preparation work, go back to the main interface, hit the ‘Convert’ button there we can easily get our work started. In other ways, I have to admit that it’s actually a good idea to record your 2014 Christmas movies on YouTube/Vimeo/Facebook as forgettable memories!

Related articles:

Monday, January 5, 2015

Convert My TiVo Recordings to HD MKV with High Quality?

Any good suggestions there offered for us to convert my Tivo recordings to HD MKV with High Quality? Waiting for your best adcices!


Summary: Seeking for tips and tricks on how to smoothly convert your Tivo files to HD MKV? As long as you get the professional Tivo converter, anything is possible!

HD videos have make up a necessary part of your digital world. At the same time, Tivo show also play an important role. But they are not a friendly companion to edit or smoothly playback. You may want to convert Tivo shows to an easy-to-play format. 

While for TiVo, the professional digital video recorder, provides us with marvelous videos, TV shows, and movies. However, we often meet the issue that TiVo videos cannot be played on Windows, Mac, media players or be transferred to portable devices or be edited in video editing tools.

To solve the compatibility and freely enjoy TiVo videos, we had better to convert TiVo videos to more popular video and audio formats just like the typical MKV, MP4, etc. Or play Tivo on Windows Media Player? Or transfer Tivo on PC? To get rid of these troubles, any best methods there we can take a reference?

So luckily, we here have searched a professional Tivo Video Converter which has the strong ability of working Tivo files with various formats or devices produced by Pavtube studio. With a high conversion speed and quality, it has a good reputation online. We also call it as Tivo Video Editor because it can merge TiVo files together, trim TiVo video clips, split TiVo files into chapters, adjust the video screen of TiVo files, remove black bars from TiVo files, add watermarks to TiVo files, add subtitles to TiVo files,etc.

P.S. If you are planning to encoding TiVo to HD MKV on Mac OS X(Yosemite included), please get the equivalent Mac version Pavtube Tivo Converter for Mac. There, you can learn how to convert Tivo to iPadtransfer Tivo to iPhone or something else.

Step by step guide on how to easily convert Tivo to MKV with high quality preserved:
Step 1.Download and launch the Windows Tivo Converter, click on the ‘Option’ button on the main interface, input your ‘Tivo Media Access Key’ to let your files in as the screen shot follows:


Tips: How to find your Tivo Media Access key? Just go to the ‘Tivo Cetral ‘menu>>’Message and Set up’ Account and system information’, your Media Access Key would be there.

Step 2. For example, transcode files from Tivo to HD MKV? Just Go to the output list to find the ‘HD Video’ >>’MKV HD Video(*.mkv)’ as your wanted. Surely you can tao the ‘MKV’ in the searching box to find is quickly.


Note: Good news here! Pavtube studio has announced that the all windows products has upgraded to version 4.8.2 which meand this Tivo converter also has the capability of encoding or decoding H.265/HEVC files well. More details about this upgraded version?

For other functional requirements? You can go to the main interface to click the ‘Edit’ as we mentioned above, there you can ‘Trim’ ‘Crop’ your output videos well. Or hit the big red button ‘Convert’, you can get your conversion work started!

More posts:

Wednesday, December 31, 2014

Workflow: Samsung NX1 4K H.265 to Sony Movie Studio 13

In order to make the Samsung NX1 4K H.265 recordings friendly with Sony Movie Studio, this following article can offer you some effective ways.

Hello guys! It’s not a bad idea if you are enjoying the 4K recordings with your Samsung NX1 camera! Cause this kind of 4K camera has shot the footage encoded by H.265 codec, which is the newest codec standard that not be fully spread in this video codec area. So editing your 4K H.265 recordings to Sony Movie Studio 13 must trouble you a lot, right?


Comparing with the H.264, what advantages can H.265 bring to us?
In general, H.265 has several big advantages over H.264, including better compression, delicate image and bandwidth saving. Small size, higher quality, that’s the highlight h.265 codec brings to us. For more detailed differences, please read H.265 vs H.264 comparison table.


Efficient way of converting H.265 to MPG to make it suitable for Sony Movie Studio 13.
Among all available H.265 video converters in the market, not all video converting tools can hold the new H.265 codec videos well. Fortunately, the famous Pavtube Studio has claimed that their upgraded version has claimed the Pavtube HD Video Converter(version 4.8.2.0) can support the H.265 codec well. Let’s get more details on how to work it well:

Step 1. Load your Samsung NX1 H.265 recordings.
Launch the H.265 Video Converter and open the main interface, normally, we can click the ‘Add video’ and ‘Add from folder’ to add the source recordings. Of course we can also drag the files in this program. Batch conversion is also available.


Step 2.Choose suitable output for Sony Movie Studio 13
Then we are going to come to the top important step, select the best output one for Sony Movie Studio 13. Tap the ‘Format’ bar on left of the preview window, drop down the output list, nearly on the bottom of the list, we suggest to find the ‘Adobe Premiere Pro/Sony Vegas’>>’MPEG-2 (*,mpg)’ as the best. Also, MOV and WMV you can have a try.


Tips: Encode other videos to H.265? Let me show you the way. Choose the ‘HD Video’ on the output list, could you see the ‘H.265 HD Video (*.mp4)’ there. That’s what you want. What I need to mention you is H.265 codec on one hand brings the higher quality and smaller size, on the other hand, it also need much more time to wait for the conversion result.


Step 3. Optional function for advanced users
Still Pavtube studio keeps the ‘Settings’ item down for those who wanna more adjustments on their output videos. To adjust the video codec, video size, bitrates or frame rate or some audio channels, why not take around of this function?

At the end of the page, if you have finished the preparation work, go back to the main interface, hit the big red button ‘Convert’ on the main interface, it’s time to get our job started. More details about this upgraded version you can take this article review for a reference.

More:

Tuesday, December 30, 2014

Let’s Get Closer to HEVC (H.265) & H.265 Transcoder

This guide below can easily take us closely to the latest codec H.265 and what’s more, we can got a best way of encoding H.265 videos well.


Brief introduction of HEVC/H.265 codec videos:

With the development of more and more video codec types, recently, the H.265/HEVC codec has become the hottest one online, do you have any message about it? H.265/High Efficiency Video Coding (HEVC) is a video compression standard, a successor to H.264/MPEG-4 AVC (Advanced Video Coding), that was jointly developed by the ISO/IEC Moving Picture Experts Group (MPEG) and ITU-T Video Coding Experts Group (VCEG). HEVC is said to double the data compression ratio compared to H.264/MPEG-4 AVC at the same level of video quality.

How could we play our H.265/HEVC videos for nice enjoyment?
Some users may wonder that if there are any players or devices to support H.265 videos since the H.265 videos are not popular. Frankly, according to the research, the vast majority of mainstream player developers are launching the technologies for playing H.265 videos. By means of searching on Google, you will find plenty of players support H.265 video playback. Moreover, some manufactures even market their H. 265 video converter.


According to the statistic data comes from the third party, it is obvious that portable devices and computers in support of playing H.265 video are widely spread and the shipment is on rise. This indicates that H.265 video will be very popular in the future. As the leading video tool developer, I don’t know if you have noticed that the Pavtube Studio has announced that they can encode or decode the H.265 videos nicely?

Best H.265/HEVC transcoder ---Pavtube HD Video Converter(Version 4.8.2.0)
Cause there are not so many editing apps or media players can support the H.265/HEVC videos yet for now, we here introduce the a upgraded HD video converter to you, which has a strong ability of transcoding this new H.265 codec to other common ones. More upgraded details you can open here.(Upgraded changes)

Step-by-step guide on working this H.265 video converter well
Step 1, From the official website, you can download the latest version and install this program according to its instructions. When you get into the main interface, two buttons on the left corner you can load your source H.265 files in, ‘Add video’ and ‘Add from folder’. Batch conversion is also supported well.


Step 2.Cause this program ca encode the H.265/HEVC files, so it is freely to load your files in. Then, wanna the suitable output to transcode H.265 codec to common ones for playing on handle devices or media players? Let me give you the ‘H.264 MP4’ as the example. Come to the ‘Common Video’, three types of H.264 codec we can choose as our favorite, ‘H.264 Baseline/Main/High’.

Tips: Usually, we choose the ‘H.264 High Profile Video’ as our best for advanced devices, if you still own older device, maybe the ‘H.264 Baseline Profile Video’ could be your best.


Step 3.Still, there are some other functional items you can take around, such as the ‘Edit’, here we can edit your output files with a nice enjoyment, right? Such like the ‘Trim’, to decide where to start and where to end. ‘Crop’ to remove your unwanted video edges, or ‘Subtitles’ to add some explanations, etc. Switch into to the ‘advanced mode’, more items you can find here.


Finally, back to the interface, if you have finished the preparation work, why not click the ‘Convert’ to start your conversion job? More details about this H.265 codec, you can open this guide to know more here. Any other suggestions or opinions you can leave as comments below.

More guides:

Monday, December 29, 2014

Surprise for Pavtube Upgraded Windows Products! H.265/HEVC or XVAC Codec Supported!

Good news for everybody! Thanks to the Pavtube Studio, we can realize our hope to enjoy the super high quality videos encoded by H.265 or HEVC. During this 2014 Christmas holidays, it is indeed a big Christmas gift for everyone who loves shooting high definition videos, right? Let’s find more details about this great job!


Tips: Development and prospect of Pavtube Studio---News for Upgraded H.265/HEVC Converter!

Main new features we may be interested in:
1. H.265/HEVC encode supported
2.H.265/HEVC decode supported
3.Support MXF in XAVC Video Codec
4.Add H.264 baseline/main/high output profiles

What Windows products are upgraded well?
For videos:
Pavtube HD Video Converter
Pavtube Video Converter
Pavtube MXF Converter
Pavtube MXF MultiMixer
Pavtube MTS/M2TS Converter

For DVD and Blu-ray:
Pavtube BDMagic
Pavtube ByteCopy
Pavtube DVDAid

Both for Videos and DVD/Blu-ray:
Pavtube Video Converter Ultimate

What is HEVC(H.265)? 
High Efficiency Video Coding (HEVC) is the latest generation video compression standard. This standard was developed by the ISO/IEC Moving Picture Experts Group (MPEG) and ITU-T Video Coding Experts Group (VCEG), through their Joint Collaborative Team on Video Coding (JCT-VC)
HEVC is also known as ISO/IEC 23008-2 MPEG-H Part 2 and ITU-T H.265
HEVC provides superior video quality and up to twice the data compression as the previous standard (H.264/MPEG-4 AVC)
HEVC can support 8K Ultra High Definition video, with a picture size up to 8192×4320 pixels

The benefits of H.265
H.264 has been a huge success. It’s a flexible codec standard that’s used by streaming services, satellite providers, and for Blu-ray discs. It’s scaled remarkably well since it was first proposed and is capable of handling 3D, 48-60 fps encodes, and even 4K. The Blu-ray disc standard doesn’t currently include provisions for some of these technologies, but the H.264 codec itself is capable of handling them.

The problem with H.264, however, is that while it can handle these types of encodes, it can’t do so while simultaneously keeping file sizes low. A new standard is necessary to push file/stream sizes back down while driving next-generation adoption, and that’s where H.265 comes in. It’s designed to utilize substantially less bandwidth thanks to advanced encoding techniques and a more sophisticated encode/decode model.

With the popularity of H.265(HEVC) and XAVC, more and more users are fond of enjoying this high resolution videos. So in this way, Pavtube Studio has offered us an efficient way when meeting troubles in editing incompatible H.265 videos in NELs or play on media players. Pavtube products I think that can do you a big favor.

Official website: http://www.pavtube.com/
Source From: http://digisns.com

More guides:

Friday, December 26, 2014

Share Tips on How to Enjoy HD MKV Movies on Apple TV/2/3

Got a hobby of enjoying HD movies on Apple TV/2/3? In following article, several pieces of suggestions there we can take to play HD MKV movies on Apple TV


Though we always look the Apple TV as our favorite playing studio, some special videos which encoded by container format is not available. MKV is such a typical one. Just be a good reader and you can get several solutions how to enjoy our MKV movies on Apple TV or play on QuickTime/iTunes below. We are looking forward to enjoy the effective measures.

Why Apple TV can attract all our attention:
It is a tiny digital media player which allows you to enjoy a whole world of movies, TV shows, sports, music, and more. So far, the latest version of Apple TV is the third generation, in up to 1080p HD. The device also plays content from any Mac OS X, iOS device or Windows with AirPlay or iTunes.

  • Apple TV is compatible with the following video formats:
  • H.264 up to 720p at 30 frames per second (1st & 2nd generation);
  • H.264 up to 1080p at 30 frames per second (3rd generation);
  • MPEG-4 up to 720x432 (432p) or 640x480 pixels at 30 frame/s;
  • Motion JPEG up to 720p at 30 frame/s.

Depending on your source files, we would like to offer you three main steps of playing MKV movies on your Apple TV/2/3.

Play the MKV file on a Mac and use AirPlay Mirroring
Remuxe the video file so that it’s compatible with the Apple TV
Transcode/Re-encode MKV files with Pavtube Video Converter for Mac

More details about the three methods we may take a close look:
A: AirPlay Mirroring
A nice and easy way, if you have a modern Mac, is AirPlay Mirroring. Basically, this means that you play the video with your Mac (for instance with VLC) and just mirror your display to the Apple TV.
Details here: AirPlay Mirroring and AirPlay Mirroring: Tips for improving Performance .The big advantage is that you can instantly start watching your video.

B: Remuxing the MKV video
In most cases, the container format (.mkv) is the problem, not the video and audio stream inside. Then remuxing helps. It’s means that you don’t touch the video and audio streams. You just put an exact copy of them into a new container which is supported by Apple TV. This works for all videos, that have compatible streams inside that are encoded for instance with H.264 and AAC.
For remuxing use a software like Subler. Open the .mkv file, select the streams and pass them through to a .m4v file. This doesn’t too long because it’s just “copying files”. You should prefer remuxing to transcoding because you leave the streams untouched and avoid losing quality.

C: Pavtube Video Converter for Mac---Transcode MKV to MP4 for Apple TV
If the video or audio stream in your MKV file isn’t supported by Apple TV, you have to re-encode it. This means converting the streams to a different codec, bitrates or resolution and save it in a compatible container file format (like .m4v). This is time-consuming and could cause a loss in quality. More specific conversion steps:

From the website, we can download and install the program successfully, with the ‘Add video ‘and ‘Add from folder’, we can easily import our MKV files. Come to the output list, we can find the ‘Apple TV’>>’Apple TV H.264(*.m4v)’, which could be the best one for playing on Apple TV. Like the following screen shot shows below. After that, we can also go around the ‘Settings; or ‘Edit’ to adjust our output videos for a nice enjoyment? Finally, just hit the ‘Convert’ button on the main interface, with a high conversion speed, we won’t wait a long time to get the output M4V files. Such an easy operation job to work with, right?


Stream MKV to Apple TV via AirPlay or iTunes
Via AirPlay: Firstly, to use AirPlay, you need to prepare one of the following devices: iPhone 4 (or later), iPad, iPad mini, or iPod touch (4th generation or later). Add the converted MKV movies to iTunes and sync to your iOS device.
Secondly, be sure iOS device and Apple TV are in the same Wi-Fi network; start play the video on your device, and then swipe up from the bottom of your device screen to access Control Center and tap AirPlay; finally, tap the name of the device you want to AirPlay to.
Via iTunes: Firstly, add the converted MKV videos to iTunes. Then, go to iTunes > Preferences, choose Apple TV, and make sure "Look for Apple TVs" is selected.
Secondly, on your Apple TV, choose Settings > Computers > "Connect to iTunes," and note the passcode displayed; in iTunes, select the Apple TV (below Devices), and enter the passcode.
Thirdly, click the Summary button and select one of "Automatic Sync" and "Custom Sync".
Now, all content are streamed to Apple TV for enjoyment. Could you image an easier way to do this than Faasoft MKV to Apple TV Converter? Good luck!

Related: