Pavtube Studio just announced all Pavtube Windows products, including BDMagic, ByteCopy, DVDAid, Video Converter Ultimate. Video Converter, MXF Converter, HD Video Converter, MTS Converter and MXF MultiMixer, are upgraded. PC users now can encode Blu-ray, DVD movies and all kinds of Common/HD/4K Videos to MOV with Apple ProRes codec, HEVC/H.265 MKV, and Sony/LG/Samsung/Panasonic TV formats with excellent video/audio quality and super speed. Registered users could download and install the latest version for solution to their issues.See also:
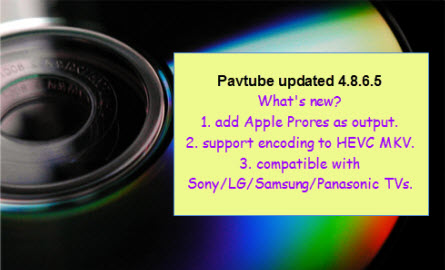 What's new in this upgrade?1. Add Apple Prores as outputPC users who are eager to create Apple ProRes video under Windows OS would love the new upgrade of Pavtube Windows programs because this has been realized in the new version. Pavtube adds Apple ProRes MOV in Format list for fluent video playback, video editing, and personal use you desire.2. Support encoding to H.265/HEVC MKVAnother new element in the new Pavtube programs is that registered users now can save Blu-ray, DVD, and video sources to HEVC/H.265 MKV. HEVC provides better video quality in same file size compared to H.264. And Pavtube members can do that in the new upgrade with fast speed.3. Compatible with Sony/LG/Samsung/Panasonic TVs.Last but not least, Pavtube software is not compatible with Sony, LG, Samsung and Panasonic TVs. Pavtube adds these TVs under Format menu, without extra operations, you can easily create movies and videos for perfect playback on any of these TVs.More information you need about the new upgrade and Pavtube products can be found on Pavtube official website.Pavtube Software Upgrade Promotion on Facebookhttp://bit.ly/1hmOn34This upgrade, Pavtube Facebook provide up to 35% Off Blu-ray/DVD Ripper & various (HD) Video Converters, the best yet easy-to-use tools to convert your Blu-ray/DVD movies, Common/HD/4K Video files into H.265 MP4/MKV, Apple Prores, various TV profiles, M3U8, MP4, MOV, MKV, AVI, M4V, WMV, VOB, MPG, FLV, SWF, Divx, Xvid, AAC, MP3, WMA, WAV, M4A, AC3, FLAC and more onto smartphone, tablet, computer, media player, stream server, TV set, game console, VR headset, hard drive, etc. with multiple wanted audio/language/chapter markers!Up to 35% OFF Discount can be shared here:35% Off Pavtube BDMagic for Windows or Mac35% Off Pavtube DVDAid for Windows or Mac30% Off Pavtube Video Converter Ultimate for Windows or Mac30% Off Pavtube Video Converter for Windows or Mac20% Off Pavtube ByteCopy Windows or Mac20% Off Pavtube MTS/M2TS Converter for Windows or Mac20% Off Pavtube Multi-track MXF Converter for Windows or MacJust like us on page and you can get it with all other free software giveaways, useful guides, and lifelong discounts.If you have any problem to buy or use Pavtube software, pls feel free to contact support@pavtube.com (for Windows user), macsupport@pavtube.com (for Mac user).
 More Topics
Summary: Want to convert FZ330 MP4/AVCHD to ProRes for FCP X editing? If so, this article is right for you. It introduces an easy way to you guys, so you can finish the job effortlessly.
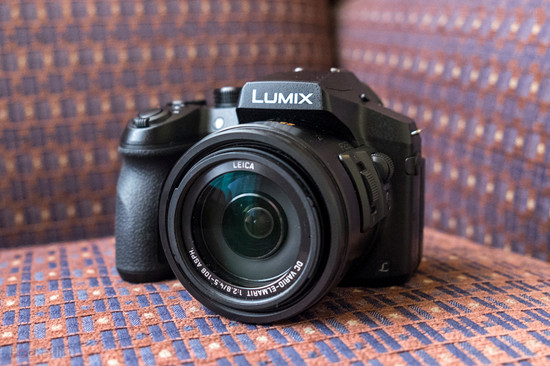 Hot search: Phantom 3 4K Video to FCP 7/X | AEE S71 MP4 to FCP 7/X | Panasonic AJ-PX380 MXF to FCPThe FZ330 adds a few upgrades over the FZ200, including 4K Photo burst shooting modes and faster autofocus. It's also possible to shoot “normal” 4K videos in MP4 format, as well as Full HD footage in MP4 or AVCHD format at up to 60p. This has necessitated an upgrade to the memory card port, which is now UHS-I and compatible with SDHC/SDXC cards.“I need a tool that can help me to import Panasonic FZ330 MP4 footage to FCP X for editing. FCP X couldn’t recognize FZ330 MP4 files. I was told that FCP X native supported codec is Apple ProRes codec, will this codec help me? Please give me some suggestions on the way to import MP4 to FCP X.”If you have whatever issues editing FZ330 MP4/AVCHD in FCP X, we would recommend convert them to a format that is best suitable for use in FCP X, such as Apple ProRes. Some main files formats recommended for Final Cut Pro:Video Formats: Apple Animation codec, Apple Intermediate codec, Apple ProRes(all versions), AVC-intra, AVCHD (including AVCCAM, AVCHD Lite, and NXCAM), DV (including DVCAM, DVCPRO, and DVCPRO50), DVCPRO HD, H.264, HDV, iFrame, Motion JPEG(OpenDML only), MPEG IMX(D-10), REDCODE RAW (R3D), Uncompressed 10-bit 4:2:2, Uncompressed 8-bit 4:2:2, XAVC, XDCAM HD/EX/HD422, QuickTime formats.Audio Formats: AAC, AIFF, BWF, CAF, MP3, MP4, WAVContainer format: 3GP, AVI, MP4, MXF, QuickTimeStill-image formats: BMP, GIF, JPEG, PNG, PSD, RAW, TGA, TIFFGenerally, we can use Log and Transfer or Log and Capture to import MP4/AVCHD to FCP X for editing, but don’t expect it to result in top quality. So we could depend on Pavtube HD Video Converter for Mac (review) to convert FZ330 MP4/AVCHD to ProRes. Along with the help of it, you can complete the task effortlessly. It supports creating high quality ProRes video for FCP X and all the versions at super fast speed effectively.
 Other Download:- Pavtube old official address: http://www.pavtube.com/hd-video-converter-mac/- Amazon Store Download: http://www.amazon.com/Pavtube-Video-Converter-Mac-Download/dp/B00QI9GNZS- AppStore Download: https://itunes.apple.com/de/app/pavtube-hd-video-converter/id502792488?mt=12- Cnet Download: http://download.cnet.com/Pavtube-HD-Video-Converter/3000-2194_4-76177786.htmlHow to edit Panasonic FZ330 MP4/AVCHD in FCP X?Step 1: Launch the MP4/AVCHD to ProRes Converter on your Mac, and then click the “Add video” button to import your source files directly. In order to import several files at one time, you can click “Add from folder” button.
 Step 2: Click the “Format” bar to get the drop-down menu and you can get “Final Cut Pro>>Apple ProRes codec”, including ProRes 422, ProRes 422 (HQ), ProRes 422 (LT), ProRes 422 (Proxy) and ProRes 4444. Choose the proper one you want. Here, we suggest you to choose Apple ProRes 422 .mov as the best output format.
 Step 3: Press the “Settings” icon and you’d better set the video frame rate as 30fps, video size as 1920*1080 for editing FZ330 MP4/AVCHD files in FCP X easily.Step 4: Now, click "Convert" and let it go. The program supports batch conversion. So if you have lots of files to convert, check “Shut down computer after conversion” and you can go away without keeping an eye on it.Conclusion: Once the conversion process shows in 100%, click “Open” to get the output videos. Create a project and start editing FZ330 MP4/AVCHD in FCP X with light speed.
Further Reading:
Summary: This article will do you a favor if you find it’s hard to play MP4 on Xbox 360. Keep learning and find something useful to you.
 Hot search: MKV to Xbox | AVI to Xbox 360 | H.265 to Xbox One/360Microsoft Xbox 360 is great not only for playing games but also for playing movies. The Xbox 360 console supports movies in most formats like AVI, WMV, MP4, H.264, MOV, M4V. However, though MP4 is claimed to be supported by Xbox 360, sometimes we still run in to difficulties to play MP4 on Xbox 360.Why fail to play MP4 on Xbox 360 and the solution to successfully play MP4 on Xbox 360Xbox 360 can play MP4 video files with extension of .mp4 or .mov with video codec of MPEG-4 AVC H.264 and MPEG-4.As MPEG-4 AVC H.264 codec, support is limited to the following specifications:AVC Profile: Baseline, Main and High Profiles;AVC Level: up to 4.1;Video bit rate: 10 Mbps with resolutions of 1920*1080 at 30 fps;Audio profiles: AAC, 2-channel, Low Complexity.As MPEG-4 codec, support is limited to the following specifications:Video profiles: MPEG-4 Part 2 (Simple Profile and Advanced Simple Profile);Video bit rate: 5 Mbps with resolutions of 1280*720 at 30 fps;Audio profiles: AAC, 2-channel, Low ComplexityIf the MP4 video does not meet the above specification, (for example MP4 with 5.1 AAC audio) the MP4 will either fail to add to Xbox 360 or unable to play on Xbox 360. But this doesn’t mean there is no solution for you: you can convert your unplayable MP4 to Xbox 360 compatible files using MP4 to Xbox 360 Converter, like Pavtube Video Converter (Mac version), a recommended choice by millions of fans. This app is outstanding with its super fast conversion speed, broad format support, helpful features and more. With its intuitive interface, you can easily and quickly convert your MP4 to output loss-less files with Xbox preferred codec or remux them to MP4 container in few clicks to make MP4 content watchable on Xbox 360 without considering its specification.
 Other Download:- Pavtube old official address: http://www.pavtube.com/video_converter/- Amazon Download: http://download.cnet.com/Pavtube-Video-Converter/3000-2194_4-75734821.html- Cnet Download: http://download.cnet.com/Pavtube-Video-Converter/3000-2194_4-75734821.htmlHow to play MP4 on Xbox 360 successfully?Step 1: Download, install and run the corresponding program. Click “Add Video” or “Add from folder” to load your MP4 files.
 Step 2: Click the “Format” bar and select “HD Video>>H.264 HD Video (*.mp4)” as output format.
 Step 3: Go back to the main interface, hit the big button “Convert” there.Conclusion: There is no need for waiting for a long time. We can receive the best output files nicely. After conversion, you can get the generated files by hitting “Open” button.Further Reading:
Summary: Are you mad that H.265/HEVC can’t be edited in EDIUS 5/6/7/8? So want to convert H.265/HEVC to EDIUS but don’t know how to do it? It’s resolved here.
 Hot search: MKV to EDIUS Pro 8 | GoPro MP4 to EDIUS Pro 7 | AVI to EDIUS 7/7.01 | Panasonic DVCPro HD MXF to EDIUS Pro 7With the smaller size and higher quality, H.265/HEVC codec has become more and more popular codec used by more camcorder brands. High Efficiency Video Coding (HEVC), also known as H.265, promises twice the compression possible with Blu-ray’s best video compression methods. But how does it work, and is it enough to get us better-looking 4K content. Unfortunately, H.265 has not be popular enough to accepted by most NLEs like EDIUS, players or devices so we need some third-party H.265/HEVC Video Converter that can handle this kind of codec much well.EDIUS Pro supported format for file import:
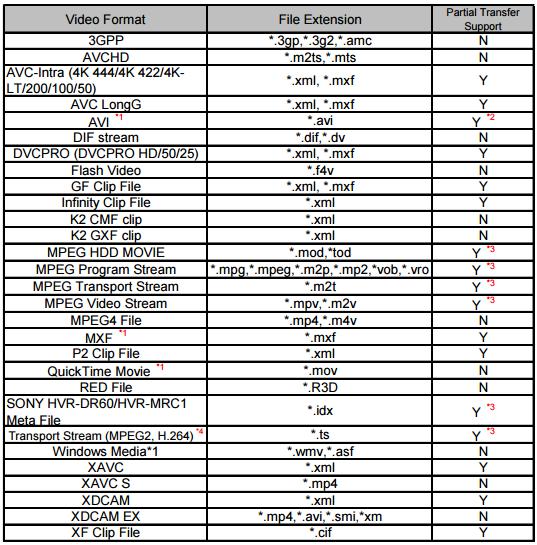 From the above table lists, we can see there EDIUS Pro has no file import support for H.265/HEVC compressed 4K video files. Therefore, how to successfully import H.265/HEVC to EDIUS becomes a hot issue. Since EDIUS lacks GPU acceleration for transcoding H.265/HEVC 4K video files, you will need to employ a third-party application to perform the video codec transcoding process for you. After multiple testing, I found Pavtube Video Converter is the best option. It is able to convert H.265/HEVC to EDIUS friendly format MPEG-2 easily with the best video quality. Besides H.265/HEVC, this video convert program can also help to convert between any popular video and audio formats as you need. Plus, with the built-in video editing feature of the program, you can trim, crop, add watermark and more to your video files. Other Download:- Pavtube old official address: http://www.pavtube.com/video_converter/- Amazon Download: http://download.cnet.com/Pavtube-Video-Converter/3000-2194_4-75734821.html- Cnet Download: http://download.cnet.com/Pavtube-Video-Converter/3000-2194_4-75734821.htmlHow to edit H.265/HEVC in EDIUS 5/6/7/8?Step 1: As soon as you download and install the program, launch it and when the main interface pops up in front of us, just click the “Add Video” or “Add from Folder” to let in.
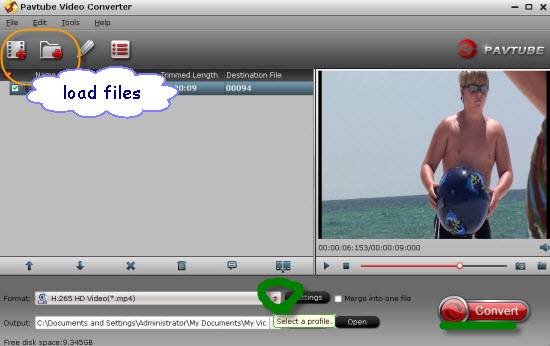 Step 2: Click the drop-down list in the format line to get the format box. Then choose “Adobe Premiere/Sony Vegas>>MPEG-2 (*.mpg)” as output format.
 Step 3: Click “Settings” button to customize the output video and audio settings by yourself. But if you are not good at it, you’d better use the default parameters, they will ensure you a good balance between file size and image quality basically. You can change the resolution, bit rate, frame rate as you need.Step 4: After that, click “Convert” to start H.265/HEVC to MPEG-2 conversion.
Conclusion: After conversion, you can get the generated files by clicking “Open” button. Now, you’ll get no troubles in editing H.265/HEVC files in EDIUS 5/6/7/8.Further Reading:
Summary: You may find that DaVinci Resolve won’t import Phantom 3 4K video smoothly. The easy workaround is to convert Phantom 3 4K video to DNxHD MOV for DaVinci Resolve editing.
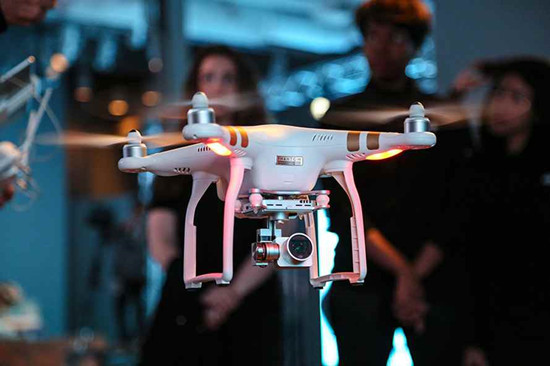 Phantom 3 Professional 4K Camera:Finally, a flying camera that packs years of experience in aerial imaging into one compact, easy to use system. With the Phantom 3 Professional, you’re shooting 4K video at up to 30 frames per second and capturing 12 megapixel photos that look crisper and cleaner than ever. A live HD view lets you truly experience flight and see everything from your camera in real time.Why does Phantom 3 4K video look horrible in DaVinci Resolve?“I just purchased a DJI Phantom 3 Professional camera, when I import the 4K video into DaVinci Resolve, it looks blurry and pixely. However, when I view the same video out of the folder that it resides in, the video looks amazing. I'm assuming I'm doing something wrong during the import process. Any suggestions?”The DJI Phantom 3 professional captured 4K video in MP4 or MOV(MPEG-4 AVC/H.264) format, which is not a native editing codec for DaVinci Resolve. In addition, the 4K video footage compressed with MPEG-4 AVC/H.264 will still have big file size, it will take a lot of time for DaVinci Resolve to render those 4K videos. To ensure a smooth workflow of Phantom 3 4K video with DaVinci Resolve, it is ideal for you to transcode Phantom 3 4K video to DaVinci Resolve best editing codec - DNxHD MOV for real-time editing.Although there are numbered tools and utilities can convert and compress the ultra HD videos, few of them can process at a fast speed. Featured with the most advanced converting technology, Pavtube HD Video Converter for Mac (review) is now providing the most reliable and professional 4K solutions to all format issues including 4K XAVC/XAVC S, 4K MP4, 4K MTS, 4K MXF and more. Other Download:- Pavtube old official address: http://www.pavtube.com/hd-video-converter-mac/- Amazon Store Download: http://www.amazon.com/Pavtube-Video-Converter-Mac-Download/dp/B00QI9GNZS- AppStore Download: https://itunes.apple.com/de/app/pavtube-hd-video-converter/id502792488?mt=12- Cnet Download: http://download.cnet.com/Pavtube-HD-Video-Converter/3000-2194_4-76177786.htmlHow to import DJI Phantom 3 4K video to DaVinci Resolve for editing?Step 1: Download and have a quick installation. The trial version will have a watermark on your converted files. Except for that, there are no time limitation, no virus, and no unnecessary bundle apps while downloading. After that, click “Add Video” button to load your original videos. You can load several files at once thanks to “Add from folder” button.
 Step 2: Here, you need to choose what you want the output to be. Click “Format” drop-down list, and then select “Avid Media Composer>>Avid DNxHD (*.mov)” as the best output format.
 Step 3: Click “Settings” button to customize the output video and audio settings by yourself. But if you are not good at it, you’d better use the default parameters, they will ensure you a good balance between file size and image quality basically. You can change the resolution, bit rate, frame rate as you need.Step 4: When everything is done, you can take a preview by hitting “Play” button. If you are satisfied with the final result, you can click “Convert” button to finish the conversion work.Conclusion: Once the conversion process is complete, you can click “Open Folder” button to get the generated files for editing DJI Phantom 3 4K video in DaVinci Resolve with optimum performance.
Further Reading:
Summary: What is currently the best and most efficient way to work JVC GY-HM200 AVCHD/MOV with Premiere Pro? Learn this article to convert GY-HM200 AVCHD/MOV to MPEG-2 for Premiere Pro effortlessly editing.
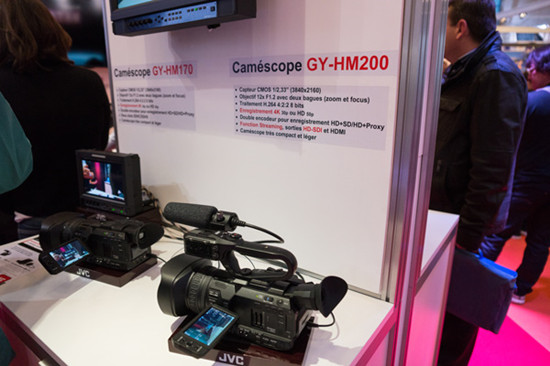 Hot search: Canon XF100 MXF to Premiere Pro | Sony HX90V XAVC S to Premiere Pro | Panasonic DMC-G7 4K MP4 in Premiere ProGY-HM200 is an excellent 4K camcorder from JVC, it is unveiled not long ago, this 4K camcorder features a 1/2.33″ backside-illuminated sensor, with it you can record 4K Ultra HD video at 24/30p, or record Full HD videos from 24p to 60p in 4:2:2. Besides it used a 12x zoon lens and a 24x dynamic zoom, it is great for your recording. It is a 4K camcorder that can record 4K Ultra HD recordings as well as full HD 1080p AVCHD MTS files.Many JVC fans have bought the GY-HM200 camcorder already, they are talking it on the forums, among the topics, one of the hot topics is the issue to import and edit JVC GY-HM200 AVCHD/MOV files with Premiere Pro, some JVC users have found that the GY-HM200 recorded footages are not accepted by Premiere, the Premiere said the AVCHD/MOV format is not supported and it can’t load the video, most of them can’t find the way to import JVC GY-HM200 AVCHD/MOV files to Premiere for editing.In order to solve the problem of importing JVC GY-HM200 AVCHD/MOV to Premiere Pro for smoothly editing, you’d better convert JVC GY-HM200 AVCHD/MOV to Premiere Pro best supported video format. Pavtube HD Video Converter for Mac (review) is the solid tool to help users achieve the goal, applying which you are capable of converting AVCHD/MOV to MPEG-2 .mpg format with lossless quality at faster speed so that you can edit JVC GY-HM200 AVCHD/MOV in Premiere Pro without any problem. Besides, the program is developed with some useful editing features. It’s really an all-in-one and affordable tool for you. Other Download:- Pavtube old official address: http://www.pavtube.com/hd-video-converter-mac/- Amazon Store Download: http://www.amazon.com/Pavtube-Video-Converter-Mac-Download/dp/B00QI9GNZS- AppStore Download: https://itunes.apple.com/de/app/pavtube-hd-video-converter/id502792488?mt=12- Cnet Download: http://download.cnet.com/Pavtube-HD-Video-Converter/3000-2194_4-76177786.htmlHow to import JVC GY-HM200 AVCHD/MOV to Premiere Pro?Step 1: Download and have a quick installation. The trial version will have a watermark on your converted files. Except for that, there are no time limitation, no virus, and no unnecessary bundle apps while downloading. After that, click “Add Video” button to load AVCHD/MOV video. You can load several files at once thanks to “Add from folder” button.Step 2: Click the “Format” bar to get the drop-down menu and you can get “Adobe Premiere/Sony Vegas>>MPEG-2 (*.mpg)” as output format.
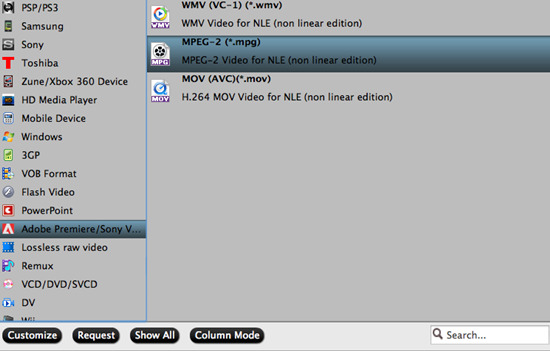 Step 3: Click “Settings” button to customize the output video and audio settings by yourself. But if you are not good at it, you’d better use the default parameters, they will ensure you a good balance between file size and image quality basically. You can change the resolution, bit rate, frame rate as you need.Step 4: Click “Convert” button on the bottom of the screen to start AVCHD/MOV to MPEG-2 .mpg conversion process. The amount of time it takes will vary based on your system’s hardware and the quality settings you selected.Conclusion: When the conversion is done, you can click “Open” button to get the generated video files. Now, you can edit JVC GY-HM200 AVCHD/MOV in Premiere Pro freely.Further Reading:
Summary: It’s quite clear that Apple TV devices cannot play FLAC files. In order to stream FLAC to Apple TV for playing FLAC on Apple TV, a strongly recommended solution is offered here.
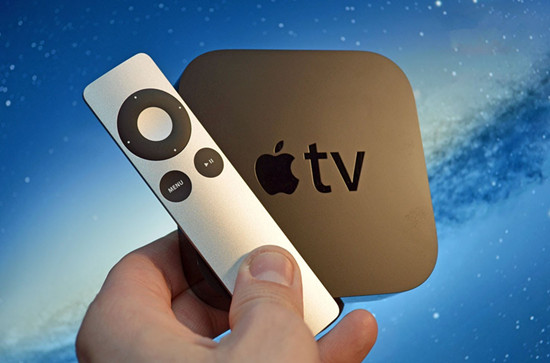 Hot search: TiVo to Apple TV | Sony camera video to Apple TV | H.265 to Apple TVWith the release of Apple TV, it gives you anytime access to endless entertainment. Thousands of videos and TV shows can be shown on your widescreen TV. Apple TV is gorgeous because it can be an online streaming resource as well as local source streaming player. Apple TV FLAC issue is quite common in life. Many of us may be troubled by the following issues:-Fail to stream FLAC files to Apple TV.-Have no ideas how to add or import FLAC to Apple TV/Apple TV 2/Apple TV 3.-Cannot open or play FLAC audios on Apple TV.-Do not know why FLAC cannot be played on Apple TV.-Need a nice way to enjoy FLAC on Apple TV/Apple TV 2/Apple TV 3 urgently.According to the authority info from Apple official site, Apple TV can support audio formats AAC (16 to 320 Kbps, protected AAC from iTunes Store, HE-AAC (V1)), MP3 (16 to 320 Kbps, MP3 VBR), Apple Lossless, AIFF, and WAV.In order to stream FLAC to Apple TV for playing FLAC on Apple TV smoothly, a strongly recommended solution is to convert FLAC to Apple TV supported MP3, AIFF, WAV, AAC as we mentioned above with a nice FLAC to Apple TV converter. Since there are so many video tools on the market, considering the easy of use and lossless quality, here you can depend on Pavtube Video Converter.Key features:-Convert FLAC to Apple TV recognized AAC, WMA, AIFF, or MP3 to play FLAC audios on Apple TV/Apple TV 2/Apple TV 3.-Convert FLAC files to other audio formats in batch and fast speed to play FLAC on various players and devices.-Convert FLAC audios and keep all meta data (including title, composer, etc.) and album cover art.-Apple TV FLAC Converter can convert among more than 160 video and audios formats like WMV, MP4, ASF, AVI, DivX, Xvid, MKV, FLV, F4V, SWF, MXF, OGM, WebM, 3GP, MPG, H.264, RMVB, MOV, M4V, QT, DAT, AVCHD, MTS, M2TS, M2T, TS, TOD, MOD, TP, R3D, BIK, AAC, AC3, DTS, ALAC, OGG, OGA, MP3, WAV, WMA, XWM, 3GA, M4A, M4B, APE, AU, AIFF, AIFC, VOC, VOX, GSM, etc. to airplay videos and audios to Apple TV/Apple TV 2/Apple TV 3.-Convert HD MKV and other HD videos to stream HD videos to Apple TV devices with HD quality and good user experiences.-Convert FLAC to transfer FLAC files to iTunes, iPad, iPod, iPhone, Apple Watch and more.-Edit FLAC files like cut, trim, split and more with FLAC Apple TV playing tools. Other Download:- Pavtube old official address: http://www.pavtube.com/video_converter/- Amazon Download: http://download.cnet.com/Pavtube-Video-Converter/3000-2194_4-75734821.html- Cnet Download: http://download.cnet.com/Pavtube-Video-Converter/3000-2194_4-75734821.htmlHow to stream FLAC to Apple TV?Step 1: As soon as you download and install the program, launch it and when the main interface pops up in front of us, just click the “Add Video” or “Add from Folder” to let in.Step 2: Click the drop-down list in the format line to get the format box. Then choose “Common Audio>>AIFF-Audio Interchange File Format (*.aiff)” as output format.
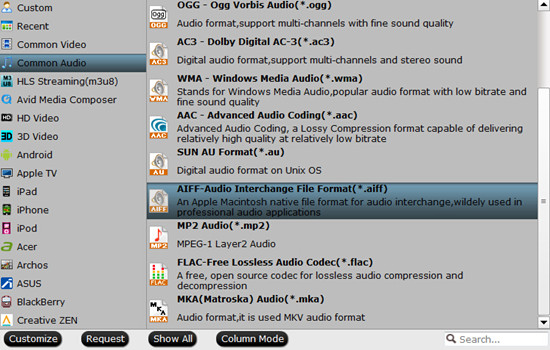 Step 3: After that, click “Convert” to start FLAC to AIFF-Audio Interchange File Format conversion.Conclusion: After conversion, you can get the generated files by clicking “Open” button. It’s so easy to play FLAC on Apple TV with FLAC to Apple TV converter. Why not try it now?Further Reading: