Sony PXW-Z150 XAVC-L Features
Sony’s latest addition to their professional XDCAM lineup, the PXW-Z150, is a compact and versatile camcorder with broadcast-quality 4K and Full HD video. The sensor supports continuous high-frame-rate Full HD image capture at up to 120 fps, as well as UHD 4K recording up to 30 fps with full pixel read and no pixel binning.
To fit into a variety of workflows, the PXW-Z150 offers XAVC-L, MPEG-2 (MPEG HD422), AVCHD recording formats to choose from. High-resolution UHD 4K can be recorded using the XAVC-L codec at 100 Mbps (8-bit 4:2:0), while Full HD 10-bit 4:2:2 recording is available in XAVC-L (50 Mbps).

PXW-Z150 XAVC-L files not accepted by iMovie
From iMovie supported cameras page, we didn’t get any supported information about the Sony PXW Z150, and searching on Google, we found many users may encountered such problems:
How to load XAVC-L footage from Sony PXW-Z150 into iMovie?
I know that my my Sony PXW-Z150 shoots using a codec that is very similar to XAVC-L 4K and XAVC-L HD, I can't seem to open the XAVC-L or even successfully transcode the video files into something that can be read on the iMovie.
The best options for PXW-Z150 XAVC-L into iMovie
The clips from the PXW-Z150 are not XAVC-L, the best options for getting Sony PXW-Z150 XAVC-L clips into iMovie are:
1. Use the free Sony Catalyst Browse to convert them (one at a time, although you can queue up multiple files without waiting for the previous one to finish).
2. Use the $200 Sony Catalyst Prepare software.
3. Shoot AVCHD(the PXW-Z150 offers XAVC-L, MPEG-2 (MPEG HD422), AVCHD recording formats to choose from) until there is a solution from Sony - supposedly Sony is at work on a plugin for iMovie to allow native ingest/editing of XAVC-L clips.
All-in-one-solution to solve troubles in importing PXW-Z150 XAVC-L to iMovie?
Our XAVC -L & iMovie test has proved that the XAVC-L footage from Sony PXW-Z150 can’t be imported into iMovie directly. To directly edit Sony PXW-Z150 XAVC-L footage in iMovie, for both compatibility reasons, and performance reasons, we strongly recommend transcoding PXW-Z150 XAVC-L formats to an intermediate format like Apple InterMediate Codec for iMovie for editing. However, many people may hesitate which converter is best suitable for them, Here, Pavtube Video Converter for Mac(read the review) is highly recommended to you. The Powerful and easy-to-use XAVC-L to iMovie Converter can be used to solve all those troubles in importing Sony PXW-Z150 XAVC-L footage into iMovie for further editing.
As mentioned above, the best editable format for iMovie is Apple InterMediate Codec, and this professional converter has preset “Apple InterMediate Codec” for iMovie, so you can use this converter to transcode Sony PXW-Z150 XAVC-L footage to Apple InterMediate Codec for iMovie to get the work done.
What's more, this Mac HD Video Converter also provides the optimal presets like H.265, M3U8, MPEG-2, DNxHD, Apple ProRes Codec for Premiere, Avid MC, FCE, FCP.
The trail-before-purchase is supported, just feel free to try it:


Other Download:
- Pavtube old official address: http://www.pavtube.com/video-converter-mac/
- Amazon Store Download: http://www.amazon.com/Pavtube-Video-Converter-Mac-Download/dp/B00QIBK0TQ
- Cnet Download: http://download.cnet.com/Pavtube-Video-Converter/3000-2194_4-76179460.html
Steps: Convert Sony PXWZ150 4K XAVC L to Apple InterMediate Codec for iMovie
Step 1: Add PXW-Z150 XAVC-L files to the program.
If you want import the video into iMovie, You must import from a connected camera and not a file created with one.
Click the “Add File” button to select the Sony PXW-Z150 XAVC-L footage from connected PXW-Z150 camera to this program.
To save your time, this program supports batch conversion so you can add multiple files at a time.

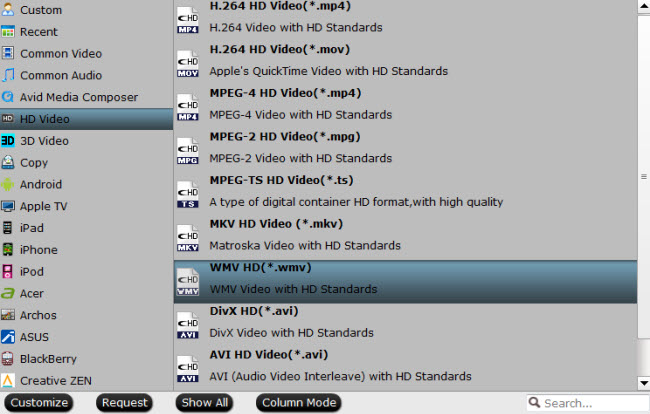
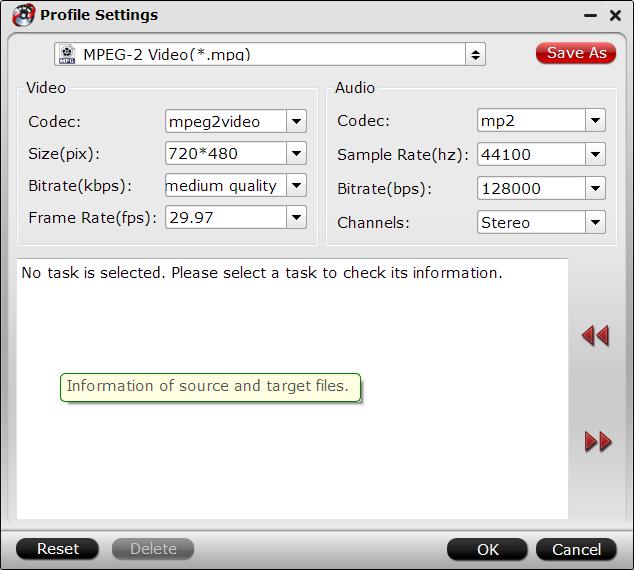
Step 2: Choose output format and specify output folder.
Choose output format for your specific usage. For example in this case, from "Format" drop-down option, choose iMovie best editing codec by selecting "iMovie and Final Cut Ex..." > "Apple Intermediate Codec (AIC)(*.mov).
If you select all files and click Merge, you can join all imported mts files to one output video.

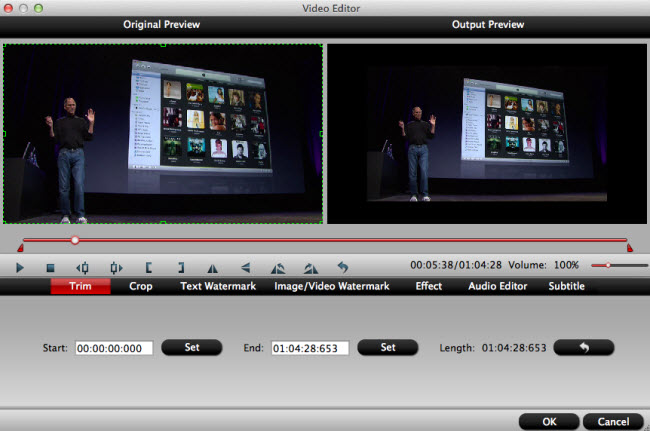
Step 3: Edit PXW-Z150 XAVC-L files (Optional).
The “Video Editor” can be reached by clicking the “Edit” button. You can edit your Sony PXW-Z150 XAVC-L files by using editing functions like trimming, cropping, adding watermark to video file, change video effects, etc.
Step 4: Start the Conversion.
Click “Convert” button to start conversion immediately. Few minutes later, you will get output video in your destination folder.
After converting Sony PXW-Z150 XAVC-L to iMovie. workable formats you can easily import them to iMovie for editing. Hope you have a good editing experience.
If you are looking for Sony PXW-Z150 XAVC-L Converter for Windows, please click HERE.
Related program:
If your Sony PXW-Z150 recorded video in AVCHD(MTS/M2TS) container, and you just encounter the compatible issues with AVCHD files and other NLEs, the best MTS/M2TS Converter should be take into your consideration!
Pavtube MTS/M2TS Converter / Mac Version:The best AVCHD(MTS/M2TS) converter on the market, which can convert AVCHD(MTS/M2TS) videos and other HD formats to FCP X Apple ProRes codec MOV format, or convert AVCHD(MTS/M2TS) to Avid Media Composer/Adobe Premiere Pro/iMovie native supported video format. >> How to convert MTS/M2TS AVCHD to AIC MOV for iMovie?
If you have the camera recorded video in MXF container, the best two MXF Converter should be take into your consideration!
Pavtube MXF Converter / Mac Version: can handle MXF/MXF footage produced by Canon, Sony and Panasonic camcorders and convert MXF video files to various video format supported by popular devices such as iPad Air/4/3, iPhone 5S/5C/5/4S/4, Apple TV 3, Google Nexus, Samsung Galaxy Tab S/3/2, Samsung Galaxy S5/S4/S3, Surface RT/Pro, PS4/PS3, WDTV, etc. >> How to Convert MXF Files for iMovie on Mac?
Read More:
Sony’s latest addition to their professional XDCAM lineup, the PXW-Z150, is a compact and versatile camcorder with broadcast-quality 4K and Full HD video. The sensor supports continuous high-frame-rate Full HD image capture at up to 120 fps, as well as UHD 4K recording up to 30 fps with full pixel read and no pixel binning.
To fit into a variety of workflows, the PXW-Z150 offers XAVC-L, MPEG-2 (MPEG HD422), AVCHD recording formats to choose from. High-resolution UHD 4K can be recorded using the XAVC-L codec at 100 Mbps (8-bit 4:2:0), while Full HD 10-bit 4:2:2 recording is available in XAVC-L (50 Mbps).
PXW-Z150 XAVC-L files not accepted by iMovie
From iMovie supported cameras page, we didn’t get any supported information about the Sony PXW Z150, and searching on Google, we found many users may encountered such problems:
How to load XAVC-L footage from Sony PXW-Z150 into iMovie?
I know that my my Sony PXW-Z150 shoots using a codec that is very similar to XAVC-L 4K and XAVC-L HD, I can't seem to open the XAVC-L or even successfully transcode the video files into something that can be read on the iMovie.
The best options for PXW-Z150 XAVC-L into iMovie
The clips from the PXW-Z150 are not XAVC-L, the best options for getting Sony PXW-Z150 XAVC-L clips into iMovie are:
1. Use the free Sony Catalyst Browse to convert them (one at a time, although you can queue up multiple files without waiting for the previous one to finish).
2. Use the $200 Sony Catalyst Prepare software.
3. Shoot AVCHD(the PXW-Z150 offers XAVC-L, MPEG-2 (MPEG HD422), AVCHD recording formats to choose from) until there is a solution from Sony - supposedly Sony is at work on a plugin for iMovie to allow native ingest/editing of XAVC-L clips.
All-in-one-solution to solve troubles in importing PXW-Z150 XAVC-L to iMovie?
Our XAVC -L & iMovie test has proved that the XAVC-L footage from Sony PXW-Z150 can’t be imported into iMovie directly. To directly edit Sony PXW-Z150 XAVC-L footage in iMovie, for both compatibility reasons, and performance reasons, we strongly recommend transcoding PXW-Z150 XAVC-L formats to an intermediate format like Apple InterMediate Codec for iMovie for editing. However, many people may hesitate which converter is best suitable for them, Here, Pavtube Video Converter for Mac(read the review) is highly recommended to you. The Powerful and easy-to-use XAVC-L to iMovie Converter can be used to solve all those troubles in importing Sony PXW-Z150 XAVC-L footage into iMovie for further editing.
As mentioned above, the best editable format for iMovie is Apple InterMediate Codec, and this professional converter has preset “Apple InterMediate Codec” for iMovie, so you can use this converter to transcode Sony PXW-Z150 XAVC-L footage to Apple InterMediate Codec for iMovie to get the work done.
What's more, this Mac HD Video Converter also provides the optimal presets like H.265, M3U8, MPEG-2, DNxHD, Apple ProRes Codec for Premiere, Avid MC, FCE, FCP.
The trail-before-purchase is supported, just feel free to try it:
Other Download:
- Pavtube old official address: http://www.pavtube.com/video-converter-mac/
- Amazon Store Download: http://www.amazon.com/Pavtube-Video-Converter-Mac-Download/dp/B00QIBK0TQ
- Cnet Download: http://download.cnet.com/Pavtube-Video-Converter/3000-2194_4-76179460.html
Steps: Convert Sony PXWZ150 4K XAVC L to Apple InterMediate Codec for iMovie
Step 1: Add PXW-Z150 XAVC-L files to the program.
If you want import the video into iMovie, You must import from a connected camera and not a file created with one.
Click the “Add File” button to select the Sony PXW-Z150 XAVC-L footage from connected PXW-Z150 camera to this program.
To save your time, this program supports batch conversion so you can add multiple files at a time.
Step 2: Choose output format and specify output folder.
Choose output format for your specific usage. For example in this case, from "Format" drop-down option, choose iMovie best editing codec by selecting "iMovie and Final Cut Ex..." > "Apple Intermediate Codec (AIC)(*.mov).
If you select all files and click Merge, you can join all imported mts files to one output video.
Step 3: Edit PXW-Z150 XAVC-L files (Optional).
The “Video Editor” can be reached by clicking the “Edit” button. You can edit your Sony PXW-Z150 XAVC-L files by using editing functions like trimming, cropping, adding watermark to video file, change video effects, etc.
Step 4: Start the Conversion.
Click “Convert” button to start conversion immediately. Few minutes later, you will get output video in your destination folder.
After converting Sony PXW-Z150 XAVC-L to iMovie. workable formats you can easily import them to iMovie for editing. Hope you have a good editing experience.
If you are looking for Sony PXW-Z150 XAVC-L Converter for Windows, please click HERE.
Related program:
If your Sony PXW-Z150 recorded video in AVCHD(MTS/M2TS) container, and you just encounter the compatible issues with AVCHD files and other NLEs, the best MTS/M2TS Converter should be take into your consideration!
Pavtube MTS/M2TS Converter / Mac Version:The best AVCHD(MTS/M2TS) converter on the market, which can convert AVCHD(MTS/M2TS) videos and other HD formats to FCP X Apple ProRes codec MOV format, or convert AVCHD(MTS/M2TS) to Avid Media Composer/Adobe Premiere Pro/iMovie native supported video format. >> How to convert MTS/M2TS AVCHD to AIC MOV for iMovie?
If you have the camera recorded video in MXF container, the best two MXF Converter should be take into your consideration!
Pavtube MXF Converter / Mac Version: can handle MXF/MXF footage produced by Canon, Sony and Panasonic camcorders and convert MXF video files to various video format supported by popular devices such as iPad Air/4/3, iPhone 5S/5C/5/4S/4, Apple TV 3, Google Nexus, Samsung Galaxy Tab S/3/2, Samsung Galaxy S5/S4/S3, Surface RT/Pro, PS4/PS3, WDTV, etc. >> How to Convert MXF Files for iMovie on Mac?
Read More: