“Hi, there, I need a good batch converter to convert P2 .mxf files from Panasonic AJ-PX800 for use in Final Cut Pro 7. The converter I already installed on my Mac can convert the files, but when I import them to FCP 7, I get an error message: File Error: 1 file(s) recognized, 0 access denied, 1 unknown. Any clue what could be causing this to happen? Or can you please kindly recommend a reliable converter that would do what I want with useful files maintaining good quality?”
Cause the AJ-PX800 records 1080/60i as well as 24p, 30p and 720p HD/SD multiple format, with that, picture quality and recorded data rate can be selected from AVC-Intra or AVC-LongG according to the application. Due to the limited video codec, that’s the causes why some Panasonic AJ-PX800 users failed in importing P2 MXF files to FCP 6/7. In addition, they also failed in importing P2 MXF files to Aperture, DaVinci Resolve, MOV and etc. If you got some useful P2 MXF footage converting tips, how to enjoy editing AJ-PX800 P2 MXF in FCP 6/7 will not be a difficult workflow.
OK, if for some reasons your already-have converter application couldn’t do what you want, you can give Pavtube MXF Converter for Mac a shot- a universal transcoder that is able to convert a wide variety of files types to whatever format you need for editing or playing use. This app is very simple and straightforward. It doesn’t try to do too much. It just does what it’s designed to do.


How to import AJ-PX800 P2 MXF to FCP 6/7 for editing?
Step 1: Launch the AJ-PX800 P2 MXF Converter on your Mac, and then click the “Add video” button to import your P2 MXF files directly. In order to import several files at one time, you can click “Add from folder” button.
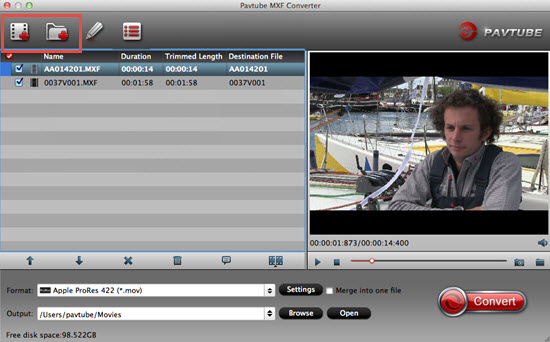
Step 2: Click the “Format” bar to get the drop-down menu and you can get “Final Cut Pro>>Apple ProRes codec”, including ProRes 422, ProRes 422 (HQ), ProRes 422 (LT), ProRes 422 (Proxy) and ProRes 4444. Choose the proper one you want. Here, we suggest you to choose Apple ProRes 422 .mov as the best output format.

Tips: Apple ProRes 422 and Apple ProRes 422 (HQ) have higher qualities. Apple ProRes 422 (LT) and Apple ProRes 422 (Proxy) have smaller sizes. You can choose according to your requirement.
Step 3: Click “Settings” button to customize the output video and audio settings by yourself. But if you are not good at it, you’d better use the default parameters, they will ensure you a good balance between file size and image quality basically. You can change the resolution, bit rate, frame rate as you need.
Step 4: Finally, start P2 MXF to Apple ProRes 422 MOV conversion. When ready, click “Convert” button to start format conversion.
Conclusion: As soon as the conversion is complete, you can click “Open Folder” button to get the generated P2 MXF files. Later, transfer AJ-PX800 P2 MXF files to FCP 6/7 as usual, you can enjoy editing nicely. With this professional easy-to-use Mac MXF Converter assistant, you are during your journey to success in video creation.
Further Reading:
- Can After Effects CC Support Canon C300 MXF Files on Windows 8.1/Mavericks?: The frustrating news is that C300 MXF recordings are not well supported by After Effects series even the latest After Effects CC and you’ll find it difficult to edit C300 MXF in other editing tools.
- Best Mac Video Converters for NLEs/Tablets/Media Players/Servers: Since we cannot avoid watching videos on tablets or media players in our daily life, why not we seek some useful NLEs, tablets or media server video converters to make it easier to enjoy our videos?
- Import Canon XC10 XF-AVC MXF 4K/1080p to Premiere Pro CC, CS6, CS5: Especially for the new XF-AVC format which developed by Canon for supporting greater workflow efficiency and convenience during the production process for high-image-quality video.
- How to Play 4K Blu-ray on PC?