The main one you'll see is the way in which the Timeline is constructed and utilized. There are no longer "tracks" to edit on, such as A1 & A2, V1, etc. All clips go into what's called a "Primary Storyline", and secondary footage (b-roll) "connects" to those clips. This allows for connected clips to always move together, keeping you from going out of sync. The "magnetic timeline", as it's called also has the great feature of clips moving out of the way and onto another level when other clips are brought in contact with them. It saves steps and organizes clips together better.
The other key feature I can point out here is the ability to organize clips in the Browser. You can choose favorite clips, mark pieces of clips with Keywords, mark sections of clips as unusable and a whole lot more. Then you can view clips in your Browser by selecting the categories you've created. In other words, any clip you gave a specific Keyword to can be pulled up instantly.
The biggest difference is that FCP 7 uses the old video-and-audio-tracks interface, where the picture and sound signals have their own track in the timeline. FCP X combines them all into one "track" called a Storyline, though you can separate the audio tracks if you need to.
In FCP 7 if you wanted to move a clip around along with any other clips sitting on top of it, you had to select them all and move them manually or use copy and paste. In FCP X, when you move a clip, any attached b-roll clips automatically move along with the primary one. This is incredibly helpful when you want to rearrange entire scenes.
There has been no official word from Apple regarding an upcoming version of FCP, but there are many changes that pro users are wanting/anticipating:
- 64 bit
- Better Color and Motion Integration
- Native DSLR (H.264) and P2 compatibility
- Fix gamma issues between applications
- Better text tools
- Native 3D integration
- Better tracking tools
- Better stability for large project files
- Integration with After Effects (not likely)
- Scratch folders linked to project folders (smart updating)
- Optical flow slow motion
- Easier way to work with keyframes?
- Media manage elements across Pro Apps
- Better audio controls and filters (the current filter audio interface is archaic)
- Save scripts for presets, motion & effects
- Update Color's UI
I could write all day about other differences, but the ability to organize clips and then utilize them in an advanced Timeline are two big differences. Maybe in a future post I'll address more. In the next i would like to show you how to import and edit the video into fcp x for smoothly editing.
As we all know that like other professional non-linear video editing program, Final Cut Pro also has its own native editing codec - Apple ProRes, which is specially designed for nonlinear editing and complex multi-generation composing in post production. To create Final Cut Pro Apple ProRes editing codec, you can download Pavtube Video Converter for Mac(read the review), a professional Mac video decoder to beneficially encode all kinds of your recorded video to Final Cut Pro X(7) optimized Apple ProRes codec.
Hot Search: H.265/HEVC to FCP X | DJI Phantom 3 4K Video with FCP X | 4K MXF to FCP X
By the way, if your are a one hundred percent Windows user, please turn to Pavtube Video Converter. It has the same ability as Mac version.


Other Download:
- Pavtube old official address: http://www.pavtube.com/video-converter-mac/
- Amazon Store Download: http://www.amazon.com/Pavtube-Video-Converter-Mac-Download/dp/B00QIBK0TQ
- Cnet Download: http://download.cnet.com/Pavtube-Video-Converter/3000-2194_4-76179460.html
Steps for Import and Edit with FCP X(7) Smoothly
Step 1: Add camcorder video files to the program.
Launch the software on your Mac computer, click "File" menu, select "Add Video/Audio" or "Add from folder" to import video to the program.

Step 2: Choose output format.
Click "Format" bar, from its drop-down options, move your mouse to "Final Cut Pro > Apple ProRes 422 (*.mov)" to select it as the output file format.

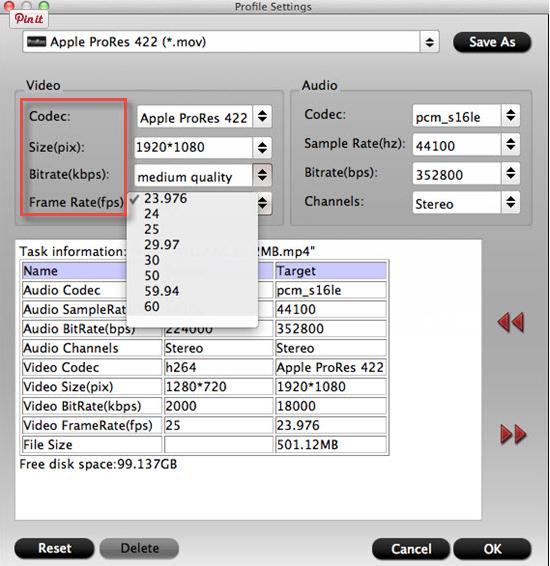
Step 3: Customize output ProRes parameters.
Open "Profile Settings" window to adjust the output video codec, size, bit rate, frame rate, audio codec, sample rate, bit rate and channels.
Step 4: Convert to Apple ProRes for FCP X.
Hit the convert button under the preview windows, the program will start Apple ProRes MOV conversion for Final Cut Pro X(7).
When the conversion is completed, run FCP(7) and import the ProRes codec footage for post production workflow.
Read More:
i recommend to use Avdshare Video Converter to import and edit the video into fcp x.https://www.avdshare.com/how-to-import-avchd-to-fcp-for-editing
ReplyDelete