Monday, May 1, 2017

Edit iPhone videos in Windows Movie Maker

You may encounter some weird problems when import and open iPhone videos in Windows Movie Maker like no picture, video preview lag, render slowly or even program crashed. The reason is that iPhone videos are recorded in .MOV format encoded with H.264, which can’t be recognized by Windows Movie Maker. This tutorial will quickly walk you through how to drag and drop iPhone videos including iPhone 7 videos to Windows Movie Maker timeline for editing without hassle.

As is known, the iPhones (including iPhone 7, iPhone 7 Plus, iPhone 6, iPhone 6 Plus, iPhone 5S, iPhone 5C, iPhone 4S, etc.) record videos in .mov format. However, the MOV is not supported natively by Windows Movie Maker. So you need to convert the MOV to Windows Movie Maker compatible format like WMV before editing. ctually, it’s not as difficult as you imagine. What’s need is a just a common video converter like Pavtube Video Converter Ultimate. It supports creating high quality WMV video for your Windows Movie Maker on Windows 10/8/7/XP/Vista, no matter what’s the format of your iPhone video or other source video files.

Hot features of Pavtube Video Converter Ultimate

  • Convert iPhone MOV/MP4 video to Windows Movie Maker supported video with 3 simple steps.
  • Convert DVD, Blu-ray, ISO, MOV, MP4, MKV, H.265, XAVC, MXF, MTS etc to Windows Movie Maker WMV format.
  • Convert iPhone video to PS3, PS4, mobile phones, Android, iPad, iPhone, Apple TV, NLE and other popular end devices.
  • Basic video editing functions: split, merge, trim, crop, add watermark, adjust video effect, edit audio and insert subtitles.
  • United free audio converter and video to image converter.
  • Batch conversion and super fast conversion speed.
  • Easy-to-use iPhone Video Converter with simple clear interface.

Free download iPhone to Windows Movie Maker Video Converter

Now Convert your iPhone video to a editable format for Windows Movie Maker

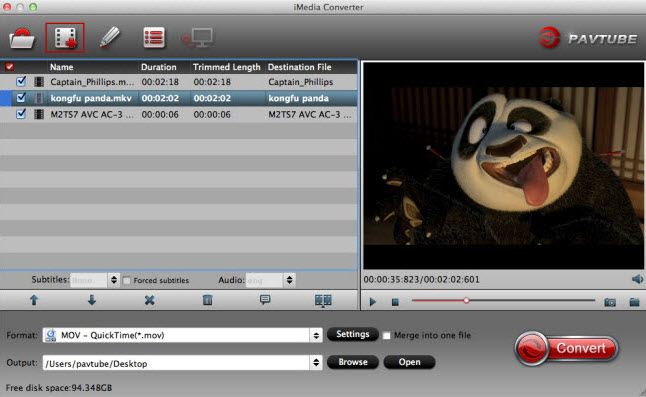
Step 1. Add iPhone video files

First download and install Pavtube Video Converter Ultimate. When complete, start this program from “Convert” menu or Windows desktop.

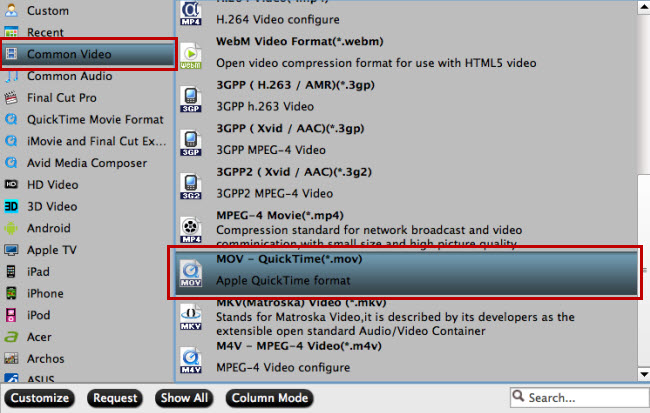
Step 2. Set WMV as the output format

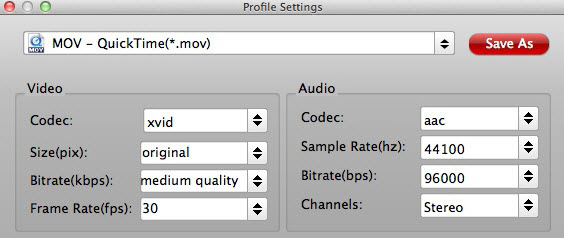
Click the format icon on the right to open the format list, and select “WMV” as the output format from Common Video or HD Video. If you want to make changes to the video settings like resolution, bit rate and other settings, click the “Settings” button at bottom.

Step 3. Convert iPhone video to Windows Movie Maker

When everything is ready, click the “Convert” button and all the imported iPhone video files will be converted to WMV format by this iPhone video to Windows Movie Maker Video Converter.

Read More:

Edit 4K Video with Windows Movie Maker | Edit DJI Phantom 4K to Windows Movie Maker 

Edit OBS video in Windows Movie Maker  | Edit MP4 to Windows Movie Maker

Edit MTS/M2TS to Windows Movie Maker | Edit WMV in Windows Movie Maker 

Edit GoPro video in Windows Movie Maker | Edit CamStudio video in Windows Movie Maker

Edit Fraps video in Windows Movie Maker | Edit Android video in Windows Movie Maker

Sony M2TS to Windows Movie Maker | Canon Vixia MTS to Windows Movie Maker

Monday, April 24, 2017

How to Edite iPhone 7 (4K) Video in Adobe Premiere Pro

iPhone 7 video to Adobe Premiere Pro issues

Q1: Having trouble with iphone 7 videos with premiere pro CC

I can’t take my iPhone 7 videos (.mp4) and load them into the timeline. Any suggestions why this is happening?

Q2: iPhone 7 Video – Serious Sync Issues Eliminate Premiere as a tool

I was excited to see how great the video is from the iPhone 7. I have taken one hour 4k videos of lectures that look great. However, when pulled into Premiere (CS5), the sound goes out of sync to the point that it is unusable after about seven minutes. I have checked the original file (.MP4) using QT – it plays perfectly. Indeed, I can trim and split the file using QT and I know that creating a bunch of small videos to link in Premiere would be a solution of sorts.

Why can’t Import iPhone 7 MP4 video into Adobe Premiere Pro?

Can’t import your iPhone 7 MP4 file to Adobe Premiere Pro CS4/CS5/CS3/CS6? The iPhone 7 records in MPEG-4 and outputs its files as .MP4 files (the container). Files are compressed using the h.264 codec (as opposed to AAC or Xvid and DivX usually found in .AVI containers). So the files you are getting out of iPhone 7 are suited to be delivered as is, which is usually not what you want. So sometimes our iPhone 7 MP4 file codec isn’t compatible with Adobe Premiere. To easily solve your problem, you can convert this iPhone 7 MP4 video to other Premiere friendly movie format like MPEG-2, FLV and more (Note: it applies to all kinds of Adobe Premiere including Adobe Premiere Pro, Adobe Premiere Pro CS3/ CS4/ CS5/ CS6).

Solution for Edit iPhone 7 (4k) Video in Adobe Premiere Pro perfectly

To fulfill your task, you can just get Pavtube HD Video Converter for Mac, a powerful video converter, editor. It can easily transcode your iPhone 7 .mp4 videos to Adobe Premiere Pro best editable .mpeg-2 format for ncie editing. Besides, it also can convert other iPhones video like iPhone 6s/6s Plus/5s/5s Plus etc video to Adobe Premiere Pro formats powerfully. In addition to transcoding iPhone 7 .mp4 video to Premiere supported videos with optimized settings while keeping the video quality, the all-in-one and easy-to-use toolkit can convert all other popular SD/HD video formats like AVI, MXF, WMV, MKV, FLV, MTS, VOB, H.265 etc. to Adobe Premiere Pro, iMovie, FCP natively supported video formats on Mac OS X (macOS Sierra, El Capitan Yosemite, Mavericks, Lion included) with fast encoding speed.

For Windows users, please get help from Pavtube HD Video Converter Download the program and learn how to convert iPhone 7 files to Adobe Premiere Pro format.

(Mac version)

 (Windows version)

Steps on converting iPhone 7 MP4 footage to supported MPEG-2 MPG for Adobe Premiere Pro CC

Step 1. Click “Add File” button to import the unsupported iPhone 7 MP4 video file. Or you can also drag your MP4 video directly to the main interface of this MP4 to Premiere Converter.

Step 2. When you come to the output list, we suggest you to drop down the list and find the ‘Adobe Premiere Pro’ column and choose the ‘MPEG-2 MPG’ as the nice one. Or other suitable output format is also available.

Tips: Advanced functions

A. Click the “Edit” button to open the Video Edit window to achieve editing MP4 like trim, crop, image, watermark, effect, subtitles and rotate and etc in the corresponding editing pane.

B. Click the “Setting…” button to open the Advanced Settings window to adjust the output video codec, resolution, bitrates, frame rate, aspect ratio, audio codec, channel, volume and etc in the advanced tab.

As soon as we have finished all the preparation work there, just get back to the main interface to click the ‘Convert’ icon to get the work started. After transferring the files to Adobe Premiere CC as usual, we can edit the recordings in Adobe which shot from iPhone 7 and iPhone 6s/6s Plus/5s/5s Plus. Have a try!

Read More:

Play iPhone 4K video on TV | Play 4K XAVC S on Plex

Edit 4K video on iMovie | 4K Video to Cyberlink PowerDirector

Import Media Files to Adobe Premiere Pro

Import MXF OP-Atom Files to Premiere Pro 

Import Canon XC10 XF-AVC MXF 4K/1080p to Premiere Pro 

Import/Edit Canon XF100 MXF to Adobe Premiere Pro

Import Samsung NX1 H.265 recordings to Adobe Premiere Pro 

Import/Edit Blackmagic 4K Ultra HD Prores with Adobe Premiere Pro CC

Upload 4K Video on YouTube/Facebook/Vimeo

Export 4K from Premiere with Best Settings for YouTube/Vimeo

Compress and Convert 4K video to iPhone 7/iPhone 7 Plus

Monday, April 17, 2017

Does Apple QuickTime Player support h.265 on Mac OS Sierra/El Capitan?

H.265 or High Efficiency Video Coding (HEVC) is the latest generation video compression standard which compresses a video file into smaller package, making it easier to store or transmit. Today is the turn of HEVC. However, many devices and applications like QuickTime player are still need time to support the new codec. Do you have some HEVC/H.265 files saved on your computer, and wonder how to make H.265 files playable in QuickTime player on Mac OS Sierra/El Capitan? You’ve come to the right place.

Since QT player can work with H.264 MP4, MOV, M4V videos well, to get H.265 files playable in QuickTime Player, a quick fix is to convert H.265 to QT Player readable format for playback easily.

One of the best Yosemite/Mavericks H.265 Converter from the market so far is Pavtube iMedia Converter for Mac, which is recentlyupgraded to support H.265 encoding and decoding and it can be taken as a completely professional H.265/HEVC encoder, decoder, player and editor.

With it, you can convert H.265 to QuickTime player friendly H.264 MP4, MOV, M4V video on Mac OS Sierra/El Capitan with quality loss effortlessly. And it is available to customize the output resolutions to any size the users want and edit video file with trim, crop, add watermark, insert subtitles, split, merge and other options before conversion. What’s more, it also supports convert non-H.265 video files to H.265 for storage and playback. Download the program and move on to see how to convert H.265 videos for QuickTime player on Mac OS Sierra/El Capitan .

Download H.265 to QuickTime player converter:

Tutorial: Converting H.265/HEVC to QuickTime player friendly format

Step 1. Add H.265 source

Install and run this best H.265 Video Converter. Click add button to import the H.265 files to the program.

Windows Video to Mac Mini Converter

Step 2. Choose QuickTime Player friendly format

Click the Format menu, select QuickTime Player friendly format as your output video format. There, you can take H.264 MP4, M4V, MOV as your output video format.

Choose Quicktime MOV Format

Tip: In case the default settings do not fit your requirement, you can click “Settings” button and enter “Profile Settings” panel to adjust video size, bit rate, frame rate, sample rate and audio channels.

Adjust QT MOV profile settings

Step 3. Start conversion

Finally click the Convert button to begin encoding H.265 to QuickTime player format.

After the short conversion, go to the output folder and drop the converted files into QuickTime player. Once all this is done, add your converted videos to QuickTime player.

Additional Tip:

Want to find another solution to play H.265(HEVC) videos? Just get the best QuickTime Alternative for Yosemite/Mavericks.

Here is a list of the top 2 options:

1. DivX Player

DivX player is another robust HEVC video file player. It is an award winning software that offers HEVC playback. It offers high-quality playback of movies, TV shows. It supports almost all the popular formats like AVI, DIVX, MKV, MP4 and more. By using its DivX Media Server one can stream music, video and photos to any DLNA-compatible device at home like PS3, XBOX, or Samsung Galaxy line of product. With the Stream To feature in player user can also control which device they can stream their videos to.

2. VLC Media Player

Another player that can play HEVC file is the VLC Media Player, which is a free and open source player and framework. It supports a wide range of multimedia files. It can also play DVDs and various streaming protocols.

Now you can experience the H.265/HEVC videos on your QuickTime Player on Mac OS Sierra/El Capitan  freely!

Continue Reading:

Encode Blu-ray to H.265 MP4 | Play H.265/HEVC on Mac

Play H.265/HEVC to PS4 | Play H.265 on LG TV

Edit H.265/HEVC with FCP X | Edit H.265/HEVC in Premiere Pro

HEVC H.265 Encoder for NVIDIA GPU | Encode H.265 with FFMPEG

Encode HEVC/H.265 MP4 to AVC/H.264 MP4 on Mac

Encode/Decode H.265 video for iPhone/iPad/Apple TV on Mac