Summary: Trouble editing or playing video in Avid Media Composer with Youtube MP4 footage because of compatibility issues? Your troubles are over.As a quite hot file extension, MP4 is widely used for saving media data and can be found in lots of places online or off line, which means, you can get MP4 videos from YouTube, or shared MP4 videos from others. However, you may run into a situation where you can't edit MP4 files in Avid Media Composer. The Media Composer deals with the MP4 files at quite a slow speed and some MP4 files even cannot be recognized. So what's matter? What is the available way to use MP4 files in Avid Media Composer?Actually, this is probably due to the MP4 file codec. Avid might not work with some MP4 files sometimes due to the codec issue or other reasons. Fortunately, there is an easy way to fix the issue. To get Avid Media Composer work well with MP4 videos, you could adjust MP4 to Avid MC supported video format. Hot Search: QuickTime Files to Avid | H.265 to Avid | XAVC S to AvidAlong with some help from third-party software like Pavtube Video Converter for Mac (Yosemite, Mavericks, Mountain Lion, Lion included), you can easily get the problem solved. With it, you can transcode MP4 to Avid native editing-friendly format - DNxHD - ensuring maximum editing quality and efficiency when working with Avid Media Composer. An Avid preset is included for easy access. If you are running a Windows PC, get Pavtube Video Converter.
 Other Download:- Pavtube old official address: http://www.pavtube.com/video-converter-mac/- Amazon Store Download: http://www.amazon.com/Pavtube-Video-Converter-Mac-Download/dp/B00QIBK0TQ- Cnet Download: http://download.cnet.com/Pavtube-Video-Converter/3000-2194_4-76179460.htmlNow download the program and follow the step-by-step gudie below to convert MP4 files to Avid DNxHD for smoothly editing.Step 1. Import YouTube MP4 files into the programHere you can directly drag & drop the YouTube MP4 files to the converter, or click "Add Video" button to load your video files.
 Step 2. Choose DNxHD as the output formatYou can directly choose the DNxHD preset from "Editing Software" category for Avid Media Composer which has been supplied by the MP4 to Avid Mac Converter. The settings also works for Avid MC 8, Avid MC 7, Avid MC 6 and Avid MC 5 etc.
 Step 3. Start YouTube MP4 to Avid DNxHD conversion on Mac.When everything is ready, click the Convert button and all the imported YouTube MP4 video files will be converted to DNxHD MOV files.After the conversion, simply click the "Open" button to find the converted videos. Now you can ingest the converted YouTube MP4 files to Avid Media Composer for editing smoothly.Read More:
Summary: Ever thought of playing MKV videos on the new Apple TV 4 with a wonderful experience of both audio and visual enjoyment? Learn from the guide and get the best way to transcode MKV to the new Apple TV 4 friendly format, so you can play MKV on Apple TV 4 with excellent 5.1 channels.I am new to Plex and I've started to figure out how everything works. When I access files from my NAS, MP4-files play nicely on the Apple TV. However, it seems that it cannot play my MKV-files. It loads them up just fine with meta-info and all, but when I hit "Play", it just loads for a while before returning to the main screen for the movie.
What am I missing here? The files play just fine in the browser on my MacBook.
Any suggestions?
Thanks in advance.Generally speaking, Plex is a media server application that enables us to share music, movies on TV, PS3, Xbox360, Android, iOS, and other DLNA-certified devices locally via home network connection, or remotely, as long as you have a Internet connection.For ATV 4, you need to know there are only two official and free methods to stream video files to Apple TV from computer: iTunes or AirPlay. Unfortunately, neither of the two supports MKV as the input format. Only few support several formats, require installing some plug-ins, and with an endless line of embedded goods, etc. So is there any way to help you to play .mkv files on the Apple TV 4 without limitation?MKV is just a container, it doesn't really tell us what kind of video file is inside it and you're trying to play. The Apple TV 4 supports H.264 video, so if your MKV files contain such video, it ought to work fine. It might be something else causing the problem. Check the log files to see if it tells you why it aborts the playback.Hot Search: Movie on Plex | Play AVI through Plex | 5.1 Surround Sound from Apple TVNow, we provide you with the best Mac MKV to Apple TV 4 conversion software— Pavtube Video Converter for Mac(read the review), which you will be your best helper for converting MKV files to the new Apple TV compatible forma on Mac OS X (El Capitan) with only four steps that save you a much time and effort. In addition to converting MKV to the new Apple TV, it also can MP4, H.265, Tivo, AVCHD, VOB, MPEG-2, MXF, WMV, AVI, DivX, Xvid, Flash format, WebM, and etc to Apple TV 4 video format. Furthermore, it is also equipped with advanced editing function like add subtitles, effect, text or picture watermark to MKV files, crop MKV black bars, trim or merge MKV files, compress output file size and etc. Other Download:- Pavtube old official address: http://www.pavtube.com/video-converter-mac/- Amazon Store Download: http://www.amazon.com/Pavtube-Video-Converter-Mac-Download/dp/B00QIBK0TQ- Cnet Download: http://download.cnet.com/Pavtube-Video-Converter/3000-2194_4-76179460.htmlGuide: How to stream and play MKV to Apple TV 4 via Plex on Mac OS XStep 1: Import MKV filesLaunch the best MKV to Apple TV 4 Converter for Mac. Click the “Load file(s)” button to add MKV movies file. If necessary, you can double click the each file to have a preview.Tip: You can merge your MKV files to Apple TV 4 MP4 on Mac OS X by checking the “Merge into one file” box. Thus, you can watch these MKV files without any interruption.Step 2: Select an output format for Apple TV 4 and set the output folder.Click on the dropdown menu of “Format” and then move your pointer to “Apple TV 3 1080P Dolby Digital Pass-through(*.m4v)” from “Apple TV” which is the compatible format for Apple TV 4. Then you can set the output folder by clicking “Browse” icon as you need. Step 3: Adjust audio and video parameters.Click the “Settings” icon and you will go into a new interface named “Profile Settings”. You can adjust codec, aspect ratio, bit rate, frame rate, sample rate and audio channel in the interface according to your needs and optimize the output file quality.
 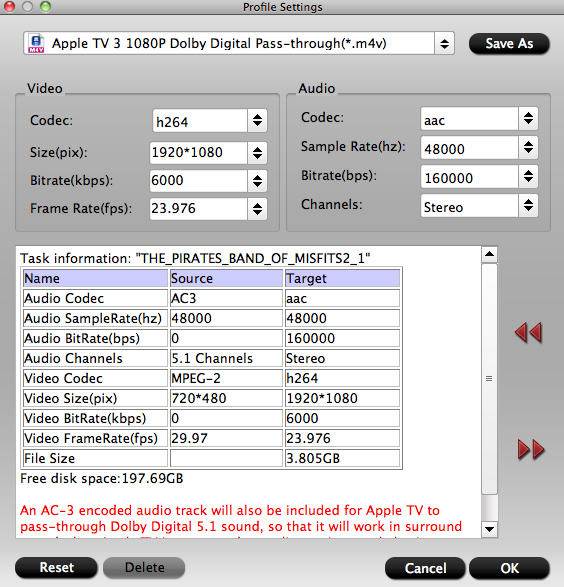 Step 4: Start transcoding MKV for Apple TV 4 on Mac OS X.Click the “Start conversion” button; it will convert MKV files for the new Apple TV on Mac OS X immediately. You can follow the converting process in the “Conversion” interface.Once the MKV for Apple TV 4 conversion on Mac is done, you can get the output files for the new Apple TV via clicking on “Open” button effortlessly. Afterward, you can easily sync/stream the transcoded mkv files to Apple TV 4 via Plex.Read More:
Summary: Have trouble importing FLV files into Final Cut Express for further editing? Fortunately, there is an easy way to fix the issue. Let’s find it out here.I am trying to import FLV files into Final Cut Express, but the program can’t directly ingest the file. Then I try to export some FLV video from Final Cut Express, but there is no FLV any more. Should I find a way to convert them into something that Final Cut Express is happy with? As you know that Final Cut Express is a video editing tool, quite a few people try to import FLV videos to Final Cut Express but fail, since we cannot import FLV files into Final Cut Pro/Final Cut Express directly.After editing your own movies on Final Cut Express, you may want to put them on your website for presenting your introduction or promoting your services/products. For users with the older version of FCE, it is easy to export FLV by choosing File > Export > Using QuickTime Conversion. However, if you could not find Flash FLV as output format from FCE, you may need a FCE to FLV converter to get Flash videos.Hot Search: FLV to QuickTime | Compress FLV | Sync FLV to iTunesPavtube HD Video Converter for Mac is the best FCE to FLV & FLV to FCE converter for you to handle videos on iMac/MacBook Pro. This vdieo converter supports import FLV videos to FCE and converts FCE export movies to FLV as short film. Wit it you can convert FLV into Apple Prores for import into FCE for editing, and any format video exported from FCE can be easily converted into FLV. Meanwhile, it is know as professional video converter with the ability of convert any video format into any another format without quality loss. Such as AVI, MKV, VOB, MXF, MTS, XAVC, MVI, etc and transfer them to many format you need including Apple ProRes for FCP, AIC for iMovie/FCE, DNxHD for Avid, MPEG-2 for Adobe Premiere Pro… Other Download:
Export/Import FLV from/to Final Cut ExpressStep 1: Run HD Video Converter for Mac and you can import FLV clips to the program through “Add Video” button button. If you like, check the “Merge into one” box to join FLV clips together.  Step 2: Transcoding FLV files to Apple InterMediate Codec Final Cut Express:Choose output format. This video converter offers optimized format preset for Final Cut. Just click “Format” menu firstly and then follow “Final Cut Pro” to set Apple ProRes 422 (*.mov)” format.
  Transcoding Video Exported from FCCE to FLV: Choose output format. Just click “Format” menu firstly and then follow “Flash Video” to choose"FLV-Flash Format(*.flv)” format.
 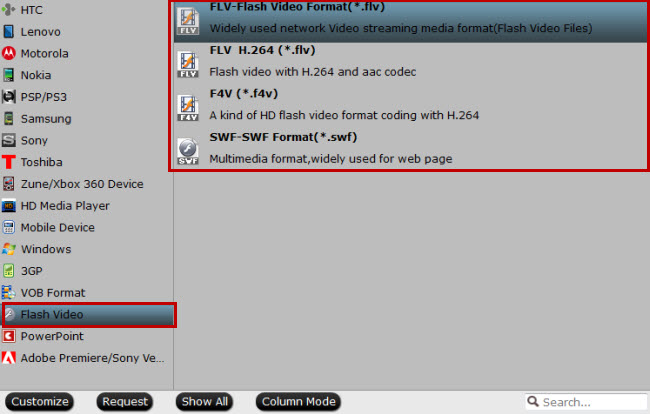 Tip: If the default settings do not fit you requirement, you can click “Settings” icon to and enter “Profile Settings” panel to adjust video size, bit rate, frame rate, sample rate and audio channels.
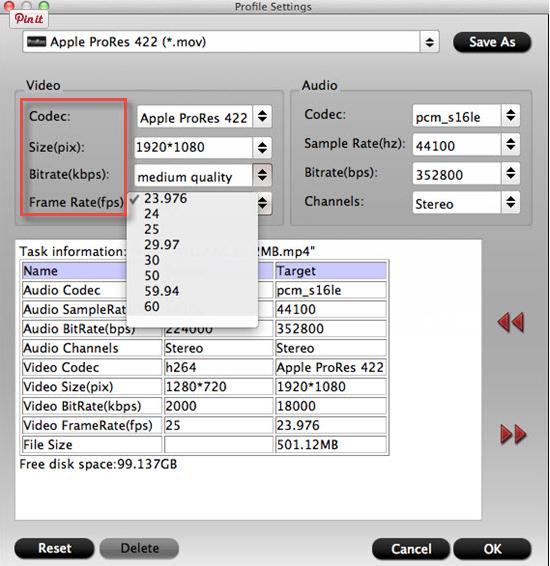 Step 3: Click “Convert” button to start encoding FLV to AIC .mov for Final Cut Express or video exporred from FCE to FLV. When the conversion task is finished, click “Open” button to get the exported files.Read More:
Pavtube Facebook Rolls out 2015 Thanksgiving & Black Friday & Cyber Monday Crazy Promotion with 50% OFF for All Blu-ray/DVD/Video Softwares Are you ready for a crazy online shopping after Thanksgiving Coupons in the next few days on Black Friday and Cyber Monday? These meaningful major festivals is best the best chance for people to find out the best deals to reserve for upcoming Chrismas.The discount offering is to show gratitude to valued customers and potential users of Pavtube software, so we Roll out 2015 Black Friday & Cyber Monday Sales with 50% Discount for top-selling Windows/Mac Blu-ray/DVD rippers and Video converters, which can help you move favorite Blu-ray/DVD movies or convert digital videos to any home devices for home use! Pavtube video products can also assist you to creat special timeless memories for this year's festivals.What can Pavtube do?1) Convert common, HD, 3D, 2K/4K Videos and Blu-ray/DVD into H.265/HEVC, M3U8, MP4, Apple ProRes, DNxHD, MOV, M4V, MOV, MKV, AVI, Xvid, Divx, VOB, MPEG-2, SWF, FLV... for playback on smartphone, tablet, TV set, HD media player, streaming server, Hard drive, Game console, or edit in Final Cut Pro, iMovie, Adobe Premiere Pro, Avid Media Composer, etc. 2) Convert Canon/Sony/Panasonic/Nikon/JVC/Blackmagic shooted H.265, XAVC, XAVC S/L, MXF, MOV, AVCHD, AVI, MP4, VOB footages into common video formats, so you can watch or edit them on PC/Mac. 3) Convert MXF, P2 MXF, XAVC MXF, XACAM MXF with Multiple audio track/channel preserver or mixer.4) 1:1 Backup Blu-ray/DVD without region code or protection limit in two clicks. 5) Convert Blu-ray/DVD movies to MKV/MP4/MOV with multiple audio tracks and subtitlesExpire on Dec 6.Part 1. 50% Discount for Top-selling Windows/Mac Video ConvertersTop 1. 50% OFF Video Converter UltimateOriginal Price: $65Now: Only $32.5Free Trial Limit PurchaseHow-ToTop 2. 50% OFF iMedia Converter for Mac Original Price: $65Now: Only $32.5Free Trial Limit PurchaseHow-ToTop 3. 50% OFF Video Converter for WindowsOriginal Price: $35Now: Only $17.5Free Trial Limit PurchaseHow-ToTop 4. 50% OFF Video Converter for MacOriginal Price: $35Now: Only $17.5Free Trial Limit PurchaseHow-ToTop 5. 50% OFF HD Video Converter for WindowsOriginal Price: $35Now: Only $17.5Free Trial Limit PurchaseHow-ToTop 6. 50% OFF HD Video Converter for MacOriginal Price: $35Now: Only $17.5Free Trial Limit PurchaseHow-ToTop 7. 50% OFF MTS/M2TS Converter for WindowsOriginal Price: $29Now: Only $14.5Free Trial Limit PurchaseHow-ToTop 8. 50% OFF MTS/M2TS Converter for MacOriginal Price: $29Now: Only $14.5Free Trial Limit PurchaseHow-ToTop 9. 50% OFF MXF MultiMixerOriginal Price: $45Now: Only $22.5Free Trial Limit Purchasehttp://www.multipelife.com/mxf-multimixer/tipsTop 10. 50% OFF iMixMXF: $22.5Original Price: $45Now: Only $22.5Free Trial Limit PurchaseHow-ToTop 11. 50% OFF MXF Converter for WindowsOriginal Price: $29Now: Only $14.5Free Trial Limit PurchaseHow-ToTop 12. 50% OFF MXF Converter for MacOriginal Price: $29Now: Only $14.5Free Trial Limit PurchaseHow-ToPart 2. 50% Discount for Top-selling Windows/Mac Blu-ray/DVD ripping & copying SoftwaresTop 1. 50% OFF BDMagic for WindowsOriginal Price: $49Now: Only $24.5Free Trial Limit PurchaseHow-ToTop 2. 50% OFF BDMagic for MacOriginal Price: $49Now: Only $24.5Free Trial Limit PurchaseHow-ToTop 3. 50% OFF ByteCopy for Windows Original Price: $42Now: Only $21Free Trial Limit PurchaseHow-ToTop 4. 50% OFF ByteCopy for MacOriginal Price: $42Now: Only $21Free Trial Limit PurchaseHow-ToTop 5. 50% OFF DVDAid for WindowsOriginal Price: $35Now: Only $17.5Free Trial Limit PurchaseHow-To Top 6. DVDAid for MacOriginal Price: $35Now: Only $17.5Free Trial Limit PurchaseHow-To Learn more at Pavtube Facebook: https://www.facebook.com/pavtubefans/?sk=app_186981981345123If you have any problem to buy or use Pavtube, pls feel free to contact support@pavtube.com (for Windows user),macsupport@pavtube.com (for Mac user).Read moreClick here get more Pavtube programsClick here to get 20% off for Pavtube Facebook FansClick here to get Blu-ray/DVD/Video/DRM software bundle PromotionsClick here to get HD/MXF/MTS/DVD Creator software bundle PromotionsClick here to get Weekend Special offers
Summary: Are you have no idea of how to watching the Leica Q MPEG-4 Recorded Videos on HDTV? Here just the right place you come.
The Leica Q is a high-end full-frame enthusiast compact with a 24MP CMOS sensor with no anti-aliasing filter. It enables 1080/60p video recording, 10 fps continuous shooting.
With this non-stop high quality video you recorded by Leica Q, many users are confused with how to watch it on the HDTV. Therefore, the issue will be solved with this article.
Hot Search: TOP 10 4K TVs | XAVC S on 4K UHD TV | H.265 4K to Ultra HD TV
The Leica Q recording videos with MPEG-4 format with a special codec due to the 10 fps continuous shooting. There, we’ll receive a big, fat “NO” when trying to import MPEG-4 video to Samsung/Sony/VIZIO/LG/Panasonic HD Smart 3D/LED TV, because some of them fail to accept this special codeced MPEG-4 format video from Leica Q. In this regard, we will have to get rid of the format issue with the help of third-party software.
Pavtube HD Video Converter / Mac Version(read the review)- HDTV video converter, is a genius in handling all HD problems: convert Any video to HD TV acceptable format, transcode one format to any other formats, transfer any video to most portable media devices like iPhone 6/6 plus/5/4s/4, Galaxy S6/S5, iPad Air 3, etc., and any other tasks that you would like to assign.
Other Download:
First things first:The Mac Version as example, Windows Version has the same Steps except the main interface logo.
How to Watching Leica Q Recorded Videos to HDTV?
Step 1. Import source video from Leica Q to this app by clicking the "Add video" button on the main UI. Or choose to add multiple videos from the same folder on your computer hard drive.
Step 2. Choose UHD TV playable "HD Video" > "H.264 HD Video" from "Format" bar drop-down selections.
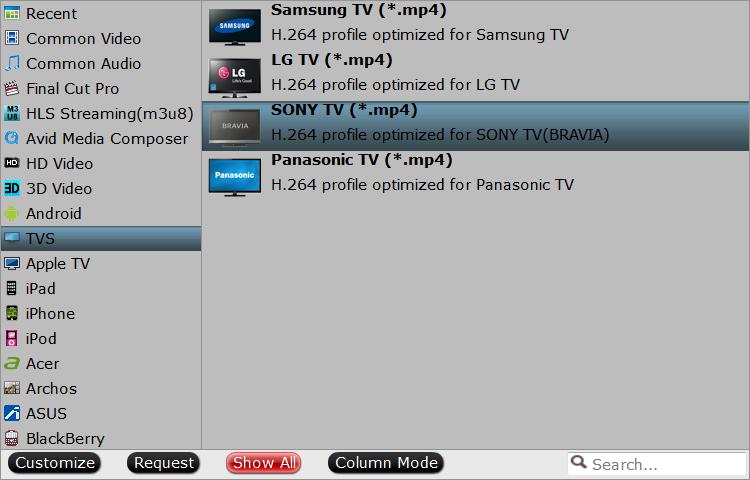
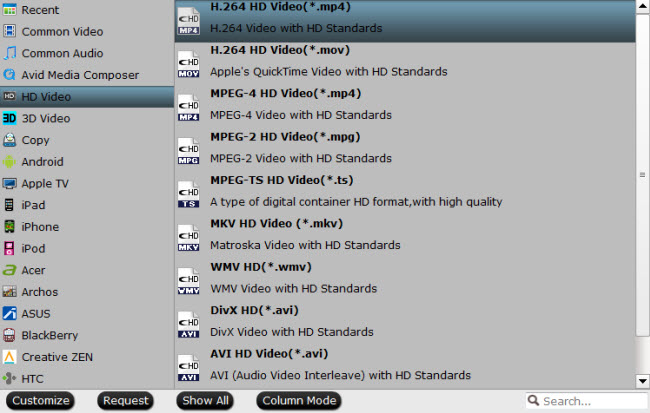 You can also choose HDTV compatible video format from "TVS" extended selections, here you can select the specific TV optimized format according to your TV brand.
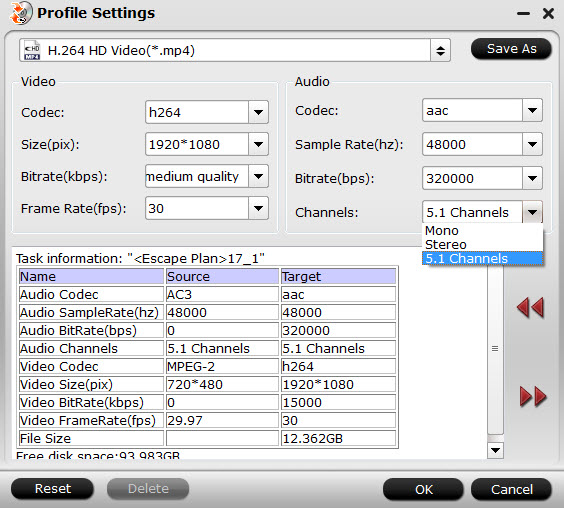
 Step 3. Adjustments like video size, bitrate, frame rate, sample rate, and channels are available. The 5.1 channel allows you to enjoy sounds from different directions and turns your home to a grand concert.
 Step 4. After you have properly set up all the output profile parameters, start the conversion process by hitting right-bottom convert button.
You can find the generated files by clicking "Open output folder" when the conversion is completed. Transfer them to an external USB hard drive and plug the drive into your HDTV, you will have no difficulty to watch Leica Q Recorded Videos on your large screen HDTV.
Read More:
Step 4. After you have properly set up all the output profile parameters, start the conversion process by hitting right-bottom convert button.
You can find the generated files by clicking "Open output folder" when the conversion is completed. Transfer them to an external USB hard drive and plug the drive into your HDTV, you will have no difficulty to watch Leica Q Recorded Videos on your large screen HDTV.
Read More:
Only once a year, Pavtube offer 30% off on MXF MultiMixer / iMixMXF in the Black Friday & Cyber Monday Promotion.Are you ready for a crazy online shopping after Thanksgiving Coupons in the next few days on Black Friday and Cyber Monday? If so, and you just have been in need to find a professional software to handle your MAXF video in the earlier days-you’ve come to the right place! Pavtube Studio preparing a 30% OFF MXF MultiMixer / iMixMXF on the Black Friday and Cyber Monday, and the promotion lasts for a week. Pavtube MXF MultiMixer/ iMixMXF is a professional MXF video converter to achieve everything users need to watch and process MXF videos. Users can turn MXF videos into virtually any formats for multiple purpose, mix multiple audio tracks/channels MXF into one, transcode MXF to Mac editing programs for free and professional editing, convert MXF to multi-track MKV/MP4/MOV, output multi-track Apple ProRes MOV for Final Cut Pro (X), and edit MXF videos.This top MXF MultiMixer Software original price is $45. Now only needs $31.5. You won’t get a Multi-track MXF Software at such low price in normal days. So if you have a plan to purchase a MXF MultiMixer in the next few days , why not push the schedule forward and get it in Pavtube Black Friday & Cyber Monday Promotion activity.By the way, please distinguishing the Windows or Mac versions and get the right one from the button below:
 Related Articles:
The vast selection of free 3rd party applications available for Mac OS X always surprises people when they’re new to the platform. Among that abundance of software is a collection of free Mac video converters which can cover nearly any situation you could find yourself in.
Don’t go looking for an expensive piece of software you may only use a handful of times. Instead, take a look at these 5 Mac video conversion tools which are completely free and surprisingly full-featured.
1. HandBrake
Handbrake is a powerhouse swiss army knife for video conversion and supports just about any conceivable format as input and exports to the most useful formats of MP4 M4V, MKV, and MPG. Originating as a DVD ripper, it has been around for ages and has now evolved into an excellent all-around video converter tool with tons of features and advanced options. All the expected conversion features are there if you want to keep things simple, but advanced options lay right under the hood, where you can add subtitles to video, add new audio tracks, change the video codec type, set and customize frame rate, adjust chapters for DVD or BluRay conversions, apply filters to denies and decomb videos, and so much more.
2. QuickTime
Did you know QuickTime, the video player bundled in OS X, can also function as an excellent easy to use video converter? We’ve shown you how to use it to turn videos into iPad compatible formats before, but it can do much more than that, and whether you’re trying to get a video ready for any iOS device or PC, it works just fine. Plus it’s already bundled with your Mac, so you don’t have to download anything else or fiddle with much to get it working.
3. MPEG Streamclip
Drag your video clip into the window and export to your chosen format — that’s all there is to it with MPEG Streamclip. If you require some extra control over the final product, there are a ton of options for that too. Is it a pretty program? No. Is it functional? Oh yeah.
4. MediaCoder
If you’re willing to delve headfirst into the software, MediaCoder is a capable program loaded with terrific conversion features. The interface, though bewildering at first glance, is relatively straightforward once you learn your way around, offering a boatload of customizable features for converting video to a specified output format of your choice. Whether you want to batch process a number of AVI files to MPEG or compress files for a reduced memory footprint, MediaCoder can handle it (albeit with a throwback design).
5.FFmpegx
FFmpegx is fast video and audio encoder, as well as free video converter Mac . It doesn’t support previewing video as HandBrake and MPEG Streamclip do, but Supports subtitles in most formats. It is a little complex for beginners, as it is filled with settings and tools, that only confirmed users will feel comfortable with. It is more suitable for experts who want to set some advanced preferences.
Above are 5 five free video converters for you. While, searching online we find there are still many users are looking for a professional video converter for Mac OS X. That’s because there are so many limits with these free video converting programs like limited output formats, heavy quality loss, slow conversion speed… and can’t meet the needs of users. Here, the best alternative Mac tool we recommend is Pavtube Video Converter for Mac
(read the review).
What’s the Advantage of Pavtube Video Converter for Mac?
1.Compatible with All SD & HD formats
With Pavtube Video Converter for Mac, you never worry about the format compatibility problem. It fully supports converting between all SD & HD formats, like AVI, MPEG, H.264/ AVC, MP4, WMV, MOV, 3GP, even 720p/1080p Full HD Video formats. What’s more, all ouput formats are well categorized by devices, you can easily choose the right format you need according to your digital players.
2. Easy to use and Works fast
It comes with user-friendly interface, all functions are well displayed and leads you step by step,any one newbie can easily handle it. The fast working speed can also bring you a nice experience, never waste your precious time.
3. Comes with built-in video editor
Want to touch up video before conversion? This best video converter for Mac enables you enhance video visual effects, like edit, crop and add some special effects, texts, and external subtitle, etc.
4. Flexible output parameters settings
Voilabits VideoConverter lets you set video output parameters to enhance the video quality, like adjust frame rate, codec, resolution, bit rate of the video and audio.
Just click the button given below to get one and start your easy work:
Read More: