How to import AVCHD to FCP X? How to edit AVCHD in FCP X? Do you have any AVCHD to FCP X solutions? If you have the issues of converting AVCHD to FCP X, do not worry too much. We are seeking some efficient ways to transcode AVCHD to FCP X freely. Panasonic's Lumix TZ series of cameras needs no real introduction, and has been one of the most popular "Travel Zoom" ranges of cameras available, with Panasonic being one of the first companies to offer a pocketable zoom camera. The Panasonic Lumix TZ57 is the "entry level" Travel Zoom, with the TZ70 being the top of the range model. From the official website, we know that TZ57 records AVCHD MTS files. I think it will be gorgeous masterpieces after editing TZ57 AVCHD MTS in FCP X.For all of its faults, FCP X offers much better native file compatibility than its predecessor. However, all files aren’t equal when working in FCP X. Some files, like the MTS files produced from AVCHD video capture, require you to take a couple of extra steps to get them into FCP X.“I have bought a new Lumix TZ57 last week, since I got it I recorded a few footages in full HD 1920*1080 resolution, the recorded video files are in AVCHD MTS video format. Today I want to import AVCHD to FCP X and editing on my MacBook Pro retina, but the FCP X shows the AVCHD MTS files are not supported, I am not familiar with this video format, can anyone tell me the best way to import AVCHD to FCP X and then edit natively?”If you are working AVCHD MTS files with FCP X, then these helpful tips should assist with any kinks in your workflow. Pavtube MTS/M2TS Converter for Mac is highly recommended here. Just like the question showed above, we should convert AVCHD to FCP X best accepted Apple ProRes with this third-party software.
 How to import TZ57 AVCHD to FCP X for editing?Step 1: Import TZ57 AVCHD files to Mac MTS Converter. Run it as the best MTS Converter, and click the "Add video" button to load AVCHD MTS videos. You may also directly drag and drop TZ57 AVCHD MTS videos to application UI for importing files.
 Step 2: Click the “Format” option and navigate the mouse cursor to “Final Cut Pro >>Apple ProRes 422 (*.mov)” as output format. Apple ProRes 422 (*.mov) and Apple ProRes 422 (HQ) (*.mov) have higher qualities. Apple ProRes 422 (LT) (*.mov) and Apple ProRes 422 (Proxy) (*.mov) have smaller size. You can choose according to your requirement.
 Step 3: To set the profile settings, please click the “Settings” button. General speaking, the default settings are just fine. Click the “Browse” button to browse and specify a destination folder to save the converted files.Step 4: When everything is ready, click “Convert” to start converting AVCHD MTS to ProRes 422. This Mac MTS/M2TS Converter supports batch conversion so you may load multiple files and convert them at one time.Conclusion: In a word, AVCHD to FCP X solutions we have mentioned above are effective for you to import TZ57 AVCHD to FCP X. As soon as you got the generated files by clicking “Open” button, you can transfer AVCHD to FCP X easily and smoothly.Further Reading:
Viewing through the Sony HDR-AS200V XAVC S forums online, we can find so many issues related to XAVC S about how to upload XAVC S to YouTube, how to burn XAVC S to DVD and etc. Read this guide below, XAVC S to YouTube workflow is provided as well as XAVC S to DVD. The versatile Sony AS200V Full HD Action Cam is designed to go wherever you do - whether on a mountain expedition or just for a walk in the park. So you will be very excited that you can share attractive videos shoot with AS200V to your friends or on website because it records your excellent time. It features a water-resistant design and simple one-button operation. Video is recorded to a separately available microSD card, with the option for MP4 and professional XAVC S compression.For sharing with friends or uploading to the website, you must be probably choosing the platform of YouTube as for it is a video-sharing website on which users can upload, share, and view videos. It is a great resource. Learn from YouTube official website, since only FLV, AVI, MPEG, MPA and etc. can be supported by YouTube very well, how can we upload XAVC S to YouTube? If an XAVC S video converter is needed, what should we do to convert XAVC S to YouTube?Equally, for keeping good moments and memories, we can burn these XAVC S videos to DVD, sooner you will find it should be a time consuming job or impossible. To be frank, you must be disappointed for DVD can’t accept XAVC S format. As two headache problems have been put forward above, what solutions can we take? To get the work done, you can depend on Pavtube XAVC S Video Converter. With it, no matter for uploading XAVC S to YouTube or burning XAVC S to DVD, it can deal with it smoothly.
 Tips on how to upload AS200V XAVC S to YouTube or burn to DVD:Step 1: After downloading and installing, launch the XAVC S Video Converter. Open the main interface and choose the “Add video” button to load your XAVC S files captured by Sony AS200V. For the multiple video clips we can hit the “Add from folder” button.
 Step 2: Click the “Format” drop-down list, and choose the corresponding output format for YouTube. We would like to introduce you to select “Flash Video>>FLV H.264 (*.flv)”.
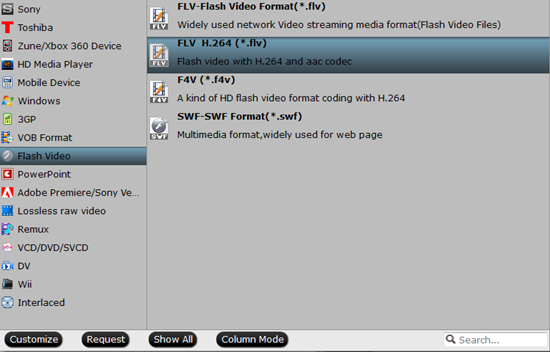 Step 3: Most of you guys must have the desire of a further editing with your output videos, right? On the main interface, “Edit” is waiting for you. “Trim” to decide where to start and where to end, “Crop” to cut some unwanted clips, “Subtitles” to add some explanations to your audience.Step 4: Click “Convert” button and start XAVC S videos conversion. After conversion, you can get the converted files by clicking “Open” button. Now, you can upload the generated AS200V XAVC S to YouTube smoothly.Conclusion: With this XAVC S Video Converter, you can choose “Common Video>>MPEG-2 Video (*.mpg)” in step 2 for burning XAVC S to DVD. Other operations are all the same. Besides, the newly released Pavtube DVD Creator lets you burn any kind of video sources to playable DVD. With its simple wizard-style user interface and powerful editing features, DVD authoring and burning can't be easier.Further Reading:
Windows Movie Maker can’t recognize MP4, AVI, Divx, VOB, MKV files? Fortunately, this issue has been solved! Here I’ll show you how to import MP4, AVI, Divx, VOB, MKV to Windows Movie Maker.
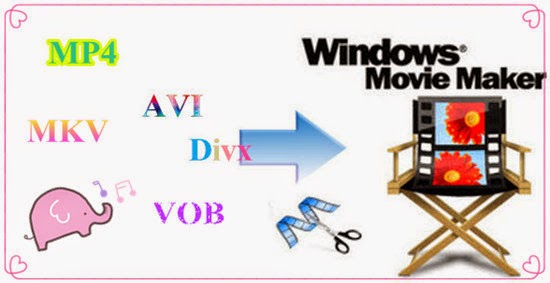 Windows Movie Maker (WMM) is one of the most popular video editing programs in the Windows operating system and it has received a lot of praises. With it, users can effortlessly create movies in WMV, AVI, ASF, MPG video formats. However, if you want to import MP4, AVI, Divx, VOB, MKV to Windows Movie Maker, then you will be disappointed with the result that Windows Movie Maker won’t import MP4, AVI, Divx, VOB, MKV at all.
What’s the matter? Well, this is a common problem encountered by many Windows Movie Maker users. Some problems occurred as quoted below. “Does anyone know why Windows Movie Maker in Windows 8.1 cannot open the video portion of MP4, AVI, Divx, VOB, MKV files? The audio version opens, but not the video.”
Fortunately, there is an easy way to fix the issue. The easy workaround is to change MP4, AVI, Divx, VOB, MKV to Windows Movie Maker acceptable file format like WMV before importing. Actually, it’s not as difficult as you imagine. What you need is a just a common video converter like Pavtube Video Converter. It supports creating high quality WMV video for your Windows Movie Maker, no matter what’s the format of your source video files. It can convert almost any video to WMV so you can import your MP4, AVI, Divx, VOB, MKV to Windows Movie Maker for editing. Plus, it comes with all regular video editing tools like trim, crop, effect, subtitle, watermark and etc. For basic video editing tasks, you can even replace your Windows Movie Maker with it.
How to make Windows Movie Maker import MP4, AVI, Divx, VOB, MKV?
Step 1: Download, install and run MP4, AVI, Divx, VOB, MKV files to WMM Video Converter. Click the “Add” button to import MP4, AVI, Divx, VOB, MKV files to the program. If you want to load several files at once, you can click “Add from folder” button. You can also use the drag-and-drop method to load the media files to the application UI.
Step 2: Click “Format” pull down list to select “HD Video>>WMV HD (*.wmv)” as output format for importing MP4, AVI, Divx, VOB, MKV to Windows Movie Maker.
Windows Movie Maker (WMM) is one of the most popular video editing programs in the Windows operating system and it has received a lot of praises. With it, users can effortlessly create movies in WMV, AVI, ASF, MPG video formats. However, if you want to import MP4, AVI, Divx, VOB, MKV to Windows Movie Maker, then you will be disappointed with the result that Windows Movie Maker won’t import MP4, AVI, Divx, VOB, MKV at all.
What’s the matter? Well, this is a common problem encountered by many Windows Movie Maker users. Some problems occurred as quoted below. “Does anyone know why Windows Movie Maker in Windows 8.1 cannot open the video portion of MP4, AVI, Divx, VOB, MKV files? The audio version opens, but not the video.”
Fortunately, there is an easy way to fix the issue. The easy workaround is to change MP4, AVI, Divx, VOB, MKV to Windows Movie Maker acceptable file format like WMV before importing. Actually, it’s not as difficult as you imagine. What you need is a just a common video converter like Pavtube Video Converter. It supports creating high quality WMV video for your Windows Movie Maker, no matter what’s the format of your source video files. It can convert almost any video to WMV so you can import your MP4, AVI, Divx, VOB, MKV to Windows Movie Maker for editing. Plus, it comes with all regular video editing tools like trim, crop, effect, subtitle, watermark and etc. For basic video editing tasks, you can even replace your Windows Movie Maker with it.
How to make Windows Movie Maker import MP4, AVI, Divx, VOB, MKV?
Step 1: Download, install and run MP4, AVI, Divx, VOB, MKV files to WMM Video Converter. Click the “Add” button to import MP4, AVI, Divx, VOB, MKV files to the program. If you want to load several files at once, you can click “Add from folder” button. You can also use the drag-and-drop method to load the media files to the application UI.
Step 2: Click “Format” pull down list to select “HD Video>>WMV HD (*.wmv)” as output format for importing MP4, AVI, Divx, VOB, MKV to Windows Movie Maker.
 Step 3: Click “Settings” to fix the frame rate, bit rate, video size, and etc. to your needs. To have a smooth editing with Windows Movie Maker, you need create the files with the appropriate resolution and frame rate that matches your source footage.
Step 4: Click “Convert” button to start MP4, AVI, Divx, VOB, MKV to Windows Movie Maker conversion.
Conclusion: With MP4, AVI, Divx, VOB, MKV to Windows Movie Maker Video Converter, you can easily convert MP4, AVI, Divx, VOB, MKV to Windows Movie Maker WMV format in few steps; video quality are guaranteed by the best MP4, AVI, Divx, VOB, MKV to WMM Video Converter. Just try and enjoy yourself.
Further Reading:
Step 3: Click “Settings” to fix the frame rate, bit rate, video size, and etc. to your needs. To have a smooth editing with Windows Movie Maker, you need create the files with the appropriate resolution and frame rate that matches your source footage.
Step 4: Click “Convert” button to start MP4, AVI, Divx, VOB, MKV to Windows Movie Maker conversion.
Conclusion: With MP4, AVI, Divx, VOB, MKV to Windows Movie Maker Video Converter, you can easily convert MP4, AVI, Divx, VOB, MKV to Windows Movie Maker WMV format in few steps; video quality are guaranteed by the best MP4, AVI, Divx, VOB, MKV to WMM Video Converter. Just try and enjoy yourself.
Further Reading:
These days I’ve been trying to figure out how to get VLC to recognize MXF recordings, how to play MXF with VLC on Mac and Windows, but there is no-go. Can anyone kindly shed some light on this issue?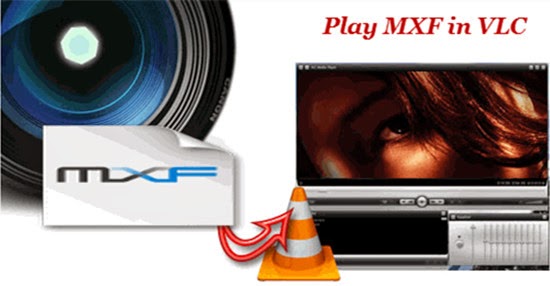 Material Exchange Format (MXF) is an open-standard container or a wrapper format for digital audio and video media. There are many camcorders use MXF format, like Sony XDCAM series, Panasonic P2 series and Canon XF series. Unfortunately MXF is not an easy format to handle both on Windows and Mac. In this article, we aim to offer you an easy way to help you play MXF with VLC media player freely.VLC media player is the most successful free open source cross-platform multimedia player in Windows, Linux, Mac OS X and framework that plays most multimedia files as well as DVD, Audio CD, VCD, and various streaming protocols. There are still many people encountered problems when playing MXF with VLC on Mac and Windows.“I am using VLC to play some MXF files. The files play fine but it seems I cannot seek. Whenever I try to click to a position on the scrollbar the video will freeze and jump to the beginning. I am wondering is this a known issue?”If you tried to play MXF with VLC on Mac and Windows, you may probably run into the same situations as mentioned above. To be able to make MXF files viewable on a Mac or a Windows PC through VLC, you are suggested to transcode MXF to a format that is suitable for your media player. This requires third party software like Pavtube MXF Converter for Mac. (Windows version) Below is the simple guide about how to play MXF with VLC on Mac and Windows.Step 1: Backup your MXF files to hard drive. Install and launch MXF Video Converter for Mac. Drag and drop MXF files to the software. You can import multiple files at once thanks to “Add from folder” button.
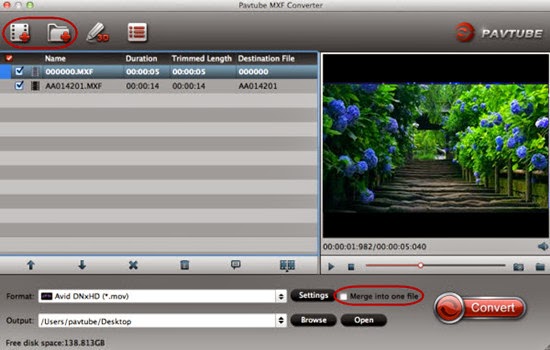 Step 2: Click the drop-down list in the format line to get the format box. Then choose “HD Video>>H.264 HD Video (*.mp4)” as output format.
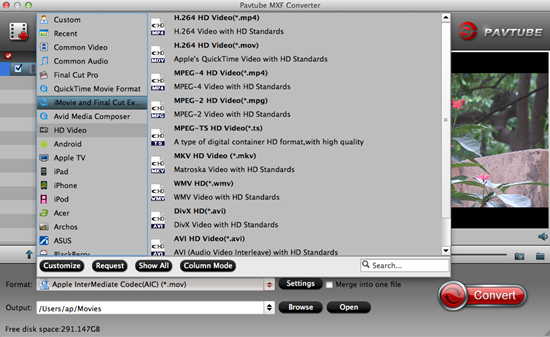 Step 3: You can adjust the parameters by clicking “Settings” button, choose the resolution, bitrate, frame rate and etc. as you want.Step 4: You can preview to check the final result. Once you are satisfied with it, click the “Convert” button to start converting MXF files to H.264 HD Video MP4 for playing with VLC flawlessly. It will take you a little while.Conclusion: Once the conversion process shows in 100%, click “Open” to get the output videos. Now, you can play MXF with VLC on Mac and Windows without any issues.Further Reading:
This article will go through briefly about Pavtube special offer and big deal on 2015 Easter promotion. Attractive activities of this grand festival held by Pavtube Studio will also be introduced.
 What do people usually do on Easter Day?
Many churches hold special services on Easter Sunday, which celebrate the Jesus Christ's resurrection after his crucifixion. Many people also decorate eggs. These can be hard boiled eggs that can be eaten later, but may also be model eggs made of plastic, chocolate, candy or other materials. It is also common to organize Easter egg hunts. Eggs of some form are hidden, supposedly by a rabbit or hare. People, especially children, then search for them. In some areas, Easter egg hunts are a popular way for local businesses to promote themselves or may even be organized by churches.
What could Pavtube Studio offer on this grand festival?
Since Easter is approaching, Pavtube Studio provides special offer on Pavtube Video Converter for Mac with 50% off! It saves your totally half price! This Mac Video Converter enables users to backup, convert, transcode, compress and edit source videos and movies to a preferred format for your mobile phones, tablets, or smart TV so you would have a chance to experience the Easter Day traditions at home with the help of Pavtube. Besides, you can import your Easter memorable videos to non-linear editing system like FCP, iMovie/FCE, Premiere, Avid and etc. for further editing so that you can share the fantastic moments with your family and friends. Burn them into DVDs for keeping is also a pretty good idea!
What can you expect for Pavtube special offer on 2015 Easter promotion?
Pavtube Studio is offering special discount on Video Converter for Mac to celebrate this year's Easter Day from March 30 to April 5. During these 7days, you can get wonderful products with attractive price just $17.5 /piece.
With this Mac Video Converter, you can do some simple edit work. On the program’s main interface, “Edit” is waiting for you. “Trim” to decide where to start and where to end, “Crop” to cut some unwanted clips, “Subtitles” to add some explanations to your audience and so on. Before conversion, you can preview the videos. When the video is playing, you may take snapshoot when it plays to your favorable frame by clicking the “Snapshoot” button. Tick off “Merge into one file” when you want to combine several files into an integrated one. You can also change aspect ratio from 4:3 to 16:9 and vice versa, rotate 90 degrees clockwise, anti-clockwise, add plug-in subtitles, apply special effect, and more. Why not download the free trail from the official website and take a close look and then have a try?
How about “Settings”? You can change the parameters by clicking “Settings” button. When Profile Settings pops up, you can change the bit rate, frame rate, codec, audio channel and etc. there. To be frank, if you are not good at change the parameters, you’d better follow the default ones. At least it can maintain the best video quality.
Starting on March 30 and ending on April 5, Pavtube Studio provides 2015 Easter promotion for all users. Let’s enjoy the annual Easter Sunday and the half price special offer! You can click here to know more details about Pavtube Easter Promotion!
More information about Pavtube, you can go to Pavtube official website.
What do people usually do on Easter Day?
Many churches hold special services on Easter Sunday, which celebrate the Jesus Christ's resurrection after his crucifixion. Many people also decorate eggs. These can be hard boiled eggs that can be eaten later, but may also be model eggs made of plastic, chocolate, candy or other materials. It is also common to organize Easter egg hunts. Eggs of some form are hidden, supposedly by a rabbit or hare. People, especially children, then search for them. In some areas, Easter egg hunts are a popular way for local businesses to promote themselves or may even be organized by churches.
What could Pavtube Studio offer on this grand festival?
Since Easter is approaching, Pavtube Studio provides special offer on Pavtube Video Converter for Mac with 50% off! It saves your totally half price! This Mac Video Converter enables users to backup, convert, transcode, compress and edit source videos and movies to a preferred format for your mobile phones, tablets, or smart TV so you would have a chance to experience the Easter Day traditions at home with the help of Pavtube. Besides, you can import your Easter memorable videos to non-linear editing system like FCP, iMovie/FCE, Premiere, Avid and etc. for further editing so that you can share the fantastic moments with your family and friends. Burn them into DVDs for keeping is also a pretty good idea!
What can you expect for Pavtube special offer on 2015 Easter promotion?
Pavtube Studio is offering special discount on Video Converter for Mac to celebrate this year's Easter Day from March 30 to April 5. During these 7days, you can get wonderful products with attractive price just $17.5 /piece.
With this Mac Video Converter, you can do some simple edit work. On the program’s main interface, “Edit” is waiting for you. “Trim” to decide where to start and where to end, “Crop” to cut some unwanted clips, “Subtitles” to add some explanations to your audience and so on. Before conversion, you can preview the videos. When the video is playing, you may take snapshoot when it plays to your favorable frame by clicking the “Snapshoot” button. Tick off “Merge into one file” when you want to combine several files into an integrated one. You can also change aspect ratio from 4:3 to 16:9 and vice versa, rotate 90 degrees clockwise, anti-clockwise, add plug-in subtitles, apply special effect, and more. Why not download the free trail from the official website and take a close look and then have a try?
How about “Settings”? You can change the parameters by clicking “Settings” button. When Profile Settings pops up, you can change the bit rate, frame rate, codec, audio channel and etc. there. To be frank, if you are not good at change the parameters, you’d better follow the default ones. At least it can maintain the best video quality.
Starting on March 30 and ending on April 5, Pavtube Studio provides 2015 Easter promotion for all users. Let’s enjoy the annual Easter Sunday and the half price special offer! You can click here to know more details about Pavtube Easter Promotion!
More information about Pavtube, you can go to Pavtube official website.
Amazon Kindle devices enable users to shop for, download, browse, and read e-books, newspapers, magazines and other digital media via wireless networking. You cannot wait to learn more about how to convert videos to Kindle or other e-read devices, can you?
 Whether you are the proud new owner of an e-read device, it can often be difficult for you to know how to convert videos to Kindle or other e-read devices for entertainment. How to deal with different formats which are not compatible with kindle or other e-read devices?
The prices of e-readers are constantly going down. Many users feel that this is a fair price for a device that lets read and manage electronic books. On the other side, e-readers are single-purpose devices. Some of them offer extra features like web browsing and it’s really functional. E-readers have technical limitations (like e-paper screen), and they are not meant to give anything more than sheer pleasure of reading.
Are you eager to place your personal owned videos on Kindle? If your source media is what Kindle compatible with, just transfer from computer hard drive to the portable tablet; otherwise, you might need to convert MKV,
Whether you are the proud new owner of an e-read device, it can often be difficult for you to know how to convert videos to Kindle or other e-read devices for entertainment. How to deal with different formats which are not compatible with kindle or other e-read devices?
The prices of e-readers are constantly going down. Many users feel that this is a fair price for a device that lets read and manage electronic books. On the other side, e-readers are single-purpose devices. Some of them offer extra features like web browsing and it’s really functional. E-readers have technical limitations (like e-paper screen), and they are not meant to give anything more than sheer pleasure of reading.
Are you eager to place your personal owned videos on Kindle? If your source media is what Kindle compatible with, just transfer from computer hard drive to the portable tablet; otherwise, you might need to convert MKV, AVI
, MOV, WMV, FLV, Tivo
, VOB, MXF
, and more videos and movies to Kindle playable MP4 in advance. Here, you can depend on Pavtube Video Converter for Mac. It’s a professional Mac Video Converter for Kindle. If you are Windows users, you can refer to Pavtube Video Converter.
How to convert videos to Kindle or other e-read devices?
Step 1: Download and install the program from the website or click the free trial icon. Then, launch the best Mac video converter for Kindle and load your original video files in with “Add video” or “Add from folder”. Directly drag files in is available.
 Step 2: Choose the right output format for Kindle. As we mentioned above, we would like to introduce you to select the “Android>>Amazon Kindle Fire HD (*.mp4)” as the export format.
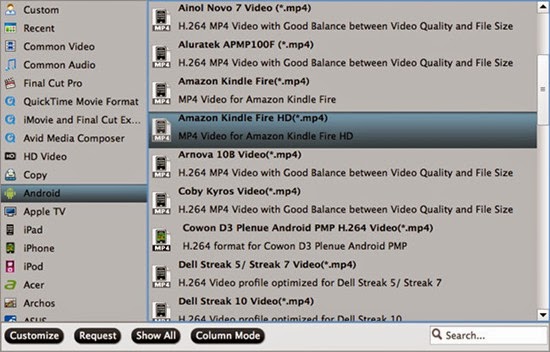 Tips: If you cannot locate the particular profile for your device, choose the general one for Android tablet or smart phone as output format.
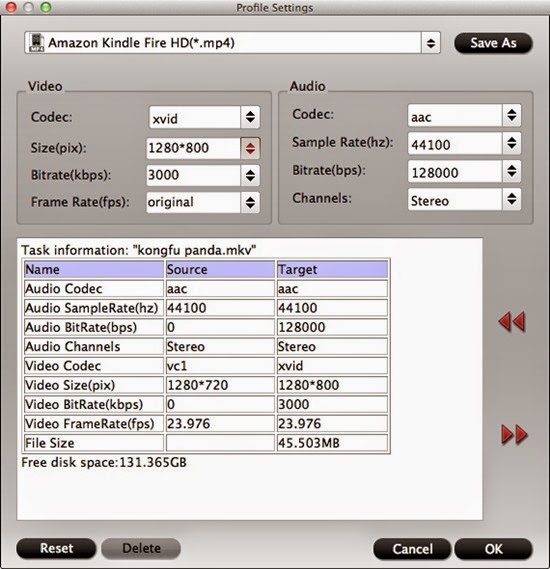
Step 3: Customize the profile settings such as video codec, size, bitrate, frame rate, etc for output. For HD videos and movies, you can customize the video size as 1280*800 and set video bitrate as 1500~3000 to get a balanced output HD video for Kindle.
Tips: If you cannot locate the particular profile for your device, choose the general one for Android tablet or smart phone as output format.
Step 3: Customize the profile settings such as video codec, size, bitrate, frame rate, etc for output. For HD videos and movies, you can customize the video size as 1280*800 and set video bitrate as 1500~3000 to get a balanced output HD video for Kindle.
 Step 4: Back to the program main UI, and hit the “Convert” icon to start converting videos to Kindle or other e-read devices.
Conclusion: When the conversion completes, get the converted files from output folder and you can transfer and watch them on Kindle or other e-read devices with smooth playback. By the way, we have promoted money saving bundles & deals activity. It really saves a lot! Why not take a look and have a try about high quality products with attractive price?
Further Reading:
Step 4: Back to the program main UI, and hit the “Convert” icon to start converting videos to Kindle or other e-read devices.
Conclusion: When the conversion completes, get the converted files from output folder and you can transfer and watch them on Kindle or other e-read devices with smooth playback. By the way, we have promoted money saving bundles & deals activity. It really saves a lot! Why not take a look and have a try about high quality products with attractive price?
Further Reading:
There is no doubt that iMovie is the best free home movie editing software. However, its supported video formats are limited. How if you want to edit videos which are not compatible with iMovie? It's used to be a headache.
 Where are your videos from? In nowadays, most videos are from cameras or camcorders. Maybe there are still videos from phones or other devices, but cameras and camcorders are the best choice when capturing. With the memory card, much information could be stored. But there is only one problem that different camcorders record videos in different formats. For example: most HD camcorders now could capture AVCHD files in MTS or M2TS format, some camcorders could capture MOV and MP4 files while some JVC camcorders capture TOD and MOD videos. How to handle these videos in various formats in iMovie?
Not all the formats could be accepted by iMovie. Actually, MOV is the best choice for iMovie editing. That's totally because iMovie could read MOV directly without any problems or rendering. Of course, you can import videos to iMovie for editing with the help of third-party software. But how?
Tips: iMovie/FCE supported video formats
Pavtube HD Video Converter for Mac is what you need. Compare with many other such video conversion tools, you will find this software is much powerful. Conversion could be easily achieved, but to keep the high quality will be much more difficult. Most such tools will supply new videos with much quality loss, but never will this HD Video Converter for Mac. It could easily help to transcode the videos to any other format you want, of course including AIC MOV for iMovie.
Tutorial on importing videos to iMovie for further editing:
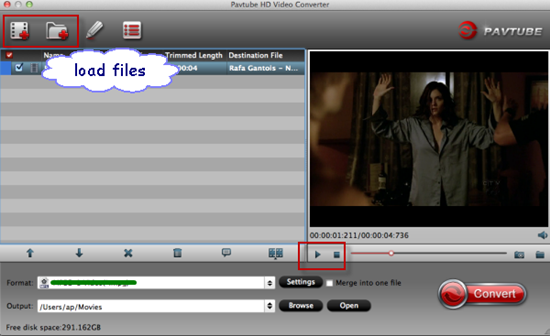
Step 1: Launch the HD Video Converter on your Mac, and then click the “Add video” button to import your videos directly. In order to import several files at one time, you can click “Add from folder” button.
Where are your videos from? In nowadays, most videos are from cameras or camcorders. Maybe there are still videos from phones or other devices, but cameras and camcorders are the best choice when capturing. With the memory card, much information could be stored. But there is only one problem that different camcorders record videos in different formats. For example: most HD camcorders now could capture AVCHD files in MTS or M2TS format, some camcorders could capture MOV and MP4 files while some JVC camcorders capture TOD and MOD videos. How to handle these videos in various formats in iMovie?
Not all the formats could be accepted by iMovie. Actually, MOV is the best choice for iMovie editing. That's totally because iMovie could read MOV directly without any problems or rendering. Of course, you can import videos to iMovie for editing with the help of third-party software. But how?
Tips: iMovie/FCE supported video formats
Pavtube HD Video Converter for Mac is what you need. Compare with many other such video conversion tools, you will find this software is much powerful. Conversion could be easily achieved, but to keep the high quality will be much more difficult. Most such tools will supply new videos with much quality loss, but never will this HD Video Converter for Mac. It could easily help to transcode the videos to any other format you want, of course including AIC MOV for iMovie.
Tutorial on importing videos to iMovie for further editing:
Step 1: Launch the HD Video Converter on your Mac, and then click the “Add video” button to import your videos directly. In order to import several files at one time, you can click “Add from folder” button.
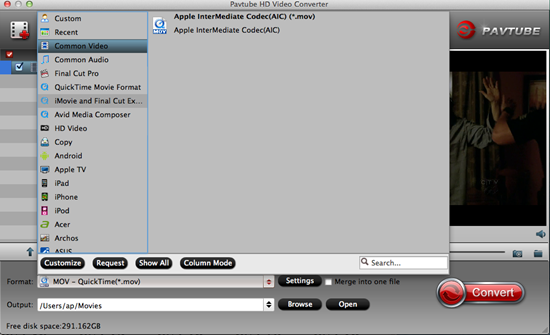
 Step 2: Click the “Format” bar to get the drop-down menu and you can get “iMovie and Final Cut Express>>Apple InterMediate Codec (AIC) (*.mov)” as the best output format.
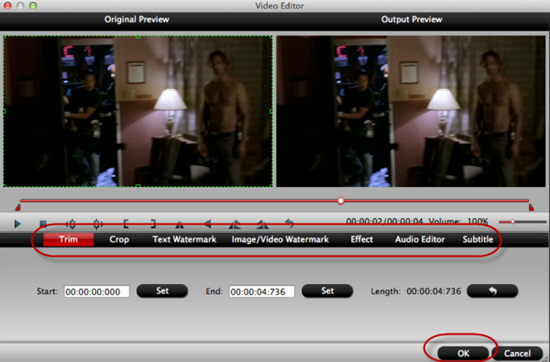
 Step 3: The built-in editing function provided by Mac HD Video Converter is something worth trying. To trim the video, add artistic effects, adjust audio, add watermark, customize video parameters and so on. You can get the work done splendidly. Of course, if you don’t think it’s a necessary to do, you can skip it and move onto the next step directly.
 Step 4: Now, click "Convert" and let it go. This HD Video Converter for Mac supports batch conversion. So if you have lots of videos to convert, check “Shut down computer after conversion” and you can go away without keeping an eye on it.
Conclusion: Once the conversion process shows in 100%, click “Open” to get the output videos. Now, you can edit videos in iMovie with light speed. The newly released Pavtube DVD Creator for Mac program makes DVD creation much easier than ever before. It lets you burn any kind of video sources to playable DVDs within a few clicks.
Further Reading:
Step 4: Now, click "Convert" and let it go. This HD Video Converter for Mac supports batch conversion. So if you have lots of videos to convert, check “Shut down computer after conversion” and you can go away without keeping an eye on it.
Conclusion: Once the conversion process shows in 100%, click “Open” to get the output videos. Now, you can edit videos in iMovie with light speed. The newly released Pavtube DVD Creator for Mac program makes DVD creation much easier than ever before. It lets you burn any kind of video sources to playable DVDs within a few clicks.
Further Reading: