Thursday, April 7, 2016

How to Import Multi MKV files to After Effects, No Quality Loss!

Many folks are facing the MKV importing issues with After Effects CS4, CS5, CS6 or even with the latest AE CC.

In AE, all imported .*mkv files will show the video just fine, but I can hear no audio. The speaker icon will show up in the timeline, but if I view the Waveform, I now get two flat lines. It is as if the Audio was -48.00 dB, but it is set to 0.00. I have even tried to push it up to +12.00 dB, but the Waveform displays only the flat lines.

As far as I know, MKV is a filename extension for the Matroska multimedia container, an envelope for which there can be many audio, video and subtitles streams, that is why MKV are used to store a complete movie or CD in a single file.

If the MKV files are not accepted by After Effects or video only(no audio), it’s probably because of containing multi-track audio and the the audio cannot be all recognized by After Effects.

According to our tests, the easy workaround is to convert MKV to a different format such as MPEG-2, AVI, MOV for After Effects without quality loss. You can easily finish the job along with some help from Pavtube Video Converter(Best Video Converter Review).

Related Key Features of Pavtube Video Converter:
  • Pavtube Video Converter can help you convert multimedia MKV to MPEG-2, AVI, MOV for After Effects without quality loss.
  • Besides pre-set compatible MPEG-2 for After Effects, Pavtube Video Converter also has pre-set compatible format for Sony VegasAdobe PremiereWindows Movie Maker,etc.
  • Pavtube Video Converter can join different source MKV videos together and output a single video. Then you can enjoy a long output movie.
  • Pavtube Video Converter able to customize the output profile, users can adjust the output Resolution, Bitrate, Frame Rate, Encoder, Channels, and Sample Rate.
Tips: The conversion speed is very fast because it supports batch conversion and NVIDIA CUDA & ATI Stream (AMD APP) acceleration technologies. It converts multiple video clips at the same time, moreover it can shut down computer after the process is complete, so run the app overnight and you could enjoy the created videos next morning when you are up.

The trail-before-purchase is supported, just feel free to try it, it is 100% clean and safe:


Other Download:
- Pavtube old official address: http://www.pavtube.com/video_converter/
- Amazon Download: http://download.cnet.com/Pavtube-Video-Converter/3000-2194_4-75734821.html
- Cnet Download: http://download.cnet.com/Pavtube-Video-Converter/3000-2194_4-75734821.html

Free get Pavtube Video Converter(compatible with Windows 10, Windows 8, Windows 7, Windows XP, and Windows Vista), it can help you convert XAVC-L videos to WMV in a short time. All of these functions are user-friendly and you can learn about it easily. 

If you are a Mac user, and in need of edit the MKV videos in Final Cut Pro 7 / X, Avid, iMovie, etc. Please turn to Pavtube Video Converter for Mac.

Convert MKV files to MPEG-2 for After Effects without Quality Loss

Step 1: Import MKV source files.

Click the button “File” to add MKV source files (or directly drag and drop your files) to the Converter.


Tip: If you want to merge MKV source files before edit in After Effects, just need to check the “Merge into one” box.

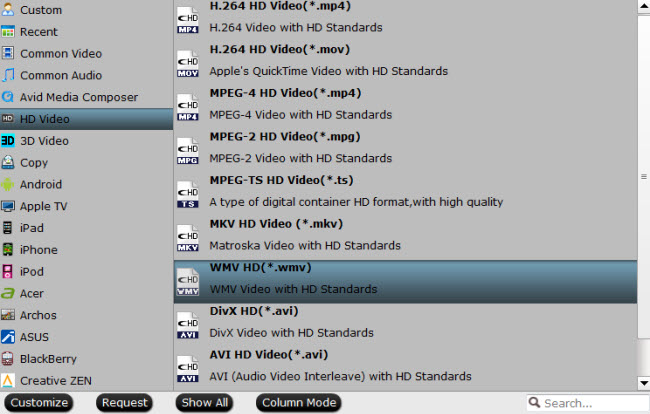
Step 2: Select an output format for After Effects.

Click “Format” bar to select suitable format for After Effects. Go to the format list and pick “MPEG-2 (*.mpg)” under “Adobe Premiere/Sony Ve…” option.


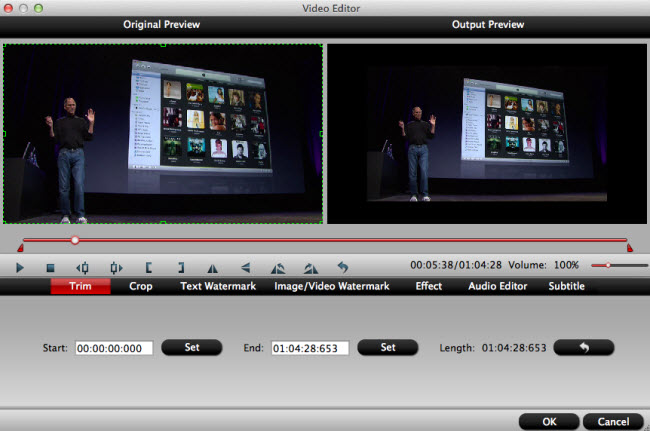
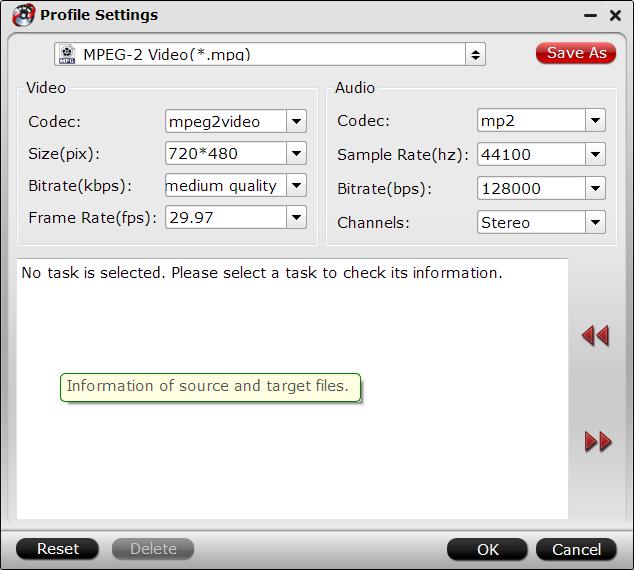
Optional: If you would like to customize the video and audio parameters, you can click "Settings", adjust the parameters as you want, like Video Codec, aspect ratio, bit rate, frame rate, Audio codec, sampling rate, bit rate, channels.


Step 3: Click "Convert" to start to convert MKV files to MPEG-2 for After Effects.

Once the conversion completes, simply click “Open” button to get the converted MPEG-2 files. And now you can bring the output MPEG-2 files into After Effects to create your own masterpieces.

Related program:

Pavtube MTS/M2TS Converter / Mac Version:The best AVCHD(MTS/M2TS) converter on the market, which can convert AVCHD(MTS/M2TS) videos and other HD formats to FCP X Apple ProRes codec MOV format, or convert AVCHD(MTS/M2TS) to Avid Media Composer/Adobe Premiere Pro/iMovie native supported video format. 
>> Solution: No Sound When Import MTS Files to Adobe After Effects.

Pavtube MXF Converter / Mac Version: can handle MXF/MXF footage produced by Canon, Sony and Panasonic camcorders and convert MXF video files to various video format supported by popular devices such as iPad Air/4/3, iPhone 5S/5C/5/4S/4, Apple TV 3, Google Nexus, Samsung Galaxy Tab S/3/2, Samsung Galaxy S5/S4/S3, Surface RT/Pro, PS4/PS3, WDTV, etc. 
>> Edit MXF P2 Media in Adobe After Effects CC.

Read More:

Tuesday, April 5, 2016

Import and Edit Sony PXW Z150 XAVC-L to iMovie

Sony PXW-Z150 XAVC-L Features

Sony’s latest addition to their professional XDCAM lineup, the PXW-Z150, is a compact and versatile camcorder with broadcast-quality 4K and Full HD video. The sensor supports continuous high-frame-rate Full HD image capture at up to 120 fps, as well as UHD 4K recording up to 30 fps with full pixel read and no pixel binning.

To fit into a variety of workflows, the PXW-Z150 offers XAVC-L, MPEG-2 (MPEG HD422), AVCHD recording formats to choose from. High-resolution UHD 4K can be recorded using the XAVC-L codec at 100 Mbps (8-bit 4:2:0), while Full HD 10-bit 4:2:2 recording is available in XAVC-L (50 Mbps).


PXW-Z150 XAVC-L files not accepted by iMovie

From iMovie supported cameras page, we didn’t get any supported information about the Sony PXW Z150, and searching on Google, we found many users may encountered such problems: 

How to load XAVC-L footage from Sony PXW-Z150 into iMovie?

I know that my my Sony PXW-Z150 shoots using a codec that is very similar to XAVC-L 4K and XAVC-L HD, I can't seem to open the XAVC-L or even successfully transcode the video files into something that can be read on the iMovie.

The best options for PXW-Z150 XAVC-L into iMovie

The clips from the PXW-Z150 are not XAVC-L, the best options for getting Sony PXW-Z150 XAVC-L clips into iMovie are:

1. Use the free Sony Catalyst Browse to convert them (one at a time, although you can queue up multiple files without waiting for the previous one to finish).
2. Use the $200 Sony Catalyst Prepare software.
3. Shoot AVCHD(the PXW-Z150 offers XAVC-L, MPEG-2 (MPEG HD422), AVCHD recording formats to choose from) until there is a solution from Sony - supposedly Sony is at work on a plugin for iMovie to allow native ingest/editing of XAVC-L clips.

All-in-one-solution to solve troubles in importing PXW-Z150 XAVC-L to iMovie?

Our XAVC -L & iMovie test has proved that the XAVC-L footage from Sony PXW-Z150 can’t be imported into iMovie directly. To directly edit Sony PXW-Z150 XAVC-L footage in iMovie, for both compatibility reasons, and performance reasons, we strongly recommend transcoding PXW-Z150 XAVC-L formats to an intermediate format like Apple InterMediate Codec for iMovie for editing. However, many people may hesitate which converter is best suitable for them, Here, Pavtube Video Converter for Mac(read the review) is highly recommended to you. The Powerful and easy-to-use XAVC-L to iMovie Converter can be used to solve all those troubles in importing Sony PXW-Z150 XAVC-L footage into iMovie for further editing. 

As mentioned above, the best editable format for iMovie is Apple InterMediate Codec, and this professional converter has preset “Apple InterMediate Codec” for iMovie, so you can use this converter to transcode Sony PXW-Z150 XAVC-L footage to Apple InterMediate Codec for iMovie to get the work done.

What's more, this Mac HD Video Converter also provides the optimal presets like H.265M3U8, MPEG-2, DNxHD, Apple ProRes Codec for PremiereAvid MCFCEFCP.

The trail-before-purchase is supported, just feel free to try it:


Other Download:
- Pavtube old official address: http://www.pavtube.com/video-converter-mac/
- Amazon Store Download: http://www.amazon.com/Pavtube-Video-Converter-Mac-Download/dp/B00QIBK0TQ
- Cnet Download: http://download.cnet.com/Pavtube-Video-Converter/3000-2194_4-76179460.html

Steps: Convert Sony PXWZ150 4K XAVC L to Apple InterMediate Codec for iMovie

Step 1: Add PXW-Z150 XAVC-L files to the program.

If you want import the video into iMovie, You must import from a connected camera and not a file created with one.
Click the “Add File” button to select the Sony PXW-Z150 XAVC-L footage from connected PXW-Z150 camera to this program. 

To save your time, this program supports batch conversion so you can add multiple files at a time.


Step 2: Choose output format and specify output folder.

Choose output format for your specific usage. For example in this case, from "Format" drop-down option, choose iMovie best editing codec by selecting "iMovie and Final Cut Ex..." > "Apple Intermediate Codec (AIC)(*.mov). 

If you select all files and click Merge, you can join all imported mts files to one output video.


Step 3: Edit PXW-Z150 XAVC-L files (Optional).

The “Video Editor” can be reached by clicking the “Edit” button. You can edit your Sony PXW-Z150 XAVC-L files by using editing functions like trimming, cropping, adding watermark to video file, change video effects, etc.


Step 4: Start the Conversion.

Click “Convert” button to start conversion immediately. Few minutes later, you will get output video in your destination folder.

After converting Sony PXW-Z150 XAVC-L to iMovie. workable formats you can easily import them to iMovie for editing. Hope you have a good editing experience.

If you are looking for Sony PXW-Z150 XAVC-L Converter for Windows, please click HERE.

Related program:

If your Sony PXW-Z150 recorded video in AVCHD(MTS/M2TS) container, and you just encounter the compatible issues with AVCHD files and other NLEs,  the best MTS/M2TS Converter should be take into your consideration!

Pavtube MTS/M2TS Converter / Mac Version:The best AVCHD(MTS/M2TS) converter on the market, which can convert AVCHD(MTS/M2TS) videos and other HD formats to FCP X Apple ProRes codec MOV format, or convert AVCHD(MTS/M2TS) to Avid Media Composer/Adobe Premiere Pro/iMovie native supported video format. >> How to convert MTS/M2TS AVCHD to AIC MOV for iMovie?

If you have the camera recorded video in MXF container, the best two MXF Converter should be take into your consideration!

Pavtube MXF Converter / Mac Version: can handle MXF/MXF footage produced by Canon, Sony and Panasonic camcorders and convert MXF video files to various video format supported by popular devices such as iPad Air/4/3, iPhone 5S/5C/5/4S/4, Apple TV 3, Google Nexus, Samsung Galaxy Tab S/3/2, Samsung Galaxy S5/S4/S3, Surface RT/Pro, PS4/PS3, WDTV, etc. >> How to Convert MXF Files for iMovie on Mac?

Read More:

Thursday, March 31, 2016

How to Import and Edit QuickTime (MOV) Files in Windows Movie Maker

“I don't know how to convert my QuickTime (MOV) videos to Windows Movie Maker. Windows Movie Maker can't recognize them.”

“I'm trying to use Movie Maker in Windows 8.1 for the first time. Every time I open a .mov file, Movie Maker immediately crashes. I've attempted it several times and the program has shut down each time.”


MOV is Apple QuickTime Movie file type developed by Apple. As MOV was designed specifically for QuickTime environment, it can suffer problems outside of that environment as we mentioned at the very beginning. On the other hand, Windows Movie Maker (WMM) is one of the most popular video editing programs in the Windows operating system and it has received a lot of praises. With it, users can effortlessly create movies in WMV, AVI, ASF, MPG video formats. However, if you want to import QuickTime MOV to Windows Movie Maker, then you will be disappointed with the result.

Kinds of files can be used in Movie Maker:


Video file types (format)


File name extensions


Windows Media Video (WMV) files


.wmv


Windows Media files


.asf and .wm


AVCHD files


.m2ts, .mts, and .m2t


Apple QuickTime files


.mov and .qt


DV‑AVI files


.avi


Microsoft Recorded TV Show files


.dvr-ms and .wtv


MPEG‑4 movie files


.mp4, .mov,.m4v, .3gp, .3g2, and .k3g


MPEG‑2 movie files


.mpeg, .mpg, .mpe, .m1v, .mp2, .mpv2, .mod, .vob, and .m2t


MPEG‑1 movie files


.m1v


Motion JPEG files


.avi and .mov

Windows Movie Maker can't recognize QuickTime (MOV) videos, only Motion JPEG .mov files. In order to import QuickTime (MOV) videos in Windows Movie Maker, we need to change a video from QuickTime to something compatible with Windows Movie Maker.

As you know, Windows Movie Maker provides best support for WMV video files. So you can just convert QuickTime MOV file to WMV format. Then there won't be any problem to import your QuickTime video to edit with Windows Movie Maker.

Here we highly recommend you Pavtube Video Converter to convert QuickTime to Movie Maker. With it, you can complete conversion from MOV to WMV within seconds. So that you can freely play or edit your QuickTime MOV video on Windows Movie Maker. It supports creating high quality WMV video for your Windows Movie Maker on Windows 10/8/7/XP/Vista, no matter what's the format of your source video files.

The trail-before-purchase is supported, just feel free to try it:


Install and run it, you will see the interface. The following is a simple instruction of how to use this Pavtube Video Converter: 

How to Convert and Import QuickTime (MOV) Files to Windows Movie Maker

Step 1: Import QuickTime (MOV) files.

Click the button “File” to add QuickTime (MOV) files (or directly drag and drop your files) to the Converter.


Tip: If you want to merge QuickTime (MOV) files before edit in Windows Movie Maker, just need to check the “Merge into one” box.

Step 2: Select an output format for Windows Movie Maker.

Click “Format” bar to select suitable format for Windows Movie Maker. WMV is one of the proper formats for Windows Movie Maker.


Step 3: Tap the“Settings”icon to adjust audio and video parameters for Windows Movie Maker. 

Once you have chosen the output format, then click the "Settings" right beside "Format" to adjust the video and audio parameters.

Step 4: Tap the big Convert button on the main interface to start transcoding QuickTime (MOV) to Windows Movie Maker.

The conversion should be quickly finished. Once the process is at 100%, you can have the converted file easily worked with Windows Movie Maker.

Read More:

Tuesday, March 29, 2016

Pavtube 2016 Easter Deals - 20% OFF Video Converter Ultimate

Have you planned your shopping list for the upcoming Easter? If you plan to purchase a 2D/3D Blu-ray Ripper, DVD Ripper, Video Converter or a 4K Compressor at Easter with a lower price, just consider Pavtube Video Converter Ultimate. This Pavtube product can fulfill all your needs on media processing and with Pavtube Easter Coupon, you just need to play $52. 


This discount offering is to show gratitude to valued customers and potential users of Pavtube software. If you are familiar with the Blu-ray/DVD/Video converter market, you will know that this Video Converter Ultimate discount is the biggest Pavtube can give at Easter since Pavtube Video Converter Ultimate contains the function of a Blu-ray Ripper+ DVD Ripper + Video Converter + 4K Compressor + H.265 Decoder&Encoder. Its normal price is the highest among many video programs.  

What can Pavtube Video Converter Ultimate do?

1) 1:1 Backup Blu-ray/DVD without region code or protection limit in two clicks. 

2) Rip Blu-ray/DVD into H.265/HEVC, M3U8, MP4, Apple ProRes, DNxHD, MOV, M4V, MOV, MKV, AVI, Xvid, Divx, VOB, MPEG-2, SWF, FLV... for playback on smartphone, tablet, TV set, HD media player, streaming server, Hard drive, Game console, or edit in Final Cut Pro, iMovie, Adobe Premiere Pro, Avid Media Composer, etc. 

3) Convert Canon/Sony/Panasonic/Nikon/JVC/Blackmagic/Red One shooted H.265, XAVC, XAVC S/L, MXF, MOV, AVCHD, AVI, MP4, VOB footages into common video formats, so you can watch or edit them on PC/Mac. 

4) Compress 4K to 1080P, 720P and allows you to adjust video/audio bitrate, frame rate, codec, sample rate to get more compatible video for Apple TV 4, Amazon Fire TV (2015), VLC, PC. 

This Pavtube Easter coupon will expire on the ending of March, the price will go back to the original $65. But in Pavtube Facebook, you still can get Pavtube Black Friday & Thanksgiving Coupon and special offer for each weekend. 

Src: http://best-tablet-converter.com/2016/03/24/pavtube-video-converter-easter-coupon/

Pavtube Video Converter Ultimate Guides:

The Easiest Way to Convert 4K DNxHR Codec Files to 1080p H.264 Videos

DNxHR was just recently added to Avid Media Composer so when you create some videos with Avid Media Composer, the output video is like to be 4K DNxHR codec video. This video is not a friendly file that common video players won’t play them.

In this case, many people choose to convert 4K DNxHR codec files to 1080p H.264 video.
Now, the question is how can you transcode 4K DNxHR codec files to 1080p H.264 video? Well, to accomplish the goal, you need a facilitate and effective DNxHR 4K to H.264 video converter. Here, we recommend you Pavtube Video Converter (ranked as one of the top 5 H.265/HEVC Encoding and Decoding Tools). With this 4K DNxHR to 1080p H.264 converter, you can effortlessly re-encode DNxHR 4K videos to 1080p  H.264 video on Windows XP/2003/Vista/Windows 7/Windows 8/Windows 8.1/Windows 10. It can convert 4K DNxHR codec video to 1080p H.264 MP4, AVI, WMV, MOV, FLV for easily playing. Besides, the built-in video editor allows you to modify your videos by trimming, cropping, adjusting video effects and more.

For Mac users, please use Pavtube Video Converter for Mac.


How to Convert 4K DNxHR Codec Files to 1080p H.264 Videos?

Step 1. Import 4K DNxHR video files.

Run the 4K Video Converter program, go to the menu bar, select File button to select the DNxHR files you want to import. You can also directly drag the video files to the program for conversion. It supports batch conversion so you can import multiple files at a time.


Step 2. Choose output format

Click “Format” bar to open the format profile list, you can choose H.264 video from “Common Video” and “HD Video” categories. Each category contains many format, like MP4, MOV, AVI, etc. You can choose any one you need. Here, we take H.264 MP4 as instance.


Tip: You can click “settings” to adjust the output parameters, like resolution, bitrate, etc. Don't forget the balance between video quality and size. 

Step 3. Start transcoding 4K DNxHR files to 1080p H.264

Now hit on the “Convert” button on software main interface to start the DNxHR to H.264 conversion. When it finished, just open the output folder to find the generated 

After the process, you can play and edit the H.264 1080p video now.

Related program

Pavtube HD Video Converter / Mac Version: It is designed for converting HD videos from HD camcorders or DVs (like JVC, Panasonic, Sony and Cannon), non-protected HD or movies, DVR files (*.tivo) to other file types for playback on popular media devices like Apple TV, PS3, Xobx, Xobx360, WD TV HD Player.

Pavtube Media Magician / Mac Version: A nice camcorder assistant manager, lossless camcorder video joiner, MTS/ M2TS/ MXF/ MOV/ MKV/ TiVo/ WMV/ AVI/ MPG converter and editor. Meamwhile it supported upload edited video to YouTube directly.

Read More: