Thursday, March 17, 2016

How-to: Edit MP4 in Sony Movie Studio

MP4 & Sony Movie Studio issue

I have many mp4 clips, but they won't open in Sony Movie Studio 11. Is there a way to get them in and work with them in a quick and lossless way?

I'm trying to import footage (.MP4 format) that was shot on a Sony EX1 camera into Sony Movie Studio. Unfortunately Movie Studio won't allow me to import it and an error message comes up saying; "Warning: An error occurred while loading the project file. The file is most likely corrupted or of an unknown format."

Movie Studio is consistently showing a black preview screen and black rendering of MP4 clips after I put a certain number of source files in my project media bins or clips on the timeline, and the program even crashes and shuts itself down. Although the video goes black in the preview and also the renders, the audio still plays perfectly fine.


Why, why, why?

Actually, Sony Movie Studio supports MP4, but it only prefers MPEG-4 codec instead of others. However, MP4 as a container format can include various video codecs. So if your MP4 files are not accepted by Sony Movie Studio, it's probably because of the video codec incompatibility. 

What video format can import into Movie Studio? 

Supported format: AAC, AA3, AIFF, AVI, BMP, CDA, FLAC, GIF, JPEG, MP3, MPEG-1, MPEG-2, MPEG-4, MVC, OGG, OMA, PCA, PNG, QuickTime, SND, SFA, W64, WAV, WDP, WMA, WMV, XAVC S. 

Yes, you can convert MXF video to Movie Studio editable format.

As I know, MPEG-2 is a good editing format for Sony Movie Studio. So, you can convert MP4 footage to MPEG-2! This is the easiest and most efficient way to make Sony Movie Studio work with MP4 files without crashes or other glitches.

How to import MP4 files to Sony Movie Studio?

Pavtube Video Converter (Review)is high recommended for you, which can help you change MP4 into a different format like MPEG-2 with least quality loss. You should then be able to import the new file into Sony Movie Studio with smooth editing without any trouble. 

Besides transcoding MP4 to Sony Movie Studio supported videos with optimized settings while keeping the video quality, the all-in-one and easy-to-use toolkit can convert all other popular video formats like AVI, MXF, MOV, WMV, MKV, FLV, MTS, VOB, etc. to Sony Vegas ProAdobe After Effects, Premiere Pro, Avid Media ComposerWindows Movie Maker natively supported video formats on Windows with fast encoding speed.

The trail-before-purchase is supported, just feel free to try it, it is 100% clean and safe:


How to Convert MP4 Files to MPEG-2 for Sony Movie Studio

Download and install Pavtube Video Converter on your PC (compatible with Windows 10, Windows 8, Windows 7, Windows XP, Windows Vista, and Windows 2000). Run this program, you will find the interface is very brief, this program is very easy to use.

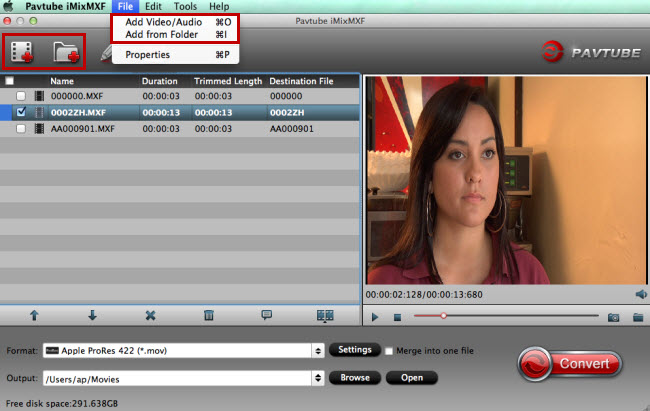
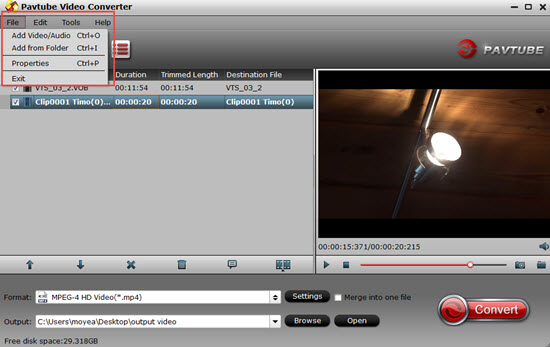
Step 1: Import MP4 clips to the program through “Add Video” button or “Add from folder” button. If you like, check the “Merge into one” box to join MP4 clips together. 


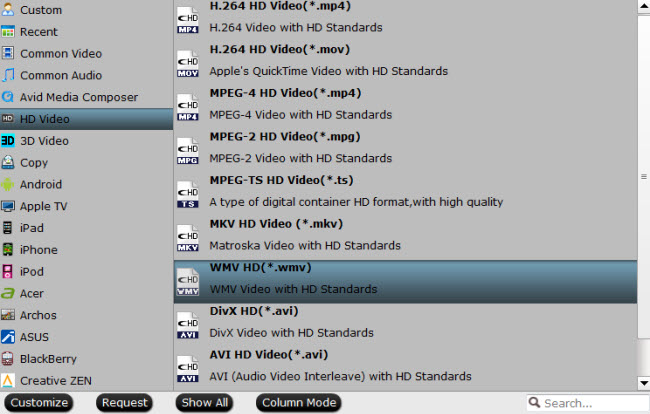
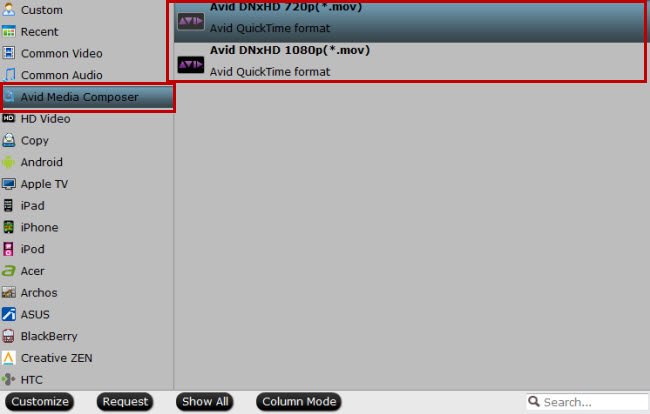
Step 2: Choose output format. This video converter offers optimized format preset for Adobe Premiere. Just click “Format” menu firstly and then follow “Adobe Premiere/Sony Vegas” to set MPEG-2, MOV or WMV format. 


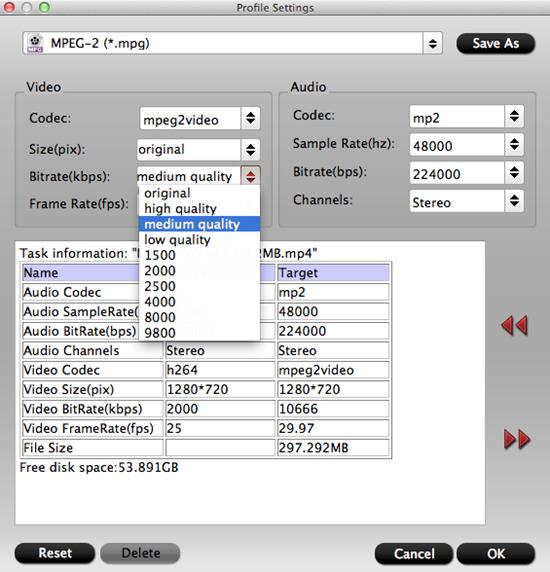
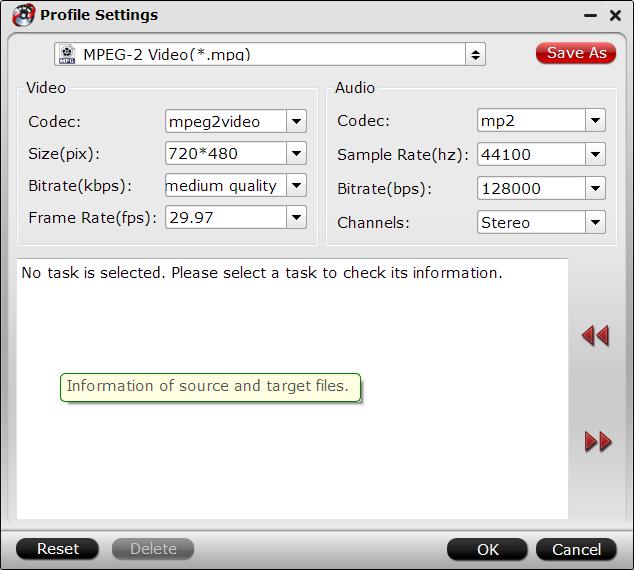
Tip: If the default settings do not fit you requirement, you can click “Settings” icon to and enter “Profile Settings” panel to adjust video size, bit rate, frame rate, sample rate and audio channels. 

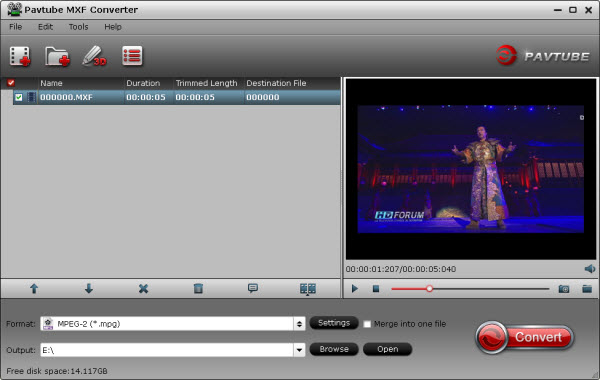
Step 3: Click “Convert” button to start encoding MP4 to MPEG-2(.mpg) for Adobe Premiere Pro. 

When the MP4 to Adobe Premiere Pro conversion task is finished, click “Open” button to get the exported files for transferring to Sony Movie Studio with easy playback or editing. 

Related program:

Pavtube HD Video Converter / Mac Version: It is designed for converting HD videos from HD camcorders or DVs (like JVC, Panasonic, Sony and Cannon), non-protected HD or movies, DVR files (*.tivo) to other file types for playback on popular media devices like Apple TV, PS3, Xobx, Xobx360, WD TV HD Player.

Pavtube Media Magician / Mac Version: A nice camcorder assistant manager, lossless camcorder video joiner, MTS/ M2TS/ MXF/ MOV/ MKV/ TiVo/ WMV/ AVI/ MPG converter and editor. Meamwhile it supported upload edited video to YouTube directly.

Read More:

Tuesday, March 15, 2016

How to Get FCP X/7 Work with All MP4 Video files

According to official spec, we can clearly find that Final Cut Pro X/7 support MP4 files although, sometimes still we encounter various issues when importing MP4 to Final Cut Pro X/7. That's because Final Cut Pro X/7 are only confined to MP4 encoded with H.264 currently, if your MP4 video encoded with other codecs which are unfriendly with Final Cut Pro X/7, you'll fail to edit MP4 files on Final Cut Pro X/7.

When comes to MP4 video, Final Cut Pro X/7 can accept most of them, like Flip MP4, Sony bloggie MP4, YouTube MP4, etc. However, this doesn't always work. There are still dozen of .mp4 files can't be imported into the Final Cut Pro X/7.

In fact, weather you can put MP4 into Final Cut Pro X/7 or not all depends on what codec inside the .MP4 files. MP4 is a video container format which may contain different codecs like MPEG-4, H.264, DivX, H.263, etc. Though Final Cut Pro 7 and Final Cut Pro X update to import MP4 video, it only support MP4 encoded with H.264. 

If the MP4 is encoded with other video codec, Final Cut Pro X/7 will still fail to import MP4. We need to find another way to perform the task. As we all know, the most compatible video codec for Final Cut Pro X/7 is Apple ProRes, then transocoding MP4 files to ProRes with a third party program is an easy way to edit MP4 videos in FCP.

Of course, to do the video conversion, you need a professional app. Here the professional MP4 to FCP Video Converter for Mac is strongly recommended. Named Pavtube Video Converter for Mac (El Capitan included). It is able to transcode XAVC files to FCP compatible ProRes 422, ProRes 422 HQ, ProRes Proxy, ProRes 422 LT, ProRes 4444 video.

Plus, you may also encode MP4 to iMovie, FCE, Avid MC and more NLE programs highly compatible formats for smooth editing. Besides, it might help you change MP4 to other frequent formats like MOV, MKV, AVI, etc for playback on media devices.

The trail-before-purchase is supported, just feel free to try it:


How to Get Convert MP4 to Apple ProRes for Final Cut Pro X/7

Notes: 
1.When converting video to Final Cut Pro oriented format templates(e.g. Apple Prores), please ensure that your computer has Final Cut Pro installed, otherwise the converted files will have audio only without image.

2.If you are using FCP X, please make sure you have installed ProApps QuickTime Codecs, or you may get files with sound only without video.

Step 1. Click the “Add File” button to select the MP4 videos from your hard drive to this program. To save your time, this program supports batch conversion so you can add multiple files at a time. 


Tips: When the MP4 files are loaded to the Pavtube Video Converter, you can view the videos from the Preview window. Simply select an item and click the “Play” button. When the video is playing, you are allowed to take snapshoot.

Step 2. Choose output format, to edit videos on Final Cut Pro X/7 native codec, you are recommended to choose Final Cut Pro -> Apple ProRes 422 (*.mov), it’s best for Final Cut Pro X editing. 


Read the difference of ProRes. 

• Apple ProRes 422 – Higher quality than Apple ProRes 422 (LT); 
• Apple ProRes 422 (HQ) – Keep original video quality for editing in FCP; 
• Apple ProRes 422 (LT) – Get a smaller file sizes than Apple ProRes 422; 
• Apple ProRes 422 (Proxy) – SD levels – 480i/p and 576i/p. Used in offline workflows. 
• Apple ProRes 4444 – Edit and finish 4:4:4 material. 

Actually, different Apple ProRes codec corresponds to different needs. Here you can refer to this article "Differences among Apple ProRes codec". 

Step 3. You can click “settings” to adjust the output parameters, like resolution, bitrate, etc. Don't forget the balance between video quality and size. 


Step 4. Click the “Convert” button to start converting MP4 to Apple ProRes 422. After that, click the “Open” button to locate the output files and transfer the files to FCP X/7 as usual. 

Launch Final Cut Pro X/7, choose File >> Import >> Files..., and browse to where you save the converted MP4 clips to. Choose the videos that you'd like to add.

Related program

Pavtube HD Video Converter / Mac Version: It is designed for converting HD videos from HD camcorders or DVs (like JVC, Panasonic, Sony and Cannon), non-protected HD or movies, DVR files (*.tivo) to other file types for playback on popular media devices like Apple TV, PS3, Xobx, Xobx360, WD TV HD Player.

Pavtube Media Magician / Mac Version: A nice camcorder assistant manager, lossless camcorder video joiner, MTS/ M2TS/ MXF/ MOV/ MKV/ TiVo/ WMV/ AVI/ MPG converter and editor. Meamwhile it supported upload edited video to YouTube directly.

Read More:

Tuesday, March 8, 2016

Why Blackmagic DNxHD MXF & Adobe Premiere Elements 13/12 importing issues exsit?

Premiere Elements is an app that makes your movies look great, it claims that you don’t have to worry about your camera skills or capturing the perfect shot. Make movies your way, and style them with cool effects and motion titles.


However, lots of people annoyed with incompatibility issues when import DNxHD MXF from Blackmagic to Premiere Elements13/12, and it keeps saying that it doesn’t have the right codec. How can it solved?

From the Blackmagic Video Assist we know that the Blackmagic camcorder captures in ProRes 422 HQ and Avid DNxHD MXF files, and it claims that the recordings can be work with popular editing software such as DaVinci Resolve, Final Cut Pro X, Adobe Premiere Pro or Avid Media Composer without having to transcode or convert the files.

Why importing issues still exsit?

After multi-testing we confirm that Adobe Premiere Elements13/12 seems to work fine if you import your DNxHD MXF footages directly from Blackmagic camcorder or SxS card, but if you have already copied DNxHD MXF recordings to your HDD, the importing error may jump out.

How to solve the importing error?

The best solution is to convert DNxHD MXF to MPEG-2, the format which is proved to be the most compatible one with all the Adobe products, including Adobe After Effects CC. 

Here I highly recommend Pavtube iMixMXF (Best Mac (multi-track) MXF Converter Review) which could be the professional DNxHD MXF converting tool that can work theDNxHD MXF well with Adobe Premiere Elements13/12. It can support the multiple audios as output, would you like to have a try? 

Key Features of Pavtube iMixMXF:
  • iMixMXF Supports batch convert MXF, AVCHD, MTS, M2TS, video to MP4, H.264, MPEG-4, M4V, MOV, DV, MPEG-2, FLV, SWF, 3GP, AVI, WMV, ASF, HD Video etc with amazing quality and fast speed.
  • iMixMXF can help you convert then import DNxHD MXF video to FCP X/7, iMovie, FCE, Avid MC, Premiere Pro/CS 4/CS 5/CS 6, Pinnacle Studio, QuickTime, iTunes and other editing applications.
  • iMixMXF supports import MXF, AVCHD, MTS, M2TS, files to all Apple/Android/Windows tablet and smartphone.
  • Batch conversion, concise guidance, friendly interface, three steps, fast speed and best quality.
  • Allows us to edit P2 MXF video files: Clip, Crop, Merge, Apply effect, set output parameter, Snapshot, Rotate etc.
The trail-before-purchase is supported, just feel free to try it, it is 100% clean and safe:


Convert DNxHD MXF Files to MPEG-2 for Adobe Premiere Elements 13/12

Download and install Pavtube iMixMXF Converter on Mac (compatible with Mac OS X 10.11 El Capitan, 10.10 Yosemite, 10.9 Mavericks, 10.8 Mountain Lion, 10.7 Lion, 10.6 Snow Leopard, 10.5 Leopard and lower versions). Run this program, you will find the interface is very brief, this program is very easy to use.

Step 1. Add DNxHD MXF files

Click "Add Video" button to load DNxHD MXF files to the program. You can also directly drag the video files into the program directly.


Step 2. Select output format

As mentioned above, MPEG-2 is the best compatible format for all Adobe products, just from "Format" drop-down lists, you can pick “MPEG-2 (*.mpg)” as Adobe Premiere Elements13/12 preferable editing codec under “Adobe Premiere/Sony Ve…” option as the output format.


Tip: If you like, adjust video and audio parameters, including the Bitrate of Video and Audio, the Codec of Video and Audio, Video Size, Sample Rate, Frame Rate, Audio Channels, etc., by clicking the Settings button on the main interface for getting the best quality.


Step 3. Start the conversion

Finally, simply hig the big Convert button to start converting DNxHD MXF to Adobe Premiere Elements13/12 friendly video formats. 

Within several minutes, you can find the converted file on your computer by clicking the "Open" button. And then you can import the converted files to Adobe Premiere Elements13/12 easily.

Read More:

Thursday, March 3, 2016

How to Import and Edit P2 MXF Files with Sony Movie Studio Platinum/Suite

Panasonic P2 MXF

Panasonic p2 series camcorders are professional camcorders which can help us record vivid HD video footages. Recognized globally as the industry's premier digital camcorder, Panasonic P2 has established itself as an indispensable acquisition tool delivering the distinct, prized look of film. P2 recorded MXF files are extremely excellent among the high-end cameras.

Sony Movie Studio 13 Platinum/Suite & P2 MXF

Sony Movie Studio is one of the most popular editing software, whether you're a beginner, an experienced filmmaker, or a professional broadcast producer, there is a Movie Studio solution to meet your needs. 

In Sony website, it claims it can work with P2 MXF format, some users still have troubles when importing P2 MXF files to Sony Movie Studio 13 Platinum/Suite. 

Indeed, Sony Movie Studio 13 Platinum/Suite work fine if you import your P2 MXF footages directly from cameras, but if you have already copied P2 MXF recordings to your HDD or you download them from somewhere, the importing error may jump out. 

In fact, Panasonic P2 series camcorder’s video clips are all saved in 'VIDEO' folder, while audio files are all stored in 'AUDIO' folder. So, when copy P2 MXF recordings please make sure you have the entire MXF file structure as it saved on your camcorder's P2 card. If you only have some loose .MXF clips, your files will have image only without audio.

Solution from Third-party Software

There is a professional software i would like to recommend to you, Pavtube iMixMXF (Best Mac (multi-track) MXF Converter Review), it can transocode P2 MXF files to MPEG-2 which regards as the most compatible video codec for Sony Movie Studio. Besides, when you importing P2 MXF clips, iMixMXF is able to recognize audio tracks from 'AUDIO' folder automatically. Most importantly, it can support the multiple audios as output, would you like to have a try?

The trail-before-purchase is supported, just feel free to try it, it is 100% clean and safe:


More Features of Pavtube iMixMXF:
  • iMixMXF Supports batch convert Panasonic MXF, AVCHD, MTS, M2TS, video to MP4, H.264, MPEG-4, M4V, MOV, DV, MPEG-2, FLV, SWF, 3GP, AVI, WMV, ASF, HD Video etc with amazing quality and fast speed.
  • iMixMXF can help you convert then import P2 MXF video to FCP X/7, iMovie, FCE, Avid MC, Premiere Pro/CS 4/CS 5/CS 6, Pinnacle Studio, QuickTime, iTunes and other editing applications.
  • iMixMXF supports import MXF, AVCHD, MTS, M2TS, files to all Apple/Android/Windows tablet and smartphone.
  • Batch conversion, concise guidance, friendly interface, three steps, fast speed and best quality.
  • iMixMXF allows us to edit P2 MXF video files: Clip, Crop, Merge, Apply effect, set output parameter, Snapshot, Rotate etc.
If you are a Windows user, and in need of edit the P2 MXF videos in Windows Movie Maker,Sony VegasAdobe After Effects,etc. Please turn to Pavtube MXF MultiMixer Converter.

How to Convert P2 MXF Files to MPEG-2 for Sony Movie Studio 13 Platinum/Suite

Download the Pavtube iMixMXF Converter and install it to your Mac(compatible with Mac OS X 10.11 El Capitan, 10.10 Yosemite, 10.9 Mavericks, 10.8 Mountain Lion, 10.7 Lion, 10.6 Snow Leopard, 10.5 Leopard and lower versions).

Step 1. Add P2 MXF files

Click "Add Video" button to load P2 MXF files to the program. You can also directly drag the video files into the program directly.


Step 2: Select an output format for Sony Movie Studio 13 Platinum/Suite.

From “Format” drop-down list, select to out “Adobe Premiere/Sony… “> “MPEG-2 (*.mpg)” format for editing with Sony Movie Studio 13 Platinum/Suite.


Tip: If you like, adjust video and audio parameters, including the Bitrate of Video and Audio, the Codec of Video and Audio, Video Size, Sample Rate, Frame Rate, Audio Channels, etc., by clicking the Settings button on the main interface for getting the best quality.


Step 3. Start the conversion

Finally, simply hig the big Convert button to start converting P2 MXF to Sony Movie Studio 13 Platinum/Suite friendly video formats. 

Within several minutes, you can find the converted file on your computer by clicking the "Open" button. And then you can import the converted files to Sony Movie Studio 13 Platinum/Suite easily.

Related program:

Pavtube Media Magician / Mac Version: A nice camcorder assistant manager, lossless camcorder video joiner, MTS/ M2TS/ MXF/ P2 MXF/ MOV/ MKV/ TiVo/ WMV/ AVI/ MPG converter and editor. Meanwhile it supported upload edited video to YouTube directly.

Read More:

Monday, February 29, 2016

How to Edit and Convert MXF to WMV for Windows Movie Maker?

“I'm planning to edit MXF videos in Windows Movie Maker, however it seems to be not supported. I got the error message from the windows. Does Windows Movie Maker deal with MXF files ? How should I edit them?”

Windows Movie Maker is the best free video editing software which could help the windows users freely edit and create movies. 


Why Convert MXF to WMV?

As we know: either windows movie maker 2012 or window media player does not support play .mxf directly, both only support few video format for playback, only can play avi, mxf, mp4, and asf. But windows movie maker, as a free windows essential software suite still has many thrilling features to enable create and edit videos as well as to publish them on SkyDrive, Facebook, YouTube, and Flickr. 

In order to make the MXF file work smoothly in Windows Movie Maker, you need to be clear what file formats are supported for importing into the editing tool first.

What kind of files can be used in Movie Maker?


Video file types (format)


File name extensions


Windows Media Video (WMV) files


.wmv


Windows Media files


.asf and .wm


AVCHD files


.m2ts, .mts, and .m2t


Apple QuickTime files


.mov and .qt


DV‑AVI files


.avi


Microsoft Recorded TV Show files


.dvr-ms and .wtv


MPEG‑4 movie files


.mp4, .mov,.m4v, .3gp, .3g2, and .k3g


MPEG‑2 movie files


.mpeg, .mpg, .mpe, .m1v, .mp2, .mpv2, .mod, .vob, and .m2t


MPEG‑1 movie files


.m1v


Motion JPEG files


.avi and .mov


From above video format picture, it is obvious to notice that Windows Movie Maker deals with the MXF files hardly . To make the MXF file compatible with Windows Movie Maker perfectly, the simple workaround is to transcode MXF to WMV, the native video format supported by Windows Movie Maker.

Pavtube MXF Converter is perfect for you to finish the conversion job on any Windows computer. It supports creating high quality WMV video for your Windows Movie Maker on Windows 10/8/7/XP/Vista, no matter what's the format of your source video files. It can convert almost any video to WMV so you can import your MXF video to Windows Movie Maker for editing. What's more, it can generates more optimal editing formats/codecs for you to use in different NLE apps, such as Windows Movie MakerAvid Media ComposerAdobe Premiere Pro CC/CS6/5/4/3,Adobe After Effects CC, etc.

Plus, this program provide simple video editing functions for you -- you can trim or crop your videos. And you are able to add subtitles and watermarks to the videos as well.

Below is a detailed guide on how to convert MXF to Windows Movie Maker more compatible video format like convert MXF to WMV.

The trail-before-purchase is supported, just feel free to try it, it is 100% clean and safe:


Key Feature of Pavtube MXF Converter:

1. Convert MXF to other videos

Powerful video converting software can help you convert MXF to MP4, AVI, MOV, WMV, HD videos, MP3.

2. Support professional video editing software

Transcode MXF files to Sony Vegas, Adobe Premiere, Windows Movie Maker, Avid, etc.

3. Merge source MXF files

Join different source MXF videos together and output a single video. Then you can enjoy a long output movie.

4. Adjust output video effect

To customize the output profile, users can adjust the output Resolution, Bitrate, Frame Rate, Encoder, Channels, and Sample Rate.

If you are a Mac user, and in need of edit the MXF videos in Final Cut Pro 7 / XiMovie,Avid Media Composer, etc. Please turn to Pavtube MXF Converter for Mac

How to Convert MXF Files to WMV for Windows Movie Maker

Download and install Pavtube MXF Converter on your PC (compatible with Windows 10, Windows 8, Windows 7, Windows XP, Windows Vista, and Windows 2000). Run this program, you will find the interface is very brief, this program is very easy to use.

Tips: The conversion speed is very fast because it supports batch conversion and NVIDIA CUDA & ATI Stream (AMD APP) acceleration technologies. It converts multiple video clips at the same time, moreover it can shut down computer after the process is complete, so run the app overnight and you could enjoy the created videos next morning when you are up.

Step 1: Import MXF files.

Click the button “File” to add MXF files (or directly drag and drop your files) to the Converter.


Tip: If you want to merge MXF files before edit in Windows Movie Maker, just need to check the “Merge into one” box.

Step 2: Select an output format for Windows Movie Maker.

Click “Format” bar to select suitable format for Windows Movie Maker. WMV is one of the proper formats for Windows Movie Maker.


Step 3: Tap the“Settings”icon to adjust audio and video parameters for Windows Movie Maker. 

Once you have chosen the output format, then click the "Settings" right beside "Format" to adjust the video and audio parameters.

Step 4: Tap the big Convert button on the main interface to start transcoding MXF to Windows Movie Maker.

The conversion should be quickly finished. Once the process is at 100%, you can have the converted file easily worked with Windows Movie Maker.

Related program:

If you have multiple-track videos requirements,  Pavtube MXF MultiMixer / Pavtube iMixMXF would be your best-choice: It is able to import and export MXF video files with multiple audio tracks/channels as well as mixing the multiple audio tracks/channels into one. Convert MXF video files from popular devices such as Apple, Samsung, Sony, Canon, JVC, Panasonic, etc. to various video format supported by any media player and NLEs.

Read More:

Thursday, February 25, 2016

XAVC and Sony Vegas Platinum 13: Can be XAVC imported into Sony Vegas Platinum 13?

“Anyone know how to get the 4K video file to be accepted into Sony Vegas Platinum 13? The files will open in Adobe Premier, but I am more comfortable with my knowledge in the Vegas editor.”


Sony Vegas Platinum 13 is a professional and popular video editing software for Windows 8, XP, Vista and 7. Many people are using it to make home movies, especially for editing camcorder videos. 

In order to edit XAVC 4K videos into Sony Vegas Platinum 13 smoothly, the easy workaround is to use 3rd-party to rewrap and convert XAVC 4K footage to a more “editable” format in 1080p. 

The recommended tool to convert XAVC 4K video to Sony Vegas Platinum 13 is Pavtube Video Converter, an intuitive conversion program that lets you convert over 70+ video and audio formats in your desired form effortlessly. With it, you can finish converting your XAVC 4K videos to Sony Vegas Platinum 13 supported format at a few mouse clicks in Windows (Windows 10 included). 

As for Mac users, Pavtube Video Converter for Mac will let you convert XAVC 4K video files to iMovie, FCPAdobe Premiere & more on Mac OS X (10.11 El Capitan included) with ease. Download the program and follow the steps below to convert your videos. 

The trail-before-purchase is supported, just feel free to try it:


Key Features:
  • Three simple clicks to convert 4K XAVC videos to Sony Vegas Platinum 13 compatible formats.
  • Aside from Sony Vegas Platinum 13, you can directly convert 4K XAVC to Adobe Premiere, Avid, Sony Vegas and more video editors supported formats without additional settings.
  • Edit your 4K XAVC videos before converting them. With the built-in editor, you can trim or crop your videos. And you are able to add subtitles and watermarks to the videos as well.
  • Perfectly compatible with Windows 10, Windows 8, Windows 7, Windows XP, Windows Vista, and Windows 2000.
Warm tip: The conversion speed is very fast because it supports batch conversion and NVIDIA CUDA & ATI Stream (AMD APP) acceleration technologies. It converts multiple video clips at the same time, moreover it can shut down computer after the process is complete, so run the app overnight and you could enjoy the created videos next morning when you are up.

Install and run it, you will see the interface. The following is a simple instruction of how to use this Pavtube Video Converter: 

How to Convert and Import 4K XAVC Files to Sony Vegas Platinum 13

Step 1. Click the button “File” to add XAVC files (or directly drag and drop your files) to the Converter.


Tips: When the 4K XAVC files are loaded to the Pavtube Video Converter, you can view the videos from the Preview window. Simply select an item and click the “Play” button. When the video is playing, you are allowed to take snapshoot.

Step 2. From "Format" drop-down list, select to out "Adobe Premiere/Sony... "> "MPEG-2 (*.mpg)" format for editing with Sony Vegas Platinum 13.


Step 3. You can click “settings” to adjust the output parameters, like resolution, bitrate, etc. Don't forget the balance between video quality and size. 


Step 4. Last, click the "Convert" button to start 4K XAVC to Sony Vegas Platinum 13 conversion. 

That's all you are required to do. In fact, this video converter can help you do more. 

Once the conversion completes, you can click "Open" button to get the generated MPEG-2 files for Sony Vegas Platinum 13 easily. Then, it would be easy for importing and editing 4K XAVC files with Sony Vegas Platinum 13.

Read More:

Tuesday, February 23, 2016

DaVinci Resolve & MTS Workflow: Importing MTS files into DaVinci Resolve 9/10/11/12

DaVinci Resolve can handle much more native video formats and camera files than any other real time editing system. However, it cannot handle the MTS footage from Sony, Panasonic or Canon cameras. That's why you found it's a painful experience to import MTS files to DaVinci Resolve 9/10/11/12 for editing. 


On many HD video editing forums, there are many users complained about the issue to import MTS to DaVinci Resolve for editing, the DaVinci Resolve video editing software can’t support MTS video files recorded by Sony, Canon, JVC, Panasonic, etc. so users can’t load the MTS footages to DaVinci Resolve for editing smoothly. How to solve this MTS to DaVinci Resolve importing and editing issue easily?

Read through some posts online, I have found some similar (but not identical) problems like no audio, import slowly… After looking into this more, I know that DaVinci Resolve has not offered support for MTS video.

To make MTS files compatible with DaVinci Resolve, the easy and reliable workaround is to transcode MTS to DaVinci Resolve 9/10/11/12 supported video formats such as QuickTime, ProRes, DNxHD first.

To convert MTS to DaVinci Resolve 9/10/11/12 easily and quickly, Pavtube MTS/M2TS Converter for Mac (Best MTS/M2TS Converter for Mac Review) is highly recommended. This program features high efficiency and seamless conversion. With it, you can transcode MTS to DaVinci Resolve 9/10/11/12 compatible video(QuickTime, ProRes, Avid DNxHD is well supported by this powerful editing system) with original quality. Besides, this software can also transcode MTS files for editing in Final Cut Pro 7/XiMovieFinal Cut Express, etc NLEs. 

If you are running on Windows, please get Pavtube MTS/M2TS Converter.

The trail-before-purchase is supported, just feel free to try it:


Key Features:
  • Three simple clicks to convert MTS videos to DaVinci Resolve 9/10/11/12 compatible formats.
  • Aside from DaVinci Resolve, you can directly convert MTS to iMovie, QuickTime, Windows Movie Maker and more video editors supported formats without additional settings.
  • Edit your MTS videos before converting them. With the built-in editor, you can trim or crop your videos. And you are able to add subtitles and watermarks to the videos as well.
  • Perfectly compatible with Mac OS X 10.11 El Capitan, 10.10 Yosemite, 10.9 Mavericks, 10.8 Mountain Lion, 10.7 Lion and 10.6 Snow Leopard.
Install and run it, you will see the interface. The following is a simple instruction of how to use this Pavtube Mac MTS/M2TS Converter:

How to Convert and Import MTS Files to DaVinci Resolve 9/10/11/12

Step 1. Add MTS files

Click "Add Video" button to load .mts files to the program. You can also directly drag the video files into the program directly.


Step 2. Select output format

As is mentioned above, Avid DNxHD is well supported by DaVinci Resolve 9/10/11/12. So just click the format bar to follow “Avid Media Compose” > “Avid DNxHD 720p (*.mov)” or “Avid DNxHD 1080p (*.mov).”


Tip: If you like, adjust video and audio parameters, including the Bitrate of Video and Audio, the Codec of Video and Audio, Video Size, Sample Rate, Frame Rate, Audio Channels, etc., by clicking the Settings button on the main interface for getting the best quality.


Step 3. Start the conversion

Finally, simply hig the big Convert button to start converting MTS to DaVinci Resolve 9/10/11/12 friendly video formats. 

Within several minutes, you can find the converted file on your computer by clicking the "Open" button. And then you can import the converted files to DaVinci Resolve 9/10/11/12 easily.

Read More: