Monday, June 27, 2016

How to edit Sony PXW Z150 AVCHD files in Windows Movie Maker

Ready for any shooting scenario, the newly released Sony PXW-Z150 handy professional camcorder delivers stunning 4K image quality, 120fps HFR Full-HD slow-motion and built-in advanced networking for live streaming and wireless workflow. Stunning 4K picture performance is supported with 4K XAVC Long GOP at 100Mbps, while 4K video shooting will take a large storage of the TF card and have strict requirements for computer configuration, so use AVCHD to further expand workflow flexibility are also offered by Sony PXW Z150.


For those Windows users who already own or plan to buy Sony PXW Z150 and wanna edit its AVCHD 1080P for sharing with friends or uploading to social websites, Windows Movie Maker can be your best choice, however, seen from the below part, we sadlly found that AVCHD is not included in Windows Movie Maker supported video formats, in order to successfully finish the conversion job with Windows Movie Maker, we suggest you to convert the imcompatible AVCHD files to any of the formats below with a powerful third party software.

Supported audio/video/picture formats supported by Windows Movie Maker:


As you may face difficulties in choosing a best suitable third party software from thousands of equal products to help you complete the AVCHD to WMV conversion job, here i recommend you Pavtube Video Converter, which is the easiest to use and offers professionalism. this AVCHD to WMV converter loaded with features to make editing experience enjoyable and memorable, offer you superfast converting speed lostless video quality, all the warm product design make users with or without experience can finish the conversion process with ease.

Hot Search: AVCHD to MP4 | AVCHD to Avid | MP4 to Windows Movie Maker | MOV to Windows Movie Maker | AVCHD to FCP

If you wanna use Pavtube Video Converter(review) to fix the AVCHD and WMV compatible issue, it is pretty important for you to have a good understanding of the conversion process, the below tutorial may of good use to you.


Other Download:
- Pavtube old official address: http://www.pavtube.com/video_converter/
- Amazon Download: http://download.cnet.com/Pavtube-Video-Converter/3000-2194_4-75734821.html
- Cnet Download: http://download.cnet.com/Pavtube-Video-Converter/3000-2194_4-75734821.html


Step tutorial for Converting/Importing AVCHD to WMM Supported Format

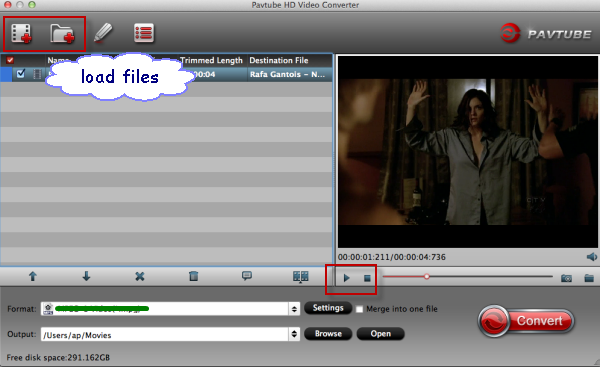
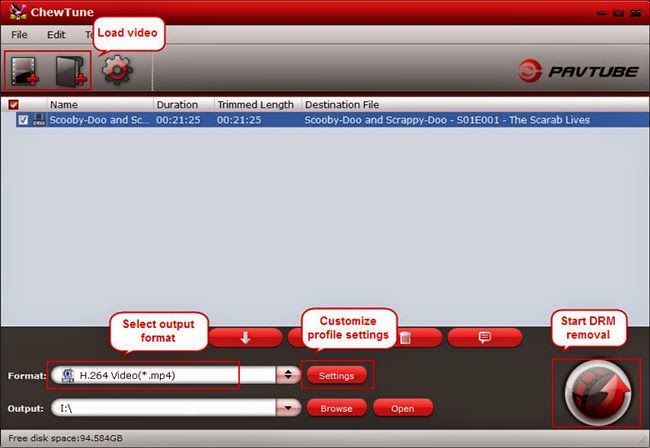
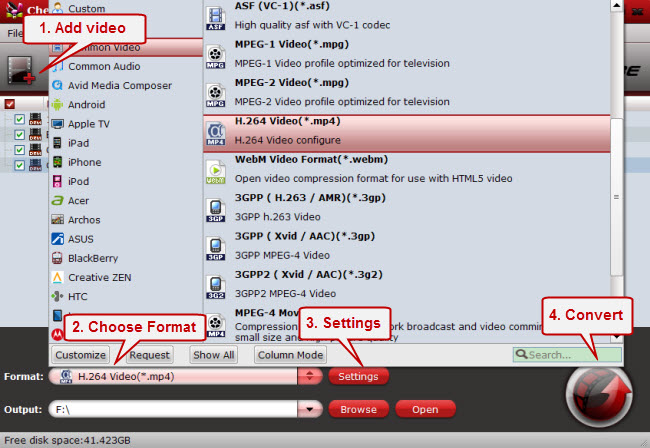
Step 1. Import Files

Launch your program and then click on “Add Files” from the menu bar. You can also browse through to view all the files to import. Alternatively, drag and drop the files directly to the program timeline.


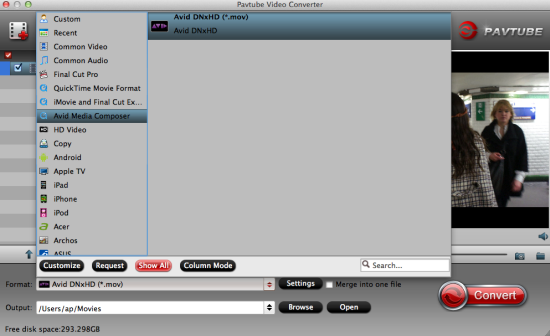
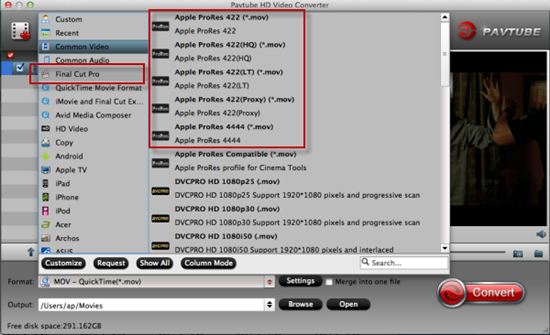
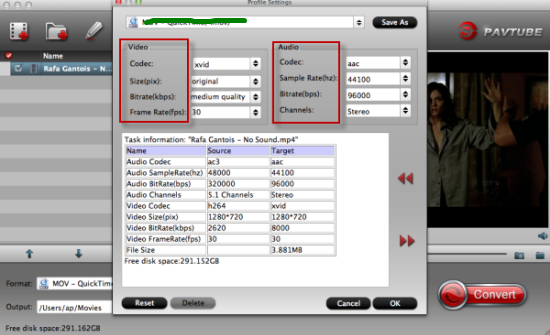
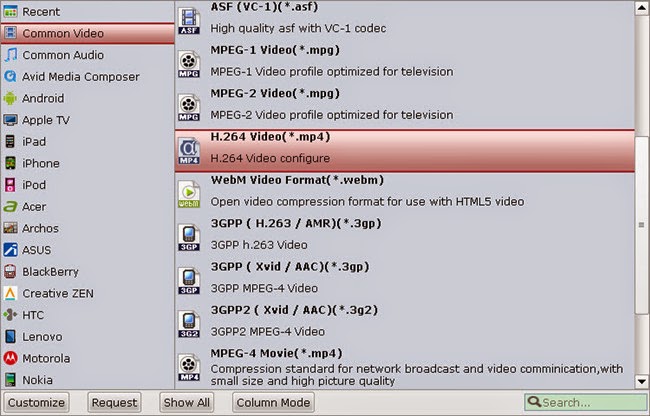
Step 2. Choose Output Format

When making this choice, make sure the format you select is fully compatible with Windows Movie Maker. The program has many of such formats, so you should make your choices wisely.


Step 3. Start Converting

Now that everything else is set, the last step will be actual conversion of your AVCHD files to the chosen format. Click the button named “Convert” and the process will begin. Once that is over, you will be able to enjoy your videos using whatever device you have.

More reading:

Monday, June 20, 2016

How to Import/Edit Sony PXW Z150 4K XAVC-L in Sony Vegas Pro

The Sony PXW Z150 can record 4K in XAVC Long at 4:2:0 8-bit, and HD in XAVC Long at 4:2:2 10-bit, as well as MPEG2HD at 4:2:2 or 4:2:0 in 8-bit only. You can edit the 4K XAVC L video with some popular editing software. But some sony PXW Z150 users have encountered the problem below when try to edit Sony PXW Z150 4K XAVC-L files in Sony Vegas Pro, below is one of the problems we found from website:

Hello: Does anyone have any suggestions on how to ingest Sony XAVC-L into Vegas Pro 13? As of now I have not been able to edit this format. The other 2 formats XAVC-I and Mpeg422 have been perfect. 

Why can’t successfully import Sony PXW Z150 4K XAVC-L files into Sony Vegas Pro?

Reading from Sony Vegas Pro official website, we found that all versions of Sony Vegas Pro even the latest version Sony Vegas Pro 13 won’t allow XAVC-L importing.

How to Solve Sony Vegas Pro won’t edit Sony PXW Z150 4K XAVC-L files issue?

As Sony Vegas Pro cannot work with Sony PXW Z150 4K XAVC-L files due to the codec issue, to get rid of the trouble, we need to convert Sony PXW Z150 4K XAVC-L footage to Sony Vegas Pro preferred codec and then transfer the converted videos to Sony Vegas Pro for editing. Sony Vegas Pro supported file type are as follow:

Sony Vegas Pro 13 Supported open file formats:

MOV, WMV, H.264, AA3, AAF, AIF, ASF, AU, AVC, AVI, BMP, BWF, CDA, DIG, DLX, DPX, DV, EXR, FLAC, GIF, HDP, IVC, JPEG, AVCHD, M2T, M2TS, MVC, Sony MXF (XDCAM and HDCAM SR), MP3, MP4, M4A, MPEG-1 and MPEG-2 video, OGG, MPO, OMA, Panasonic MXF (DVCPRO, AVC-Intra) PCA, PSD, QT, R3D, PNG, SFA, SND, TIFF, TGA, W64, WAV, VOX, WDP, WMA, XAVC Intra MXF, XAVC S

Other version of Sony Vegas Pro Supported open file formats:

AA3, AAF, AIF, ASF, AU, AVI, BMP, BWF, CDA, DIG, DLX, DPX, DV, EXR, FLAC, GIF, HDP, IVC, JPG, M2T, M2TS, MOV, Sony MXF (XDCAM and HDCAM SR), MP3, MP4, M4A, MPEG-1 and MPEG-2 video, OGG, OMA, Panasonic MXF (DVCPRO 25, 50, 100, AVC-Intra 50, 100), PCA, PNG, PSD, QT, R3D, SFA, SND, TIFF, TGA, VOX, W64, WAV, WDP, WMA, WMV

Note: Although so many formats are supported by Sony Vegas Pro, the best choice for you is to convert Sony PXW Z150 4K XAVC-L footage to MPEG-2, which is the most friendly video format to enable you edit smoothly.

Among hundreds of video converter, we here recommend you the top rated Pavtube Video Converter for Mac (best 4K XAVC L converter)) the most powerful and easy-to-use app that can help you convert Sony PXW Z150 4K XAVC-L video to Sony Vegas Pro compatible video format with original quality with superfast speed, I guess there probably no guys willing to spend a whole after to convert a 30-minutes video. So the both time and trouble saving choice is suitable for you. And all you need is to drag the result videos for playing and editing, and the Pavtube video Converter will do the last job for you.

Hot search:

Also, if you are a windows user, turn to Pavtube Video Converter windows version, which has the same function as the Mac version.

Free download or Purchase Mac version:


Other Download:
- Pavtube old official address: http://www.pavtube.com/video-converter-mac/
- Cnet Download: http://download.cnet.com/Pavtube-Video-Converter/3000-2194_4-76179460.html

Free download or Purchase Windows version:


Other Download: 
- Pavtube old official address: http://www.pavtube.com/video_converter/ 
- Cnet Download: http://download.cnet.com/Pavtube-Video-Converter/3000-2194_4-75734821.html


Step tutorial for 4K XAVC-L to MPEG-2 conversion workflow

Step 1.install and run the XAVC-L to MPEG-2 Converter ; click “Add Videos” icon to load your source XAVC videos from Sony PXW Z150.


Step 2. Select the right output one for Premiere Pro 12. Click “Format” pull down list to select Adobe Premiere/Sony Vegas> MPEG-2(*.mpg) as the best video format for Sony Vegas Pro. WMV, MOV formats are the good choice as well. You can click Settings to adjust video and audio parameters to get the best quality video.


Step 3. Here are some additional functions which are deserved for us to have a try. Or on the main interface, we can finally tap the ‘Convert’ button to end the conversion work. When the conversion is finished, you can click “Open” button to get the generated MPEG-2 files effortlessly. Afterwards, you can launch your editing program to import converted XAVC-L clips into Sony Vegas Pro for further editing.

More reading:


Friday, June 17, 2016

iMedia Converter for Mac 4.8.6.6 Retail + Crack

Pavtube iMedia Converter for Mac 4.8.6.6 2016 Crack Full Version Download


Pavtube iMedia Converter for Mac is more than just a converter. It comprises a Video Converter + Blu-ray Ripper + DVD Ripper + Audio Converter + Subtitle Editor + Video Editor to rip Blu-ray, backup DVD and transcode videos. This feature-rick Mac video converter toolbox can not only copy 2D BD, 3D BD and standard DVD with original structure but also convert all BD/DVD collection to virtually any video and audio format for iPhone, iPad, Android phones/tablet, PS4, Xbox One, etc. It also can create 3D SBS MP4/MKV for Gear VR, Oculus Rift DK 2, Oculus Rift CV1, Zeiss VR One and other VR Headsets.

Website: http://www.multipelife.com/


What's new in this 4.8.6.6 version:

1. Support MXF in XAVC video codec.
2. Support H.265/HEVC decode&encode.
3. Add Samsung/LG/Panasonic/Sony TV profile
4. Be compatible with latest Blu-ray&DVD movies.
5. Support TrueHD audio.

System Requirements:

  • Operating System: Mac OS X 10.5 above (including Mac OS X 10.5 Leopard,Mac OS X 10.6 Snow Leopard,Mac OS X 10.7 Lion, OS X 10.8 Mountain Lion, OS X 10.9 Mavericks, OS X Yosemite 10.10) on iMac, MacBook, Mac Pro, MacBook Air, MacBook Pro, etc. 
  • Memory: 512 MB physical RAM or above. 
  • Processor: Intel processor. 
  • Monitor: 1024*768 or higher resolution display. 
  • Optical drive: DVD Drive/Blu-ray Drive.

iMedia Converter for Mac 4.8.6.6 Download Link:

- Pavtube new official address:http://www.multipelife.com/download/imedia-converter-mac/imedia_converter_setup.dmg
- Pavtube old official address: http://www.pavtube.cn/imedia-converter-mac/
- Cnet Download: http://download.cnet.com/Pavtube-iMedia-Converter/3000-2194_4-76177788.html
- Freedownloadmanager Download: http://en.freedownloadmanager.org/Mac-OS/Pavtube-iMedia-Converter-for-Mac.html
- Softonic Download: http://pavtube-imedia-converter-for-mac.en.softonic.com/mac

You may want to check out more applications cracks
Video Converter Ultimate 4.8.6.6 Retail + Crack
ByteCopy for Mac 4.8.6.6 Retail + Crack
ByteCopy for Windows 4.8.6.6 Retail + Crack

SRC: http://best-tablet-converter.com ... 4-8-6-6-full-crack/

Wednesday, June 15, 2016

Get Canon PowerShot SX620 HS MP4 projects into Premiere Pro CC


Back at the start of 2015, Canon replaced its affordable, no-frills pocket zoom camera with a newer model, the PowerShot SX610 HS. The Canon SX620 HS can capture Full HD video clips suitable for viewing on your high-definition TV or editing with popular editing software like Premiere Pro CC.

Canon PowerShot SX620 HS shooting secifications

You can shot 1080p, or 1,920 x 1,080 pixels with Canon PowerShot SX620 HS, if you want exact dimensions. You can also shoot 720p (1,280 x 720) and VGA (640 x 480) resolutions, all at 30 (29.97) frames per second as with the preceding model. Video format is MP4 using MPEG-4 AVC/H.264 encoding with MPEG-4 AAC-LC monaural audio.

Canon PowerShot SX620 HS MP4 with Premiere Pro CC issue

Adobe Premiere did announce to import MP4, while it only imports two kinds of MP4: the one is Sony and JVC introduced XDCam-EX movie (.mp4), the other one is Apple created MPEG-4 (.m4v). That is to say, Premiere only import MP4 recorded from Sony camcorder, JVC camcorder or Apple's iPhone, iPad, that is to say, if you want to edit some MP4 videos shot by Canon PowerShot SX620 HS with Adobe Premiere Pro for uploading to web or sharing with your friends, you will be possiblly failed to directly to do so, you may also encounter the annoying problems like loading the video with no audio and the audio and the video are not synchronized.

Method to deal with Canon PowerShot SX620 HS MP4 with Premiere Pro CC issue

Luckily, there is still have easy ways to fix the Canon PowerShot SX620 HS MP4 won’t be edit in Adobe Premiere issue. You can either convert Canon PowerShot SX620 HS MP4 video to Adobe Premiere supported MP4 format or convert this MP4 video to otherPremiere friendly movie format like DV, MPEG-2, FLV and more.

Hot Search: MP4 to Youtube | MP4 to After Effects CC | MP4 to FCP | MP4 toAvid 

Here the best third party software to help you is Pavtube HD Video Converter for Mac. This powerful but easy to use Canon PowerShot SX620 HS MP4 projects to Premiere Pro CC converter is able to do both of the above conversion: Convert Premiere CC unsupported MP4 to Premiere supported MP4; Convert Premiere unsupported MP4 to Premiere compatible other video formats like MPEG-2, FLV, DV and more. And it applies to all kinds of Adobe Premiere including Adobe Premiere Pro, Adobe Premiere Pro CS3/ CS4/ CS5.(Read review)


Other Download:

Tutorial: How to convert Canon PowerShot SX620 HS MP4 projects to Premiere Pro CC compatible formats

Step 1 Import Canon PowerShot SX620 HS MP4 video file

Click "Add File" button to to import the unsupported MP4 video file. Or you can also drag your MP4 video directly to the main interface of Bigasoft Total Video Converter.


Step 2. Set MPEG-4 Video
Click the drop-down button on the right side of the "Profile" button to select Adobe Premiere Pro CC compatible MPEG-4 Video(*.mp4) as output video format from "General Video" category


Step 3. Convert MP4 to Premiere supported MPEG-4 format
Click "Convert" button to finish converting MP4 video file.

Step 4 Import MP4 into Premiere
First start Adobe Premiere, then select File > Import from the main menu to import the converted MP4 to Premiere.

Conclusion
It is dead easy to import converted Canon PowerShot SX620 HS MP4 files to Adobe Premiere, just follow this guide. Wait no more, just free download it and have a try!

More reading:

Monday, June 13, 2016

Edit Canon PowerShot SX620 HS H.264 video files in Avid Media Composer

Top quality optics, dependability, and convenience of use are just some of the reasons that customers choose Canon digital cameras. Canon cameras are inevitably on the camera wish list of any consumer that desires a high quality camera. The recently released Canon PowerShot SX620 HS has dded more optical zoom, going from the 18x zoom lens on the SX610 to a nice 25x optical zoom which can help you record full HD 1080p videos in H.264 format.

However, things may sometimes go wrong when working with H.264 codec in Avid MC. In fact, H.264 is the ubiquitous codec, and it looks like it will stay for quite some time. Avid Media Composer supports H.264 via AMA Link. Well, if you failed on this try, another solution is introduced. From Avid Media Composer official website you will learn that DNxHD codec was developed by Avid technology, and it is natively supported by Avid Media Composer. So the second method is to convert H.264 MP4 to DNxHD for Avid editing. Then you can edit them in Avid Media Composer natively without codec issue anymore.

The most powerful but easy to use third party software Pavtube HD Video Converter for Mac, with it’s help, you can perfectly transcode H.264 to DNxHD codec for your Avid Media Composer on Mac. besides prores codec, you don’t need to worry about the quality, video and audio synchronization is perfectly guaranteed, you will get top quality videos for editing with Avid Media Composer. Besides, it has many native formats or codecs supported, such as Prores for FCP, AIC for iMovie/FCE, etc. you can use it to convert HD formats to any formats you need.(Read review)


Other Download:


How to convert Canon PowerShot SX620 HS H.264 video files to DNxHD MOV on Mac?

Step 1. Run this Canon H.264 to Avid Converter, and then click “Add File” button on the top left corner to load the Canon PowerShot SX620 HS H.264 video files that you want to convert.


Step 2. Click the “Profile” bar, and move mouse cursor to “Avid Media Composer” category, then select “Avid DNxHD 1080p(*.mov)” as output format.


Step 3. (Optional) Beside the ‘Settings’ and ‘Edit’ on the main interface, here we would like to introduce you the button ‘Merge into one file’ on the left of the preview window. If you are confused of the batched video clips, it can help you join all the clips into one complete folder.


Step 4. Click “Convert” button to convert canon H.264 to DNxHD MOV for Avid on Mac. Pavtube HD Video Converter for Mac will start the Canon PowerShot SX620 HS H.264 video files to DNxHD conversion immediately.

Step 5. When the canon H.264 to DNxHD conversion process is done, you can click ”Open Folder” button and get the generated DNxHD .mov videos, and then you can import converted Canon H.264 files into Avid Media Composer for editing with native DNxHD codec.

More reading:

Sunday, June 12, 2016

Father’s Day Biggest Discount: 50% OFF on Pavtube HD Video Converter

Started with a memorial story which happened in 1909: a young lady called Sonora Dodd thinking of the love and nurturing she and her siblings received from their father while growing up on a farm during there youth time on mother’s day, so they celebrated the first Father's Day on their father's Birthday in the next year. Later in 1966 the President Lyndon Johnson declared that the third Sunday in June would officially be Father's Day.


So Have you already prepared the Father’s day gift for your dear Dad? If not, Pavtube gives you the best idea. You can record the happy time with your father, help your father deal with the videos which captured during his traveling, you can also add your thanks in the video using a video editing program. Pavtube Studio prepares Father’s Day Special Offer where you can get the best HD Video Converter for Mac tool with 50% off to help you achieve the video produce.

Pavtube HD Video Converter(Win/Mac) , a powerful video/audio converting software developed by Pavtube Studio, is now on sale at a special discount price for all windows and Mac users from now on to June 19, 2016 as an unlimited giveaway. (Read review)

This Father’s Day present HD Video Converter for Mac can help your father converts up to 200+ video formats including SD/HD/4K TS, MTS, M2TS, MKV, MOV, MOD, MPEG, AVI, WMV, XAVC and more to portable devices like iPhone SE/6S Plus/6S/6 Plus/6 , iPad Air/Pro/mini, Android HTC One, Samsung Galaxy S7/ S7 Edge/S6/S6 Edge, Apple TV 4/3/2, PS4/3 etc. And editing software FCP, FCE, Sony Vegas Pro, Adobe Promiere and etc.

Get the Pavtube HD video converter/Pavtube HD video converter for Mac below:


Note: Bear in mind that all software programs will go back to original prices once the Father's Day special offer 2016 ends, catch this promotion and show your great love to your dear father! Time limited, don’t miss it!

Related Articles:


Import Canon PowerShot SX620 HS MPEG-4/H.264 videos to FCP

Canon introduced the new Canon PowerShot SX620 HS digital camera - ideal for individuals looking for a convenient, easy-to-carry compact digital camera capable of producing high-quality photos and videos in May 11, 2016. While, Have you ever met some troubles for editing the PowerShot SX620 HS footage with Final Cut Pro? If so, keep reading this tutorial and get the best Canon PowerShot SX620 HS MPEG-4 videos with FCP solution.


The Canon PowerShot SX620 HS features with a 20.2MP BSI CMOS sensor and 25X, 25-625mm equivalent lens which allows you to record Full HD video in MPEG-4/H.264 format. While for FCP, we all know that the Appple ProRes could be the best compatible editing formats. So the issue just be easy: For smoothly editing Canon PowerShot SX620 HS MPEG-4/H.264 videos in FCP , transcode our MPEG-4 or H.264 to Final Cut Pro's ProRes.

Pavtube HD Video Converter for Mac offers an efficient way to convert Canon PowerShot SX620 HS MPEG-4 video files to Apple ProRes video format, which would be easily imported into Final Cut Pro to make amazing movie editing effect. As there are different types of Apple ProRes types, you are allowed to convert Canon PowerShot SX620 HS MPEG-4 footages to Apple ProRes 422, Apple ProRes 422 HQ, Apple ProRes 422 Proxy, Apple ProRes LT, or Apple ProRes 4444 depending on your resolution requirements.

Besides, this software runs fast, so you can convert your Canon PowerShot SX620 HS MPEG-4 video footages to FCP in less time, video and audio synchronization are perfectly guaranteed. What’s more, it can transcode MP4/H.264 as well as MKV, DivX, MTS, MXF, VOB, AVI, etc to Final Cut Pro favorable ProRes videos with high output quality. Meanwhile, this Mac Video Conversion tool can create files compatible with various non-linear editing systems like Avid, FCE, iMovie and Adobe Premiere Pro, etc.

Equipped with Pavtube HD Video Converter for Mac, your life will be more beautiful and easily shared with friends, family members, etc. Following the step-by-step guidance below, you can easily fix the Canon PowerShot SX620 HS MPEG-4/H.264 videos won’t be smoothly edit with FCP issues.


Other Download:

Step-by-step guide on converting and importing Canon PowerShot SX620 HS video clips for smoothly editing in Final Cut Pro

Step 1: Launch the HD Video Converter on your Mac, and then click the “Add video” button to import your MPEG-4/H.264 files from Canon PowerShot SX620 HS directly. You can also use the drag-and-drop method to load the media files to the application UI. In order to import several files at one time, you can click “Add from folder” button.


Step 2.:Click the “Format” bar to get the drop-down menu, then turn to “Final Cut Pro>>Apple ProRes codec”, there are ProRes 422, ProRes 422 (HQ), ProRes 422 (LT), ProRes 422 (Proxy) and ProRes 4444 for your choice. Choose the proper one you want. Here, we suggest you to choose Apple ProRes 422 .mov as the best output format.


Step 3. Click "Settings" button if you'd like to customize advanced audio and video parameters like Video Codec, aspect ratio, bit rate, frame rate, Audio codec, sample rate, audio channels.


Step 4: Now, click "Convert" and let it go. The HD Video Converter for Mac supports batch conversion. So if you have lots of MPEG-4/H.264 videos to convert, check “Shut down computer after conversion”and you can go away without keeping an eye on it.

After the cpnversion job done, get the converted t Canon PowerShot SX620 HS MPEG-4/H.264 footages by clicking “Open” button and learn how to import the files to fcp in this article.

More reading:

Tuesday, June 7, 2016

Watch and play iTunes m4v movies on Surface

Plex Media Server can not play iTunes contents. This article will guide you how to work around to get Plex playing purchased and rented iTunes movies TV shows. 

To have all these movies backed up and saved to watch anytime you want without having to pull out the disc? Plex Media Server is the solution. It allows you to store all your movies on a central server and watch them on your TV, iPad, computer or phones both home and away. 

However, there are people who have Plex Media Server and iTunes Movies and TV Shows. Is there any method to play iTunes movies and TV shows on Plex? The following tutorial will give you answer! 
Because of DRM protection, movies and TV shows that you purchased and rented from iTunes Store are limited to play in Appple ecosystem. This kind of videos have DRM protections that prevents you from copying and transferring to other devices or programs for playing. Besides, Plex Media Server allows to stream and play nearly all kinds of local media files including MP4, MOV, AVI, MPEG video files, MP3, WMA audio files, and etc, but M4V files is not supported. 

The best way to successfully import iTunes DRM videos to Plex Media Server for streaming and playing is to remove DRM from iTunes videos and convert iTunes DRM M4V to common videos like MP4, MOV, AVI, and etc. What you need is a powerful DRM removing tool and iTunes M4V Video Converter- like Pavtube ChewTune. (Read Top 10 Best DRM Removal Review

Money-saving Tips: 
If you are a Mac user, please turn to ChewTune for Mac. Free download the right version and enjoy your iTunes M4V movies on Plex Media Server without any hassle! 

Tips and preparations: 

1. Make sure that your computer is authorized by source iTunes videos, that is to say you can play the source iTunes movies in iTunes without trouble. 

2. Allow the audio driver installed during the Pavtube ChewTune installation. 


3. Close iTunes before running the Pavtube DRM Removal Converter when converting iTunes M4V movies. 

How to Convert iTunes movies to Plex Media Server 

Step 1: Download a trial version of Pavtube DRM Removal Tool, and install it. 

Step 2: Start the iTunes to Plex Converter, hit the "Add video" or "Add from folder" button and browser the source iTunes videos location for loading. 


Step 3. From the "Format" drop-down list, choose suitable profile for Plex Media Server. Here I suggest you choose "Common Video > H.264 Video(*.mp4)" as output format. 


Optional – If you like, you could adjust profile settings including video codec, bitrate, frame rate, etc to get better video and audio quality for watching iTunes movies on Plex Media Server. 

Step 4. Hit the "Convert" button to start recording iTunes movies. After it finishes, click the "Open" icon to locate the recorded iTunes movie, and you are ready to transfer and stream these MP4 videos to Plex Media Server, it's very easy. 

Pavtube ChewTune is developed as the top DRM Removal tool and Recorder to help users legally strip off DRM protection from iTunes M4V movies, Amazon Instant Videos and Digital Copy so that you are able to watch almost all DRM movies on multiple smartphones and tablets anywhere you like. Have a try! 
Hot Topics: 


How to play iTunes movies on Surface 2? Can I istall iTunes on Surface 2? Here you will find an easy way to sync and play iTunes M4V movies on Surface 2 tablet. 

Did you get a Microsoft Surface 2 as your Thanksgiving gift? Microsoft Surface 2 is one of the most popular Windows tablets which help you surf online checking mails and browsing websites, read book play games and also watch movies and HD videos. It makes your spare time interesting. Now if you have some movies in your iTunes library and now you want to transfer them to Surface 2 for playback, then you are right here! 


You may find most iTunes videos can be easily imported to Surface 2 but cannot play. What's the matter? Is there anything wrong with your videos? Well, that's because your iTunes movies are purchased from iTunes store and are copyright-protected by Apple's DRM mechanism which prevents from your playing the media on non-Apple products. To play iTunes DRM-protected movies and TV shows on Surface 2, you need to take DRM off iTunes movies and TV shows first. 

Here, iTunes movie DRM decoder entitled ChewTune is such a tool to help you out while you are having a headache not being able to play iTunes m4v movies on Surface 2. This application features DRM Removal and Media File Conversion. With it, you can easily convert the DRM protected iTunes video and audio files to the plain, Surface 2 playable file formats such as mp4 format. 

Firs Instructions: 

Here are few tips before starting the iTunes m4v movies to Surface 2 Conversion: 

1. Make sure that your computer is authorized for source videos, that is to say you can play the source iTunes M4V movies in iTunes. 

2. Allow the audio driver installed during the Pavtube ChewTune installation. 


3. Close iTunes before running the Pavtube DRM Removal Converter when converting iTunes M4V movies. 

4. It would take as long as the source movie length for the whole DRM video to Surface 2 conversion process since Pavtube ChewTune records source DRM videos in 1:1 video and audio quality. 

The Steps (based on Windows Screenshots): 

Step 1: Add iTunes M4V movies to the software. After installing, Launch ChewTune and import your iTunes files (including the copy-protected music, movies, TV shows) to the program. Batch conversion is supported so that you can add multiple files to convert at a time. 


Step 2: Select output format. Click "Format" bar and move mouse to "Windows" column, you can easily find the profile of "Microsoft Surface Windows RT H.264 Video (*.mp4)". The output videos could also fit on Surface 2 tablet perfectly. If you like, you can click "Settings" to change the video encoder, resolution, frame rate, etc. as you wish. 


Step 3: Start the conversion. After above steps, just hit the "Convert" icon to start converting iTunes M4V videos to MP4 videos for Surface 2. Once the process completes, just copy and transfer the DRM-free MP4 videos to your Surface 2 and enjoy the m4v movies with ease. 

Check out 'The Ways Transferring Files to Your Surface' if you have no idea about Surface 2 file transfer. 

Related articles 

Monday, June 6, 2016

Load Sony Cyber-shot DSC-WX80 AVCHD files to FCP

Combining a powerful Optical Zoom and innovative image sensors, Sony Cyber-shot DSC-WX80 digital cameras can help you capture detailed photos and shoot beautiful Full HD/4K videos in AVCHD format.


Right click the AVCHD file, you can find footages are divided into several .mts or .m2ts clips for preserving. AVCHD MTS/M2TS is a file-based format for the digital recording and playback of high-definition video, which uses the MPEG-4 AVC/H.264 standard, supporting a variety of standard, high definition, and stereoscopic (3D) video resolutions.

However, AVCHD MTS/M2TS files are not the preferred formats by Final Cut Pro 6/7 and Final Cut Pro X. Even you will have problem for transferring and logging these MTS, M2TS videos. So when you are experiencing difficulties with AVCHD files on FCP, you may obtain an unlisted cam.

To make it easier for editing Sony AVCHD MTS/M2TS videos on FCP, you’d better to transcode Sony AVCHD to FCP supported formats - Apple ProRes first, as it is the best codec for Final Cut Pro editing. Using Pavtube Video Converter for Mac to convert Sony AVCHD videos to ProRes 422 for Final Cut Pro on iMac/MacBook Pro/Mac Mini with Mac OS X, Leopard, Snow Leopard, Lion, Mountain Lion, Mavericks. (read review)

Hot search: MKV to FCPSony Cyber-shot DSC-RX10 III 4K videos to Avid Media Composer
Download it and get the full guide below to have a smooth editing with the Sony AVCHD  footages in FCP.


Other Download:
- Pavtube old official address: http://www.pavtube.com/video-converter-mac/
- Amazon Store Download: http://www.amazon.com/Pavtube-Video-Converter-Mac-Download/dp/B00QIBK0TQ
- Cnet Download: http://download.cnet.com/Pavtube-Video-Converter/3000-2194_4-76179460.html

Full Guide: Encode Sony (4K) AVCHD footage to ProRes 422 for Final Cut Pro

Step 1. Import the AVCHD files from camcorder to Mac.

Here are two ways to import your AVCHD footage:

Plan A.) Find a USB cable and connect your camcorder to Mac until it’s recognized by Mac; your device will be showed as a hard disc icon on desktop. This method has no limitation of video preserving path, but you need to keep the camcorder on all long the connection; otherwise it will not be recognized by Mac.

Plan B.) Take out the memory card from camcorder; use a card reader to upload it to Mac. But you should be clear that whether the videos are saved on internal memory or the pluggable card.


Step 2: Add Sony AVCHD files into Sony AVCHD MTS/M2TS Converter

Install and run Pavtube Video Converter for Mac. You can import Sony AVCHD footage from your camcorder or your computer.


Tips: This best Sony AVCHD MTS/M2TS converter support batch conversion, you can load more Sony AVCHD MTS/M2TS video files at once.

Step 3: Choose ProRes codec video as output format

Click “Format” icon and select “Apple ProRes 422 (*.mov)” or “Apple ProRes 4444 (*.mov)” for “Final Cut Pro” section as the exported video format. What’s more, you are free to choose the folder where you want to put converted MOV file by clicking the “Output” icon.

Tip: Before Sony AVCHD to Apple ProRes conversion, you can click settings button to customize the resolution, bitrate and other parameters as you want.


Step 4:
 Start Sony AVCHD MTS/M2TS to FCP ProRes conversion

Click the “Convert” button and the Mac Sony AVCHD Video converter would start transcoding Sony AVCHD MTS/M2TS videos to Apple ProRes 422 MOV for FCP on Mac OS X immediately.

After conversion, tap “Open” icon in the main interface to locate result video. Launch FCP 6/7 or FCP X, and go to “File > Import > Files…” to import converted Sony AVCHD to FCP project with easy editing.


More reading: