The latest high definition 4K XAVC S video format from Sony FDR-X1000V is still not supported well by FCP X so far. If you want to edit Sony X1000V 4K XAVC S files in FCP X, a wise solution is to convert X1000V 4K XAVC S files to FCP X best accepted ProRes for editing and using flawlessly.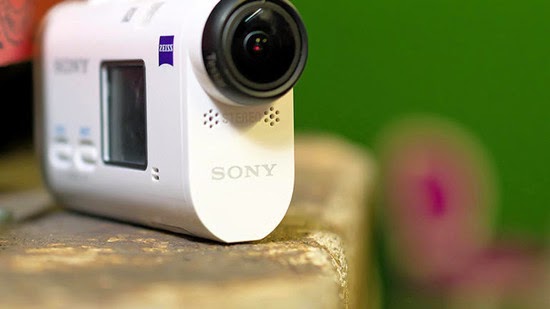 The Sony FDR-X1000V is a true 4K Action Camcorder that is ideal for capturing fast moving action at close quarters. It is also splashproof and shockproof, with a supplied 10m underwater housing. With its Wi-Fi and GPS connectivity, you can go just about anywhere, prove you are there in glorious 4K quality and share your experiences with your online friends wherever they are in the world.Maybe you have recorded some footages by Sony FDR-X1000V and you are wondering how to import it recorded XAVC S files to FCP X for editing natively on Mac. As we know, Sony FDR-X1000V recordings are in XAVC S or MP4 format and XAVC S codec is not well supported by Final Cut Pro X/7/6 on Mac. You may encounter importing problems, or can’t edit Sony FDR-X1000V in FCP X/7/6 smoothly, besides, it will take a long time to render.At present XAVC S, a long GOP inter-frame codec, does not appear to be supported by Final Cut Pro. Apple does not respond on the issues and no one here knows or can say when, if ever, XAVC S will be natively supported by FCP (X). In this case, to smoothly edit FDR-X1000V 4K XAVC S files in FCP X, the easy workaround is to convert Sony X1000V XAVC S to ProRes MOV which is the best codec with best results when working with Final Cut Pro. For this purpose, considering the easy of use and lossless quality, Pavtube Video Converter for Mac is highly recommended. With it, you don’t need to render again and it saves your time.
 How to edit FDR-X1000V 4K XAVC S files in FCP X?Step 1: Download and have a quick installation. The trial version will have a watermark on your converted files. Except for that, there are no time limitation, no virus, and no unnecessary bundle apps while downloading. After that, click “Add Video” button to load your 4K XAVC S files. You can load several files at once thanks to “Add from folder” button.
 Step 2: Click the “Format” bar to get the drop-down menu and you can get “Final Cut Pro>>Apple ProRes codec”, including ProRes 422, ProRes 422 (HQ), ProRes 422 (LT), ProRes 422 (Proxy) and ProRes 4444. Choose the proper one you want. Here, we suggest you to choose “Apple ProRes 422 (*.mov)” as the best output format.
 Tips: Apple ProRes 422 and Apple ProRes 422 (HQ) have higher qualities. Apple ProRes 422 (LT) and Apple ProRes 422 (Proxy) have smaller sizes. You can choose according to your requirement.Step 3: Click “Settings” button to customize the output video and audio settings by yourself. But if you are not good at it, you’d better use the default parameters, they will ensure you a good balance between file size and image quality basically. You can change the resolution, bit rate, frame rate as you need.Step 4: When everything is done, you can take a preview by hitting “Play” button. If you are satisfied with the final result, you can click “Convert” button to finish the conversion work.Conclusion: When the conversion is done, you can click “Open” to get your generated files. Now, you can edit Sony FDR-X1000V 4K XAVC S files in FCP X without any hassles. Good news for everyone! All of us can get 40% discount off before May, 1st, 2015. Come on! Why not seize the chance and take a close look at the event?Further Reading:
As the newest codec and with features of smaller size and higher quality, H.265/HEVC has become more and more popular in our video codec area. What brought to us was the related questions. What's the true meaning of H.265/HEVC? How could we convert, edit or play H.265/HEVC videos? Is there any best methods provided for us to handle the H.265 encode and decode workflow well?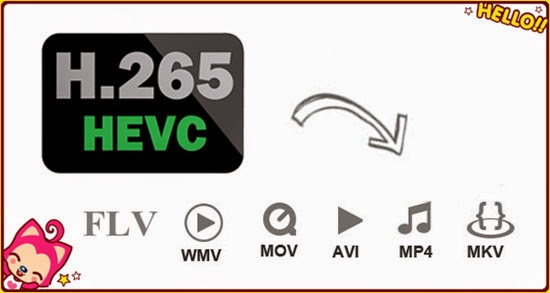 Q1: What is H.265/HEVC?High Efficiency Video Coding (HEVC) is the latest generation video compression standard developed by the ISO/IEC Moving Picture Experts Group and ITU-T Video Coding Experts Group, through their Joint Collaborative Team on Video Coding. HEVC is also known as ISO/IEC 23008-2 MPEG-H Part 2 and ITU-T H.265. HEVC provides superior video quality and up to twice the data compression as the previous standard (H.264/MPEG-4 AVC). HEVC can support 8K Ultra High Definition video, with a picture size up to 8192×4320 pixels.Q2: What’s the difference between H.265 and the previous standard H.264?H.264 has been a huge success. It’s a flexible codec standard that’s used by streaming services, satellite providers, and for Blu-ray discs. It’s scaled remarkably well since it was first proposed and is capable of handling 3D, 48-60 fps encodes, and even 4K. The Blu-ray disc standard doesn’t currently include provisions for some of these technologies, but the H.264 codec itself is capable of handling them.However, while it can handle these types of encodes, it can’t do so while simultaneously keeping file sizes low. A new standard is necessary to push file/stream sizes back down while driving next-generation adoption, and that’s where H.265 comes in. It’s designed to utilize substantially less bandwidth thanks to advanced encoding techniques and a more sophisticated encode/decode model.Q3: How to encode/decode H.265/HEVC to MKV, MP4, AVI, MOV, WMV, FLV on Mac Yosemite?After testing countless freeware and commercial software, considering the ease of use and lossless quality, we would recommend Pavtube Video Converter for Mac to you which is an all-in-one H.265 Converter. As upgraded to the latest version 4.8.5.0, this Mac Video Converter can definitely support H.265 encoder/decoder very well. Moreover, it can encode/decode H.265 to MKV, MP4, AVI, MOV, WMV, FLV on Mac Yosemite with fast speed, easy operation and quality maintained. Specific guide on how to encode/decode H.265 to MKV, MP4, AVI, MOV, WMV, FLV on Mac Yosemite:Step 1: Run the upgraded Mac Video Converter, and click the “Add video” button to load your original H.265 recordings. If you want to load several files at one time, “Add from folder” button is available. Besides, you can also drag and drop the files to the main interface directly.
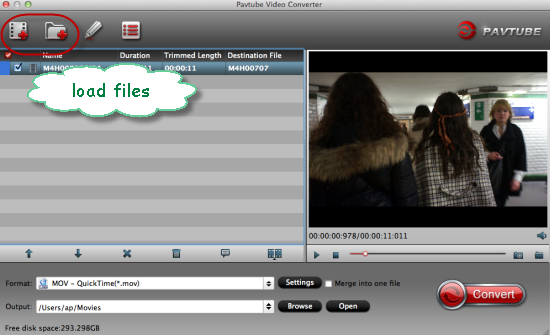 Step 2: When you launch the program and load your H.265 files in , then we can choose the suitable output formats. To convert H.265 to MKV, you can choose “HD Video>>MKV HD Video (*.mkv)”. To convert H.265 to MP4, you can choose “HD Video>>H.264 HD Video (*.mp4)”. To convert H.265 to AVI, you can choose “HD Video>>AVI HD Video (*.avi)”. To convert H.265 to MOV, you can choose “HD Video>>H.264 HD Video (*.mov)”. To convert H.265 to WMV, you can choose “HD Video>>WMV HD (*.wmv)”. To convert H.265 to FLV, you can choose “Flash Video>>FLV H.264 (*.flv)”.
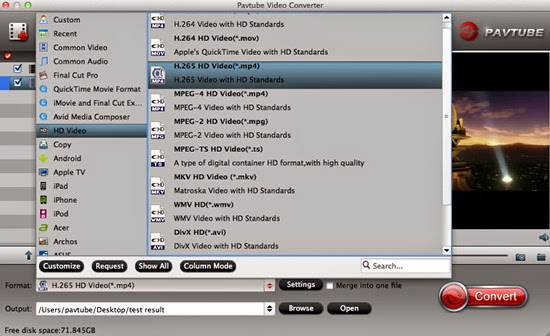 Step 3: Click “Settings” button to customize the output video and audio settings by yourself. But if you are not good at it, you’d better use the default parameters, they will ensure you a good balance between file size and image quality basically. You can change the resolution, bit rate, frame rate as you need.Step 4: When everything is ready, you can take a preview by hitting “Play” button. If you are satisfied with the final result, you can click “Convert” button to finish the conversion work.Conclusion: When the conversion is done, you can click “Open” to get your generated files. Now, you can use them for editing, playing, uploading, sharing and all you want. Good news for everyone! All of us can get 40% discount off before May, 1st, 2015. Come on! Why not seize the chance and take a close look at the event?
Further Reading:
Good news for everyone! Thanks to the Pavtube Studio, we can realize our hope to enjoy the super high quality videos encoded by H.265. With the stronger and stronger function of the upgraded Pavtube Video Converter for Mac, XAVC MXF supported and VPx series decoder can be done excellently. Pavtube Video Converter for Mac- upgrade to the version 4.8.5.0This upgraded Pavtube Video Converter for Mac is the professional and easy-to-use Mac Video Converter, which is specially designed for Mac users to easily convert between various video formats including H.265/HEVC, H.264, MP4, MOV, MKV, AVI, MPEG, Xvid, DivX, 3GP, WMV, FLV, MOD, TOD, WTV, MXF, MVI, F4V, WebM, VP8, 720p, 1080p, 1080i HD, AVCHD videos and more, convert between various audio formats including APE, MP3, AAC, AC3, WAV, WMA, and even extract audio from movie files. You can know more details on the official website.What’s new of Pavtube Video Converter for Mac (version 4.8.5.0)?1.Support H.265 decoder and refine asm.2.Support XAVC codec contained in MXF.3.Better support for VPx series decoder.Key features of Pavtube Video Converter for Mac (version 4.8.5.0):1. Convert various videos/audios as input and output.2. So many popular editing tools and media players are available.3. Easy operation workflow and faster conversion speed.4. Extra acceleration function for Mac users.5. Strong ability of setting and editing output videos. Tips: Before May 1st, you can get a discount on Pavtube Video Converter for Mac. Why not click the link to know more about this 40% off event and seize the chance to buy excellent products with such pretty attractive price?Simple guide on how to convert videos with this Mac Video Converter:Step 1: Run the upgraded Mac Video Converter, and click the “Add video” button to load your original recordings. If you want to load several files at one time, “Add from folder” button is available. Besides, you can also drag and drop the files to the main interface directly.
 Step 2: When you launch the program and load your files in , then we can choose the suitable output formats. For example, if you want to convert XAVC MXF to FCP X/7/6 for editing, you can click the “Format” bar and choose “Final Cut Pro>>Apple ProRes 422 (*.mov)” as target output. There are many presets in the software, you can choose the output format according to your requirements.
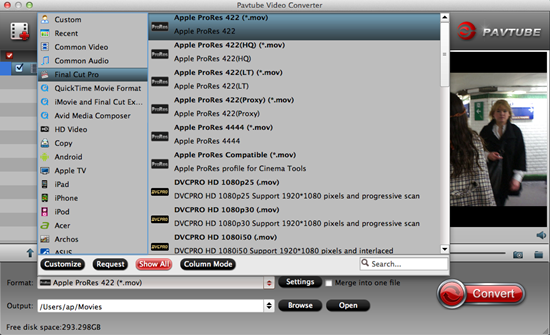 Tips: If you want to convert your recordings to H.265 codec, let’s go to the “Common Video” to get the “H.265 Video (*.mp4)” as the best. You can also choose “HD Video>>H.265 HD Video (*.mp4)” to get higher definition.
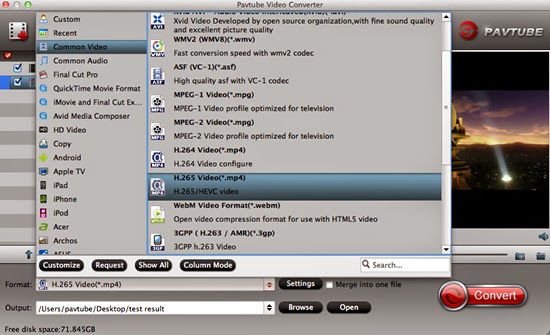 Step 3: Click “Settings” button to customize the output video and audio settings by yourself. But if you are not good at it, you’d better use the default parameters, they will ensure you a good balance between file size and image quality basically. You can change the resolution, bit rate, frame rate as you need.
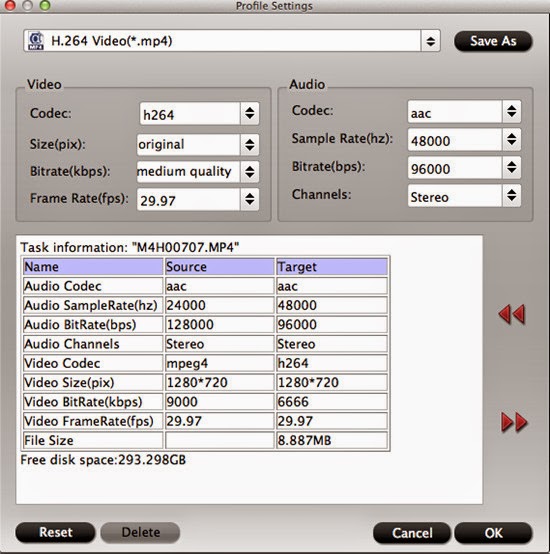 Step 4: Most of you guys must have the desire of a further editing with your output videos, right? On the main interface, “Edit” is waiting for you. “Trim” to decide where to start and where to end, “Crop” to cut some unwanted clips, “Subtitles” to add some explanations to your audience.
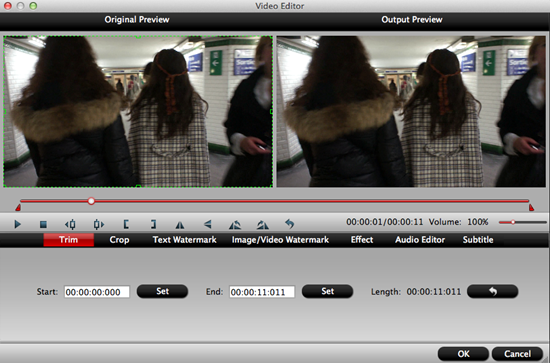 Step 5: When everything is ready, you can take a preview by hitting “Play” button. If you are satisfied with the final result, you can click “Convert” button to finish the conversion work.Conclusion: When the conversion is done, you can click “Open” to get your generated files. Now, you can use them for editing, playing, uploading, sharing and all you want.Download Address:Official download:http://download.pavtube.com/video-converter-mac/videoconvertermac_setup.dmgAmazon download:http://www.amazon.com/Pavtube-Video-Converter-Mac-Download/dp/B00QIBK0TQ/ref=sr_1_3/175-5152965-3528837?ie=UTF8&qid=1430103806&sr=8-3&keywords=pavtubeFurther Reading:
At times, when I am fooling around on the internet, I would always come across with the similar question on forums: “What format does video need to be for iMovie?” I bet this is not an individual bother. So for the sake of relieving some friends from the problem, here I would like to illustrate you the best video format for iMovie 11/10/9. Just sustain your attention on the following. Q1: Can iMovie 11/10/9 edit MKV files in OS X Yosemite 10.10?“I have a 1080p MKV file and I want to import MKV to iMovie for editing in OS X Yosemite 10.10. I know MKV won't work with iMove and it needs to be converted to something friendly like Apple InterMediate Codec(AIC). Right now I'm converting the MKV using Perian in Quicktime but it's taking an extremely long time. It's been 15 hours and it's only halfway through. I was wondering if there was something like that available for converting MKV to iMovie so that I don't have to re-encode. Any suggestions?”Q2: How can I use MKV videos in iMovie 10?“I’ve some videos in .mkv extension and I’d like to edit some scenes in iMovie studio. Is it possible? How to?”As we all know, MKV (Matroska Video), as an open and free container format is not so compatible with NLEs including iMovie, though it is able to keep diverse video, audio, and subtitle components in just one file and has ability to let users enjoy high definition videos at home easily. Since iMovie 11/10/9 only imports MP4, MOV, M4V files that are encoded with MPEG-4/AAC or H.264/AAC data, if the MP4, MOV, M4V files are not encoded with iMovie support codec and if files are in MKV, FLV, AVCHD MTS, MXF, XAVC other than MP4, MOV or M4V format, iMovie 11/10/9 will refuse to import.According to other users' experience and my own testing, Pavtube Video Converter for Mac is highly recommended here which can achieve your goal for converting MKV to AIC MOV for iMovie editing without quality loss.This following parts introduce an easy step-by-step guide on how to import and convert MKV to iMovie 11/10/9 for editing on Mac. Step-by-step guide on how to import and convert MKV to iMovie 11/10/9 for editing:Step 1: When you download and install the Mac Video Converter, open the main interface and choose the “Add video” to load you MKV videos in. For the multiple video clips we can hit the “Add from folder” button.Step 2: Click the “Format” bar to get the drop-down menu and you can get “iMovie and Final Cut Express>>Apple InterMediate Codec (AIC) (*.mov)” as the best output format.
 Step 3: Click “Settings” button to customize the output video and audio settings by yourself. But if you are not good at it, you’d better use the default parameters, they will ensure you a good balance between file size and image quality basically. You can change the resolution, bit rate, frame rate as you need.Step 4: Now, click “Convert” and let it go. The Mac Video Converter supports batch conversion. So if you have lots of MKV videos to convert, check “Shut down computer after conversion” and you can go away without keeping an eye on it.Conclusion: Once the conversion process shows in 100%, click “Open” to get the output videos. Create a project and start editing MKV in iMovie 11/10/9 with light speed.Further Reading:
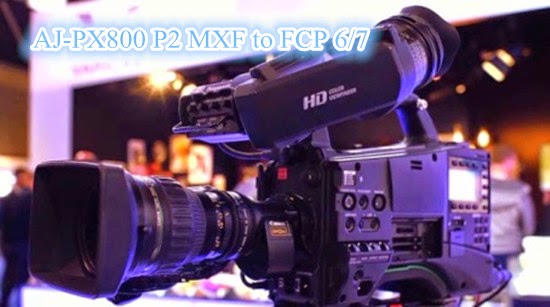
Right place you have come here if you were confused in importing your Panasonic AJ-PX800 P2 MXF footages to FCP 6/7 for editing! I’m sure you will fall in love with this kind of formats after reading some useful MXF tips in the following guide.
 “Hi, there, I need a good batch converter to convert P2 .mxf files from Panasonic AJ-PX800 for use in Final Cut Pro 7. The converter I already installed on my Mac can convert the files, but when I import them to FCP 7, I get an error message: File Error: 1 file(s) recognized, 0 access denied, 1 unknown. Any clue what could be causing this to happen? Or can you please kindly recommend a reliable converter that would do what I want with useful files maintaining good quality?”
Cause the AJ-PX800 records 1080/60i as well as 24p, 30p and 720p HD/SD multiple format, with that, picture quality and recorded data rate can be selected from AVC-Intra or AVC-LongG according to the application. Due to the limited video codec, that’s the causes why some Panasonic AJ-PX800 users failed in importing P2 MXF files to FCP 6/7. In addition, they also failed in importing P2 MXF files to Aperture, DaVinci Resolve, MOV and etc. If you got some useful P2 MXF footage converting tips, how to enjoy editing AJ-PX800 P2 MXF in FCP 6/7 will not be a difficult workflow.
OK, if for some reasons your already-have converter application couldn’t do what you want, you can give Pavtube MXF Converter for Mac a shot- a universal transcoder that is able to convert a wide variety of files types to whatever format you need for editing or playing use. This app is very simple and straightforward. It doesn’t try to do too much. It just does what it’s designed to do.
How to import AJ-PX800 P2 MXF to FCP 6/7 for editing?
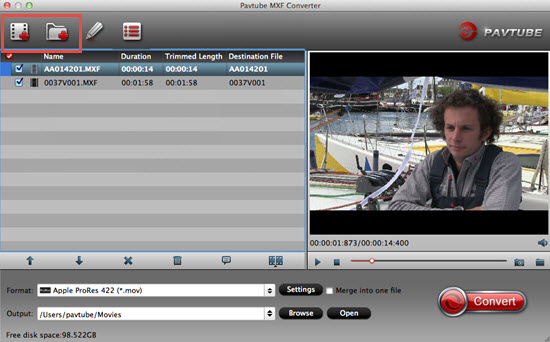
Step 1: Launch the AJ-PX800 P2 MXF Converter on your Mac, and then click the “Add video” button to import your P2 MXF files directly. In order to import several files at one time, you can click “Add from folder” button.
“Hi, there, I need a good batch converter to convert P2 .mxf files from Panasonic AJ-PX800 for use in Final Cut Pro 7. The converter I already installed on my Mac can convert the files, but when I import them to FCP 7, I get an error message: File Error: 1 file(s) recognized, 0 access denied, 1 unknown. Any clue what could be causing this to happen? Or can you please kindly recommend a reliable converter that would do what I want with useful files maintaining good quality?”
Cause the AJ-PX800 records 1080/60i as well as 24p, 30p and 720p HD/SD multiple format, with that, picture quality and recorded data rate can be selected from AVC-Intra or AVC-LongG according to the application. Due to the limited video codec, that’s the causes why some Panasonic AJ-PX800 users failed in importing P2 MXF files to FCP 6/7. In addition, they also failed in importing P2 MXF files to Aperture, DaVinci Resolve, MOV and etc. If you got some useful P2 MXF footage converting tips, how to enjoy editing AJ-PX800 P2 MXF in FCP 6/7 will not be a difficult workflow.
OK, if for some reasons your already-have converter application couldn’t do what you want, you can give Pavtube MXF Converter for Mac a shot- a universal transcoder that is able to convert a wide variety of files types to whatever format you need for editing or playing use. This app is very simple and straightforward. It doesn’t try to do too much. It just does what it’s designed to do.
How to import AJ-PX800 P2 MXF to FCP 6/7 for editing?
Step 1: Launch the AJ-PX800 P2 MXF Converter on your Mac, and then click the “Add video” button to import your P2 MXF files directly. In order to import several files at one time, you can click “Add from folder” button.
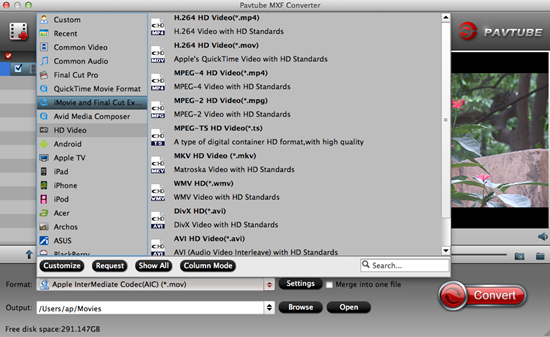
 Step 2: Click the “Format” bar to get the drop-down menu and you can get “Final Cut Pro>>Apple ProRes codec”, including ProRes 422, ProRes 422 (HQ), ProRes 422 (LT), ProRes 422 (Proxy) and ProRes 4444. Choose the proper one you want. Here, we suggest you to choose Apple ProRes 422 .mov as the best output format.
Tips: Apple ProRes 422 and Apple ProRes 422 (HQ) have higher qualities. Apple ProRes 422 (LT) and Apple ProRes 422 (Proxy) have smaller sizes. You can choose according to your requirement.
Step 3: Click “Settings” button to customize the output video and audio settings by yourself. But if you are not good at it, you’d better use the default parameters, they will ensure you a good balance between file size and image quality basically. You can change the resolution, bit rate, frame rate as you need.
Step 4: Finally, start P2 MXF to Apple ProRes 422 MOV conversion. When ready, click “Convert” button to start format conversion.
Conclusion: As soon as the conversion is complete, you can click “Open Folder” button to get the generated P2 MXF files. Later, transfer AJ-PX800 P2 MXF files to FCP 6/7 as usual, you can enjoy editing nicely. With this professional easy-to-use Mac MXF Converter assistant, you are during your journey to success in video creation.
Further Reading:
Step 2: Click the “Format” bar to get the drop-down menu and you can get “Final Cut Pro>>Apple ProRes codec”, including ProRes 422, ProRes 422 (HQ), ProRes 422 (LT), ProRes 422 (Proxy) and ProRes 4444. Choose the proper one you want. Here, we suggest you to choose Apple ProRes 422 .mov as the best output format.
Tips: Apple ProRes 422 and Apple ProRes 422 (HQ) have higher qualities. Apple ProRes 422 (LT) and Apple ProRes 422 (Proxy) have smaller sizes. You can choose according to your requirement.
Step 3: Click “Settings” button to customize the output video and audio settings by yourself. But if you are not good at it, you’d better use the default parameters, they will ensure you a good balance between file size and image quality basically. You can change the resolution, bit rate, frame rate as you need.
Step 4: Finally, start P2 MXF to Apple ProRes 422 MOV conversion. When ready, click “Convert” button to start format conversion.
Conclusion: As soon as the conversion is complete, you can click “Open Folder” button to get the generated P2 MXF files. Later, transfer AJ-PX800 P2 MXF files to FCP 6/7 as usual, you can enjoy editing nicely. With this professional easy-to-use Mac MXF Converter assistant, you are during your journey to success in video creation.
Further Reading:
No matter for all kinds of tablets or smart TV, have taken a large share on the market. One factor attributing to the success of these two devices can be exactly their high-resolution screens, making them perfect for movies, videos and programs watching.
 OnePlus One is an Android phablet manufactured by the Chinese firm OnePlus. First unveiled in 2014, it is OnePlus's first product. The One was designed to be a low-cost smart phone comparable in performance and quality to competing devices released at around the same time, and features a variation of the aftermarket Android distribution CyanogenMod as its operating system. As we all know, this product is available by invite only. If you are lucky enough to get an OPO, have you ever thought stream its video files to portable tablets and high definition smart TV for watching?
To stream OPO videos to tablets and smart TV for watching, you should first check whether your media files are supported by tablets or smart TV. Even though it is said that tablets and smart TV are working on increasingly number of supported formats, some formats still cannot be recognized. In this case, we need to convert those incompatible ones for tablets and smart TV. Since videos from OPO are not accepted by tablets and smart TV, how should I do to watch OPO videos on tablets and smart TV?
Don’t worry! It’s rather simple to stream OPO videos to tablets and smart TV. All you have to do is several clicks. To solve the issues well, we here introduce the Pavtube Video Converter for Mac for you, which we all look it as the professional OnePlus One Converter. If you are running on Windows, Pavtube Video Converter is also available. You can choose the corresponding version according to your own requirements.
How to convert videos from OPO to tablets and smart TV for watching?
Step 1: Launch the Video Converter on your Mac, and then click the “Add video” button to import your OPO video files directly. In order to import several files at one time, you can click “Add from folder” button.
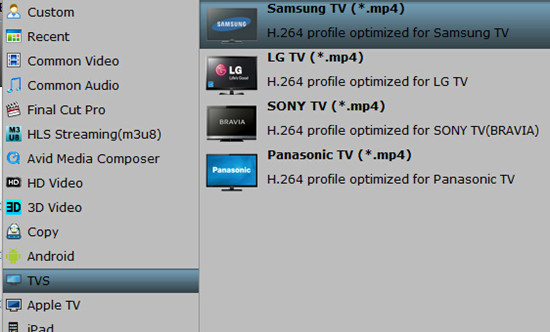
Step 2: Click the “Format” bar to get the drop-down menu and you can get the suitable format from "Tvs" category.
Step 3: The built-in editing function provided by OPO Mac Converter is something worth trying. To trim the video, add artistic effects, adjust audio, add watermark, customize video parameters and so on. You can get the work done splendidly. Of course, if you don’t think it’s a necessary to do, you can skip it and move onto the next step directly.
Step 4: Now, click “Convert” button and let it go. The OPO Video Converter for Mac supports batch conversion. So if you have lots of videos to convert, check “Shut down computer after conversion” and you can go away without keeping an eye on it.
Conclusion: Once the conversion process shows in 100%, click “Open” to get the generated videos. Now, you can watch OPO videos on tablets and smart TV without any hassles.
Further Reading:
OnePlus One is an Android phablet manufactured by the Chinese firm OnePlus. First unveiled in 2014, it is OnePlus's first product. The One was designed to be a low-cost smart phone comparable in performance and quality to competing devices released at around the same time, and features a variation of the aftermarket Android distribution CyanogenMod as its operating system. As we all know, this product is available by invite only. If you are lucky enough to get an OPO, have you ever thought stream its video files to portable tablets and high definition smart TV for watching?
To stream OPO videos to tablets and smart TV for watching, you should first check whether your media files are supported by tablets or smart TV. Even though it is said that tablets and smart TV are working on increasingly number of supported formats, some formats still cannot be recognized. In this case, we need to convert those incompatible ones for tablets and smart TV. Since videos from OPO are not accepted by tablets and smart TV, how should I do to watch OPO videos on tablets and smart TV?
Don’t worry! It’s rather simple to stream OPO videos to tablets and smart TV. All you have to do is several clicks. To solve the issues well, we here introduce the Pavtube Video Converter for Mac for you, which we all look it as the professional OnePlus One Converter. If you are running on Windows, Pavtube Video Converter is also available. You can choose the corresponding version according to your own requirements.
How to convert videos from OPO to tablets and smart TV for watching?
Step 1: Launch the Video Converter on your Mac, and then click the “Add video” button to import your OPO video files directly. In order to import several files at one time, you can click “Add from folder” button.
Step 2: Click the “Format” bar to get the drop-down menu and you can get the suitable format from "Tvs" category.
Step 3: The built-in editing function provided by OPO Mac Converter is something worth trying. To trim the video, add artistic effects, adjust audio, add watermark, customize video parameters and so on. You can get the work done splendidly. Of course, if you don’t think it’s a necessary to do, you can skip it and move onto the next step directly.
Step 4: Now, click “Convert” button and let it go. The OPO Video Converter for Mac supports batch conversion. So if you have lots of videos to convert, check “Shut down computer after conversion” and you can go away without keeping an eye on it.
Conclusion: Once the conversion process shows in 100%, click “Open” to get the generated videos. Now, you can watch OPO videos on tablets and smart TV without any hassles.
Further Reading:
Have interests in uploading Canon XC10 XF-AVC 4K MXF to YouTube, Vimeo or Facebook for sharing? That’s exactly an awesome idea! But do you know the best video codec for uploading? If not, you may get some troubles there. Fortunately, best solutions are offered here to upload the Canon XC10 XF-AVC 4K MXF to YouTube, Vimeo and Facebook.
 How to upload Canon XC10 XF-AVC 4K MXF to YouTube, Vimeo and Facebook? If you are looking for an easy and direct way, you may wish to read this post. Canon has recently announced the development of XF-AVC, a new proprietary video format for the efficient recording of high-image-quality 4K, 2K and HD video footage. XF-AVC is mainly targeting professional-use 4K video camcorders, such as the most recent Canon XC10 4K Camcorder, which delivers enhanced workflows across various stages of the production process, from shooting to editing.
Canon XC10 uses XF-AVC movie recording format, employs the MPEG-4 AVC/H.264 video compression format, and stores shootings in an MXF wrapper. MXF is a “container” or “wrapper” format which supports a number of different streams of coded “essence”, encoded with any of a variety of codecs, together with a metadata wrapper which describes the material contained within the MXF file. MXF has been designed to address a number of problems with non-professional formats.
Since YouTube/Vimeo/Facebook has their best supported video formats, why can’t we convert all the video formats to those suitable ones for YouTube/Vimeo/Facebook. Powerful converting assistant Pavtube MXF Converter for Mac is highly recommended here. If you are running on Windows, you can refer to the equivalent version Pavtube MXF Converter. As well as encoding the edited video back to normal files for sharing with friends, it can adjust our output videos with our own favorite settings.
Below is the simple guide about how to upload Canon XC10 XF-AVC 4K MXF to YouTube/Vimeo/Facebook:
Step 1: Backup your MXF files from Canon XC10 to hard drive. Install and launch MXF Converter for Mac. Drag and drop MXF files to the software. You can import multiple files at once thanks to “Add from folder” button.
Step 2: Click the “Format” bar and come to the output list, here we should select the different output items there. For example, choose the “Flash Video>>FLV H.264 (*.flv)” for YouTube. Or “HD Video>>AVI HD Video(*.avi)/H.264 HD Video (*.mp4)” individually for Vimeo and Facebook.
How to upload Canon XC10 XF-AVC 4K MXF to YouTube, Vimeo and Facebook? If you are looking for an easy and direct way, you may wish to read this post. Canon has recently announced the development of XF-AVC, a new proprietary video format for the efficient recording of high-image-quality 4K, 2K and HD video footage. XF-AVC is mainly targeting professional-use 4K video camcorders, such as the most recent Canon XC10 4K Camcorder, which delivers enhanced workflows across various stages of the production process, from shooting to editing.
Canon XC10 uses XF-AVC movie recording format, employs the MPEG-4 AVC/H.264 video compression format, and stores shootings in an MXF wrapper. MXF is a “container” or “wrapper” format which supports a number of different streams of coded “essence”, encoded with any of a variety of codecs, together with a metadata wrapper which describes the material contained within the MXF file. MXF has been designed to address a number of problems with non-professional formats.
Since YouTube/Vimeo/Facebook has their best supported video formats, why can’t we convert all the video formats to those suitable ones for YouTube/Vimeo/Facebook. Powerful converting assistant Pavtube MXF Converter for Mac is highly recommended here. If you are running on Windows, you can refer to the equivalent version Pavtube MXF Converter. As well as encoding the edited video back to normal files for sharing with friends, it can adjust our output videos with our own favorite settings.
Below is the simple guide about how to upload Canon XC10 XF-AVC 4K MXF to YouTube/Vimeo/Facebook:
Step 1: Backup your MXF files from Canon XC10 to hard drive. Install and launch MXF Converter for Mac. Drag and drop MXF files to the software. You can import multiple files at once thanks to “Add from folder” button.
Step 2: Click the “Format” bar and come to the output list, here we should select the different output items there. For example, choose the “Flash Video>>FLV H.264 (*.flv)” for YouTube. Or “HD Video>>AVI HD Video(*.avi)/H.264 HD Video (*.mp4)” individually for Vimeo and Facebook.
 Step 3: Click “Settings” button to customize the output video and audio settings by yourself. But if you are not good at it, you’d better use the default parameters, they will ensure you a good balance between file size and image quality basically. You can change the resolution, bit rate, frame rate as you need.
Step 4: You can preview to check the final result. Once you are satisfied with it, click the “Convert” button to start converting Canon XC10 XF-AVC 4K MXF for uploading to YouTube/Vimeo/Facebook flawlessly. It will take you a little while.
Conclusion: From Canon XC10 XF-AVC 4K MXF to supported videos for YouTube/Vimeo/Facebook, such the easy operation job you can do well. Just have fun for sharing wonderful XF-AVC 4K MXF videos captured by Canon XC10 on YouTube, Vimeo and Facebook with your family and friends!
Further Reading:
Step 3: Click “Settings” button to customize the output video and audio settings by yourself. But if you are not good at it, you’d better use the default parameters, they will ensure you a good balance between file size and image quality basically. You can change the resolution, bit rate, frame rate as you need.
Step 4: You can preview to check the final result. Once you are satisfied with it, click the “Convert” button to start converting Canon XC10 XF-AVC 4K MXF for uploading to YouTube/Vimeo/Facebook flawlessly. It will take you a little while.
Conclusion: From Canon XC10 XF-AVC 4K MXF to supported videos for YouTube/Vimeo/Facebook, such the easy operation job you can do well. Just have fun for sharing wonderful XF-AVC 4K MXF videos captured by Canon XC10 on YouTube, Vimeo and Facebook with your family and friends!
Further Reading:
How to import AVCHD to FCP X? How to edit AVCHD in FCP X? Do you have any AVCHD to FCP X solutions? If you have the issues of converting AVCHD to FCP X, do not worry too much. We are seeking some efficient ways to transcode AVCHD to FCP X freely. Panasonic's Lumix TZ series of cameras needs no real introduction, and has been one of the most popular "Travel Zoom" ranges of cameras available, with Panasonic being one of the first companies to offer a pocketable zoom camera. The Panasonic Lumix TZ57 is the "entry level" Travel Zoom, with the TZ70 being the top of the range model. From the official website, we know that TZ57 records AVCHD MTS files. I think it will be gorgeous masterpieces after editing TZ57 AVCHD MTS in FCP X.For all of its faults, FCP X offers much better native file compatibility than its predecessor. However, all files aren’t equal when working in FCP X. Some files, like the MTS files produced from AVCHD video capture, require you to take a couple of extra steps to get them into FCP X.“I have bought a new Lumix TZ57 last week, since I got it I recorded a few footages in full HD 1920*1080 resolution, the recorded video files are in AVCHD MTS video format. Today I want to import AVCHD to FCP X and editing on my MacBook Pro retina, but the FCP X shows the AVCHD MTS files are not supported, I am not familiar with this video format, can anyone tell me the best way to import AVCHD to FCP X and then edit natively?”If you are working AVCHD MTS files with FCP X, then these helpful tips should assist with any kinks in your workflow. Pavtube MTS/M2TS Converter for Mac is highly recommended here. Just like the question showed above, we should convert AVCHD to FCP X best accepted Apple ProRes with this third-party software. How to import TZ57 AVCHD to FCP X for editing?Step 1: Import TZ57 AVCHD files to Mac MTS Converter. Run it as the best MTS Converter, and click the "Add video" button to load AVCHD MTS videos. You may also directly drag and drop TZ57 AVCHD MTS videos to application UI for importing files.
 Step 2: Click the “Format” option and navigate the mouse cursor to “Final Cut Pro >>Apple ProRes 422 (*.mov)” as output format. Apple ProRes 422 (*.mov) and Apple ProRes 422 (HQ) (*.mov) have higher qualities. Apple ProRes 422 (LT) (*.mov) and Apple ProRes 422 (Proxy) (*.mov) have smaller size. You can choose according to your requirement.Step 3: To set the profile settings, please click the “Settings” button. General speaking, the default settings are just fine. Click the “Browse” button to browse and specify a destination folder to save the converted files.Step 4: When everything is ready, click “Convert” to start converting AVCHD MTS to ProRes 422. This Mac MTS/M2TS Converter supports batch conversion so you may load multiple files and convert them at one time.Conclusion: In a word, AVCHD to FCP X solutions we have mentioned above are effective for you to import TZ57 AVCHD to FCP X. As soon as you got the generated files by clicking “Open” button, you can transfer AVCHD to FCP X easily and smoothly.Further Reading:
Viewing through the Sony HDR-AS200V XAVC S forums online, we can find so many issues related to XAVC S about how to upload XAVC S to YouTube, how to burn XAVC S to DVD and etc. Read this guide below, XAVC S to YouTube workflow is provided as well as XAVC S to DVD. The versatile Sony AS200V Full HD Action Cam is designed to go wherever you do - whether on a mountain expedition or just for a walk in the park. So you will be very excited that you can share attractive videos shoot with AS200V to your friends or on website because it records your excellent time. It features a water-resistant design and simple one-button operation. Video is recorded to a separately available microSD card, with the option for MP4 and professional XAVC S compression.For sharing with friends or uploading to the website, you must be probably choosing the platform of YouTube as for it is a video-sharing website on which users can upload, share, and view videos. It is a great resource. Learn from YouTube official website, since only FLV, AVI, MPEG, MPA and etc. can be supported by YouTube very well, how can we upload XAVC S to YouTube? If an XAVC S video converter is needed, what should we do to convert XAVC S to YouTube?Equally, for keeping good moments and memories, we can burn these XAVC S videos to DVD, sooner you will find it should be a time consuming job or impossible. To be frank, you must be disappointed for DVD can’t accept XAVC S format. As two headache problems have been put forward above, what solutions can we take? To get the work done, you can depend on Pavtube XAVC S Video Converter. With it, no matter for uploading XAVC S to YouTube or burning XAVC S to DVD, it can deal with it smoothly.
 Tips on how to upload AS200V XAVC S to YouTube or burn to DVD:Step 1: After downloading and installing, launch the XAVC S Video Converter. Open the main interface and choose the “Add video” button to load your XAVC S files captured by Sony AS200V. For the multiple video clips we can hit the “Add from folder” button.
 Step 2: Click the “Format” drop-down list, and choose the corresponding output format for YouTube. We would like to introduce you to select “Flash Video>>FLV H.264 (*.flv)”.
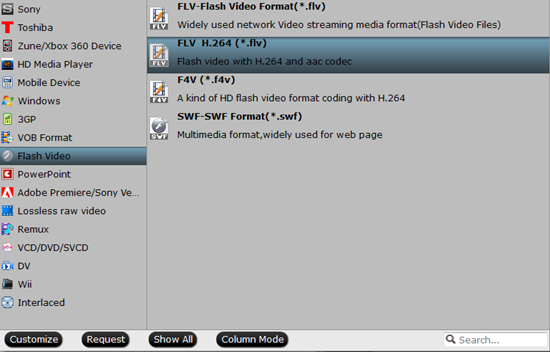 Step 3: Most of you guys must have the desire of a further editing with your output videos, right? On the main interface, “Edit” is waiting for you. “Trim” to decide where to start and where to end, “Crop” to cut some unwanted clips, “Subtitles” to add some explanations to your audience.Step 4: Click “Convert” button and start XAVC S videos conversion. After conversion, you can get the converted files by clicking “Open” button. Now, you can upload the generated AS200V XAVC S to YouTube smoothly.Conclusion: With this XAVC S Video Converter, you can choose “Common Video>>MPEG-2 Video (*.mpg)” in step 2 for burning XAVC S to DVD. Other operations are all the same. Besides, the newly released Pavtube DVD Creator lets you burn any kind of video sources to playable DVD. With its simple wizard-style user interface and powerful editing features, DVD authoring and burning can't be easier.Further Reading: